

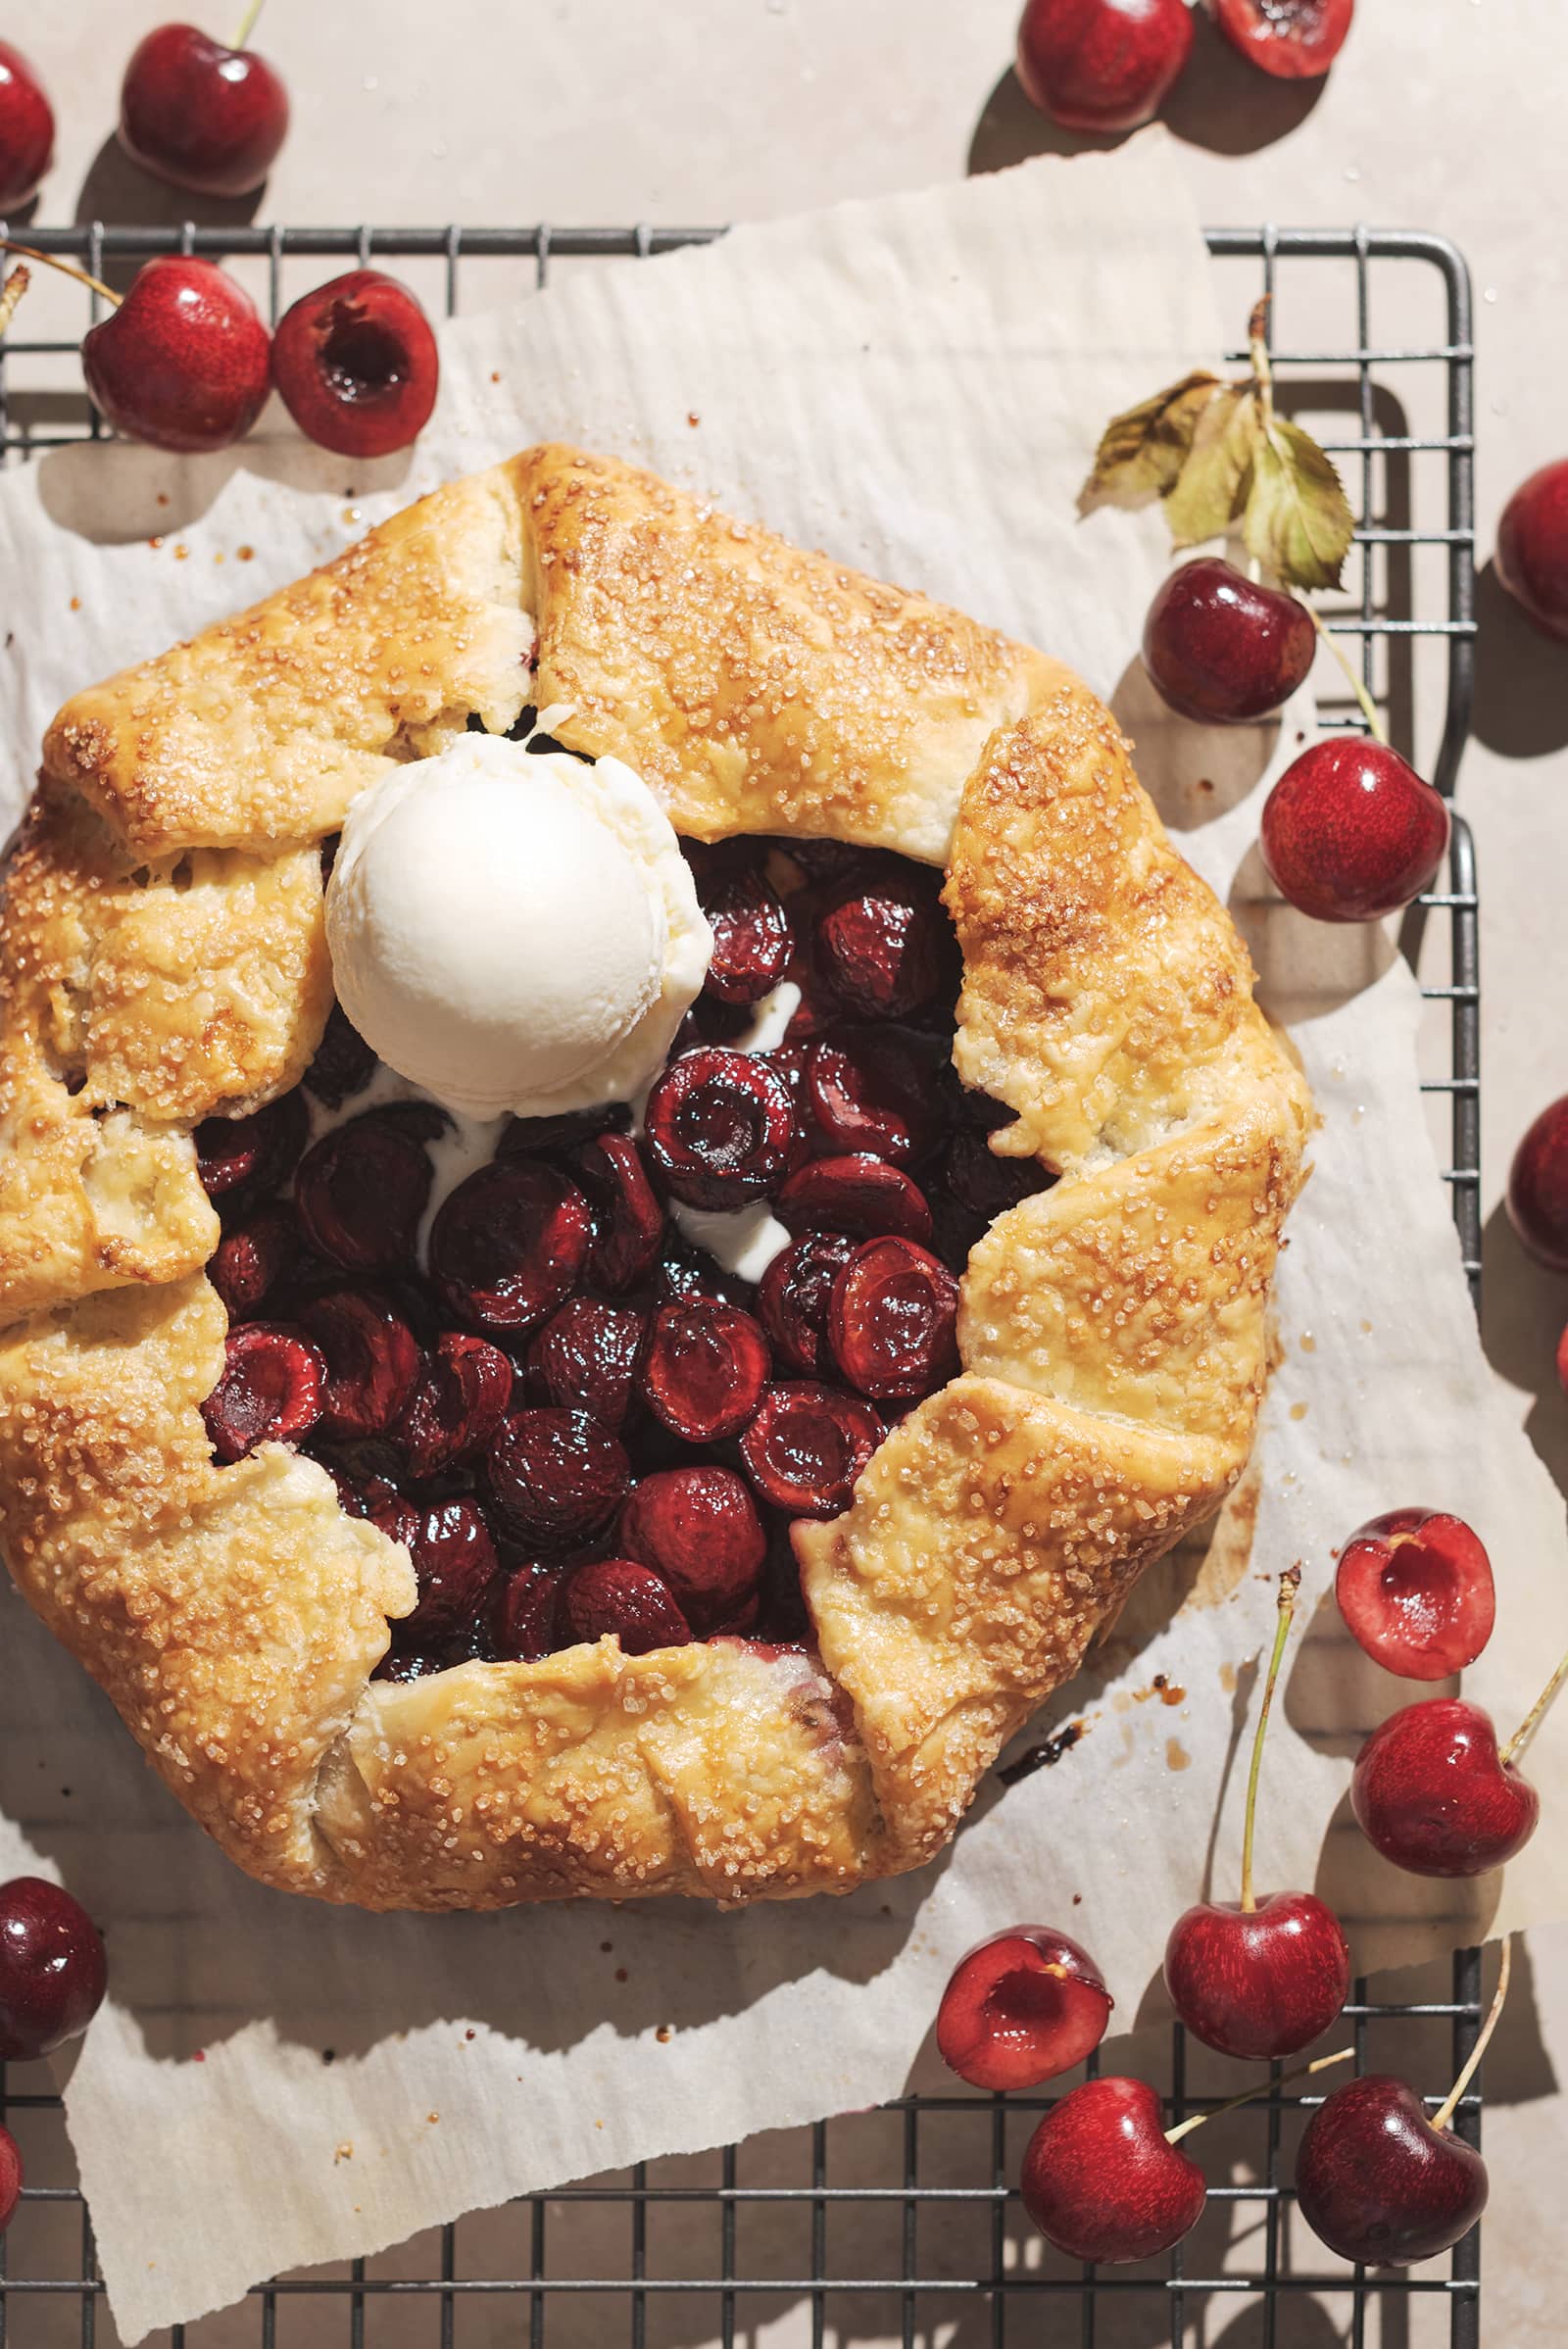
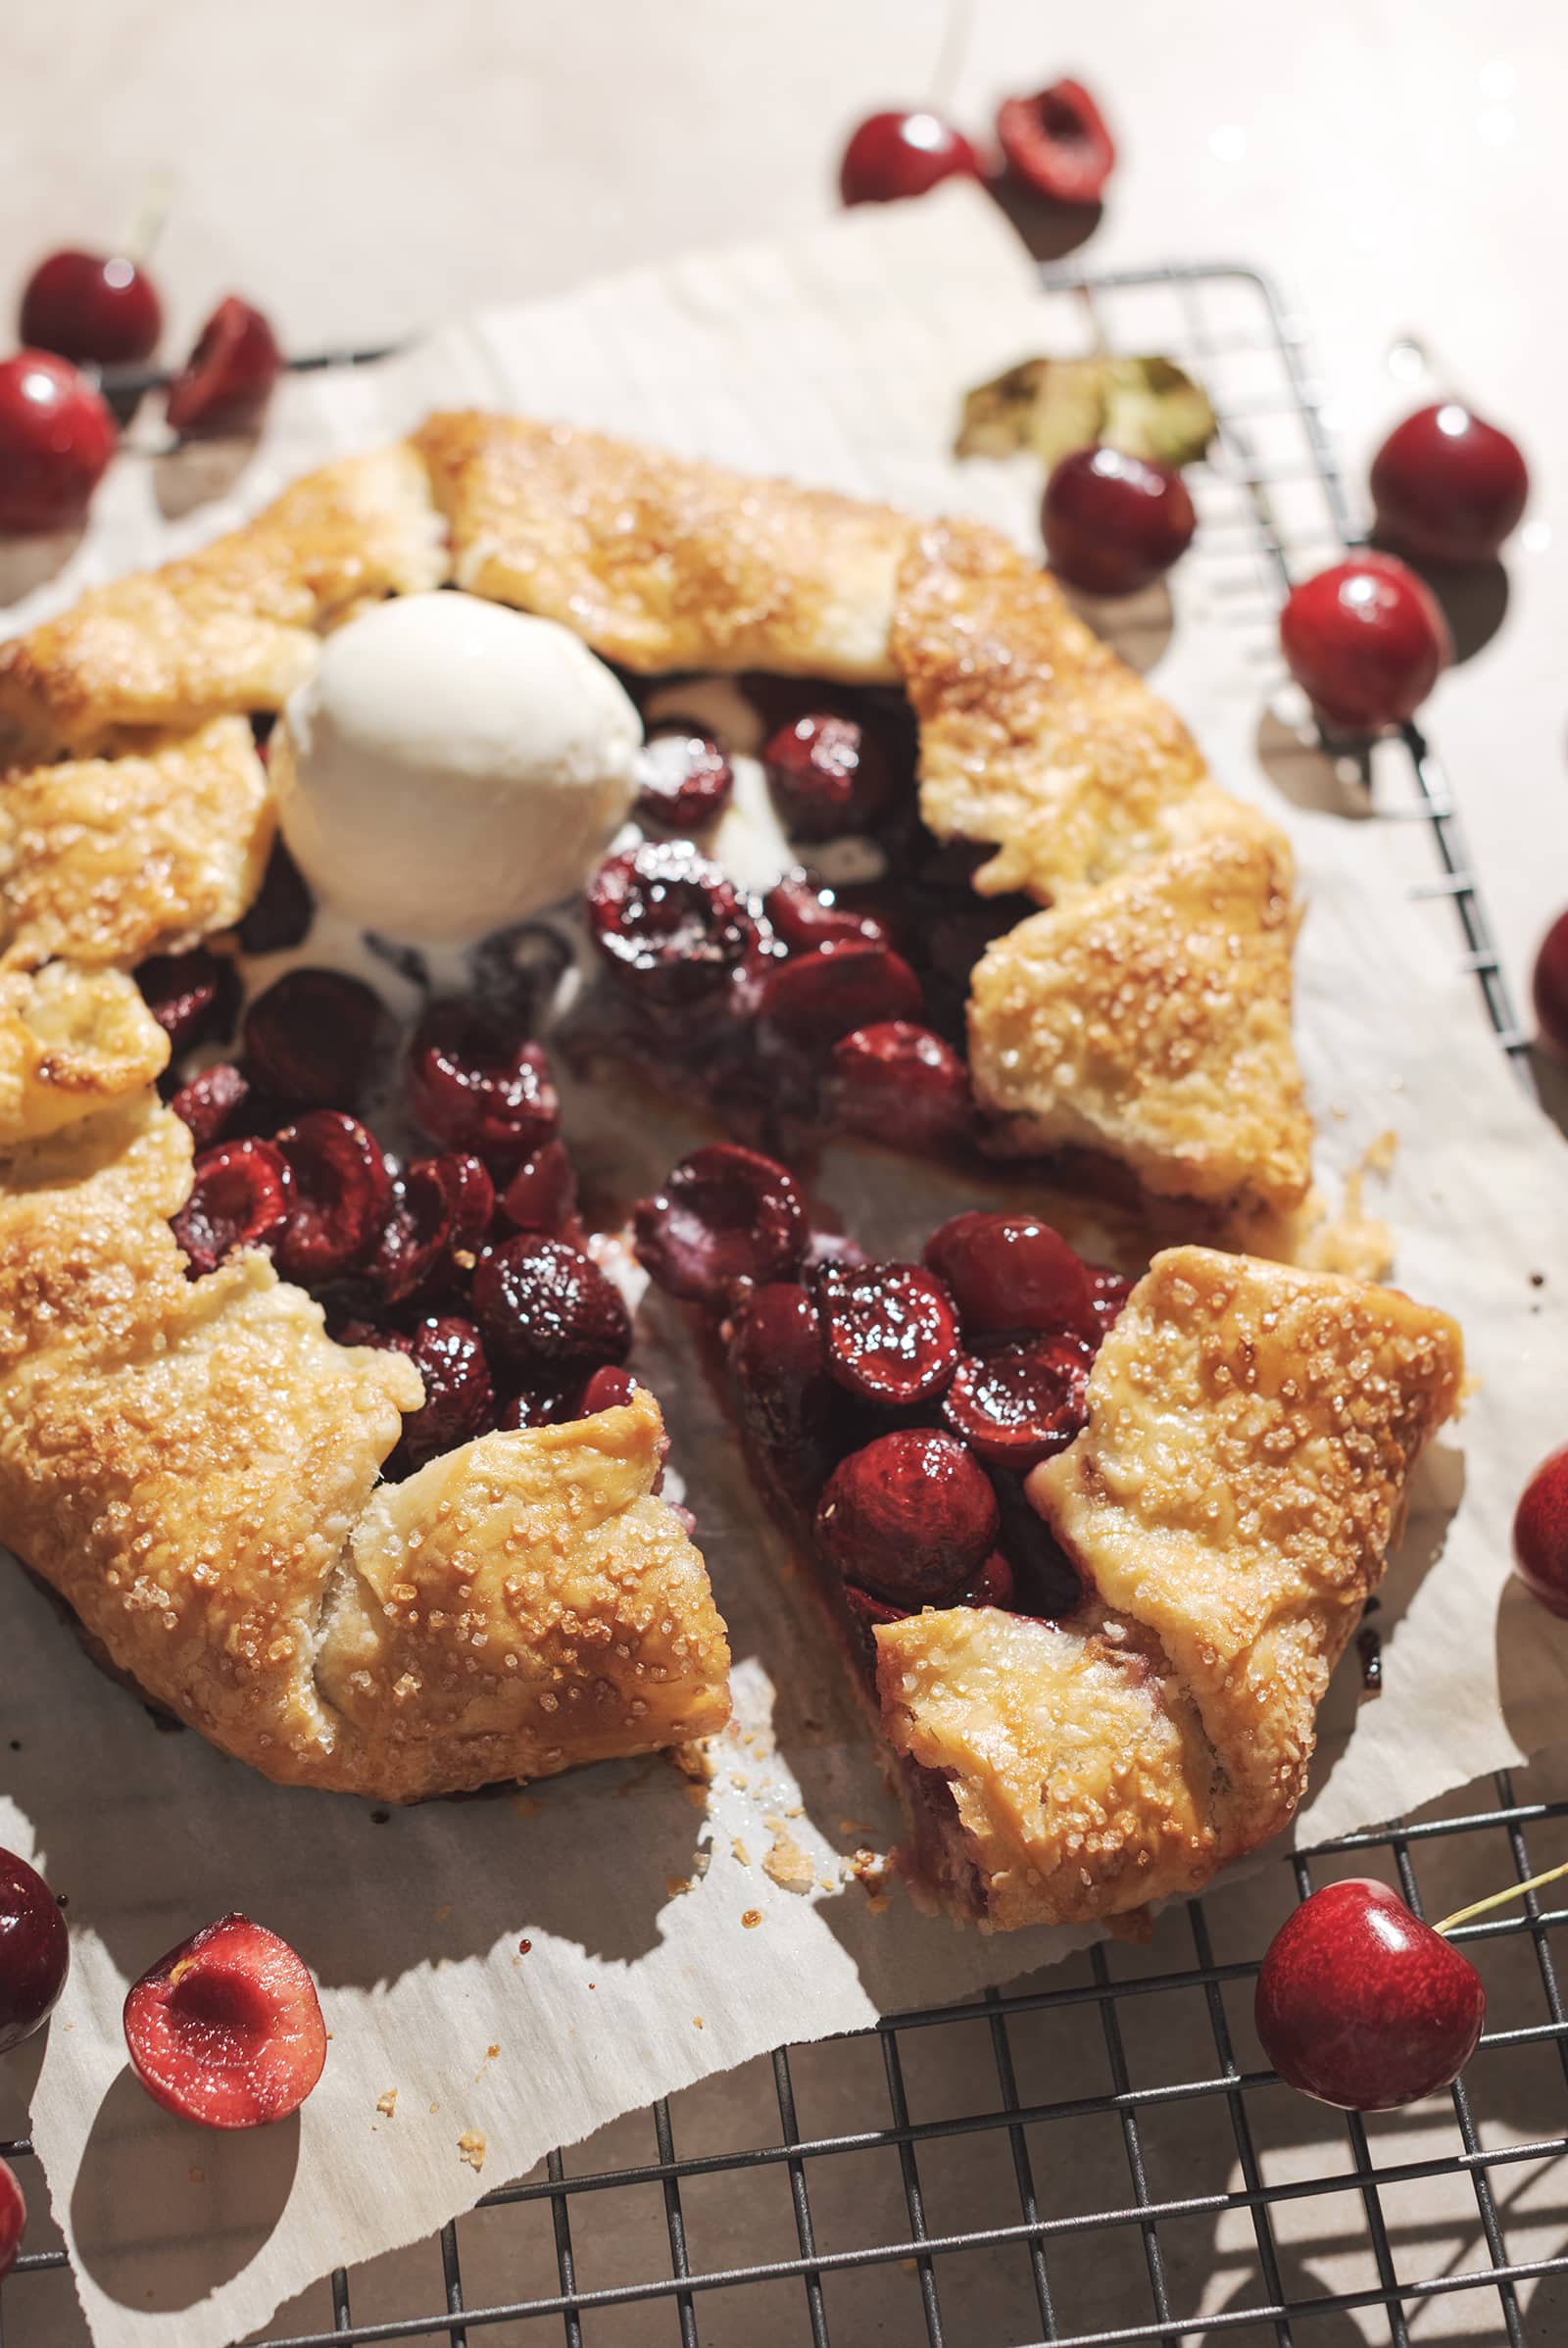
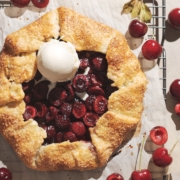
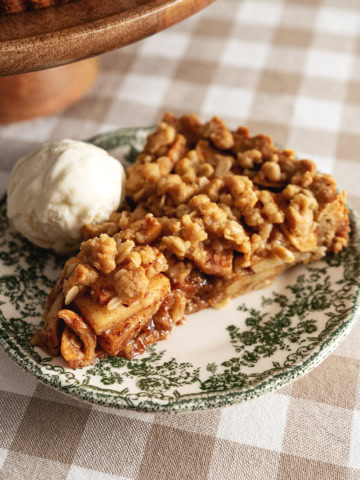
This cherry galette is made with a flaky and crispy crust filled with juicy red cherries. It’s the perfect alternative to a cherry pie but galettes are much easier to make! Serve this galette warm with a scoop of vanilla ice cream and you’ll have the best cozy dessert ever.
Jump to:
Galettes are my ultimate favourite pastry dessert. They’re such a joy to make. The process of making galettes is casual, forgiving, and less intimidating than a whole pie.
This cherry galette makes use of sweet seasonal red cherries during the end of the summer season. Galettes and pies always remind me of the Fall season so this is the best dessert you can make during the Summer and Fall season.
The buttery, crispy pastry crust is the perfect vessel for highlighting fresh seasonal fruits. The fresh cherries in this galette become soft, caramelized, and juicy after being baked. It becomes a thick and jammy pie filling with bursts of fruitiness with every bite. It’s seriously so good.
I’ve included lots of tips and tricks below to help you make the best cherry galette ever.
What is a galette?
A galette is a flat, round pastry made with pie pastry for the crust and a sweet, fruit, or savoury filling in the middle. They are made in a freeform shape that is more or less round but can also be formed into a rectangular shape.
Unlike pies, galettes are baked directly on a baking sheet instead of a pie dish. The crust is formed by folding over the edges of the dough rather than placing a second sheet of dough on top.
Galettes have all the elements and taste of a pie but they’re much easier and faster to make.
Why you’ll love this recipe
- The galette crust is super buttery, flaky, and crispy.
- It's like a cherry pie but galettes are easier to make.
- The cherry filling is so juicy and delicious.
- You can use this recipe as a base for other seasonal fruits like blueberries, strawberries, peaches, plums, or apples.
- You can make the galette dough in advance and keep it in the freezer for months.
- Enjoying a slice of this galette warm with a scoop of vanilla ice cream is makes you feel all warm and cozy.
Ingredients
As always, the full recipe card with ingredient amounts and instructions is at the bottom of this post! Keep reading for more details on each ingredient or skip ahead to the recipe.
- All-purpose flour
- Salt
- Unsalted butter - Your butter should be cold straight from the fridge and roughly cubed so that they’re easier to break into smaller pieces. If possible, use high-quality European-style butter since the butter is such a key component in a flaky pie crust.
- Ice cold water - You want your dough to always be cold so that the butter doesn’t melt. Put a cup of water in the fridge until you're ready to use it or stir water with a few ice cubes before measuring out the amount you need.
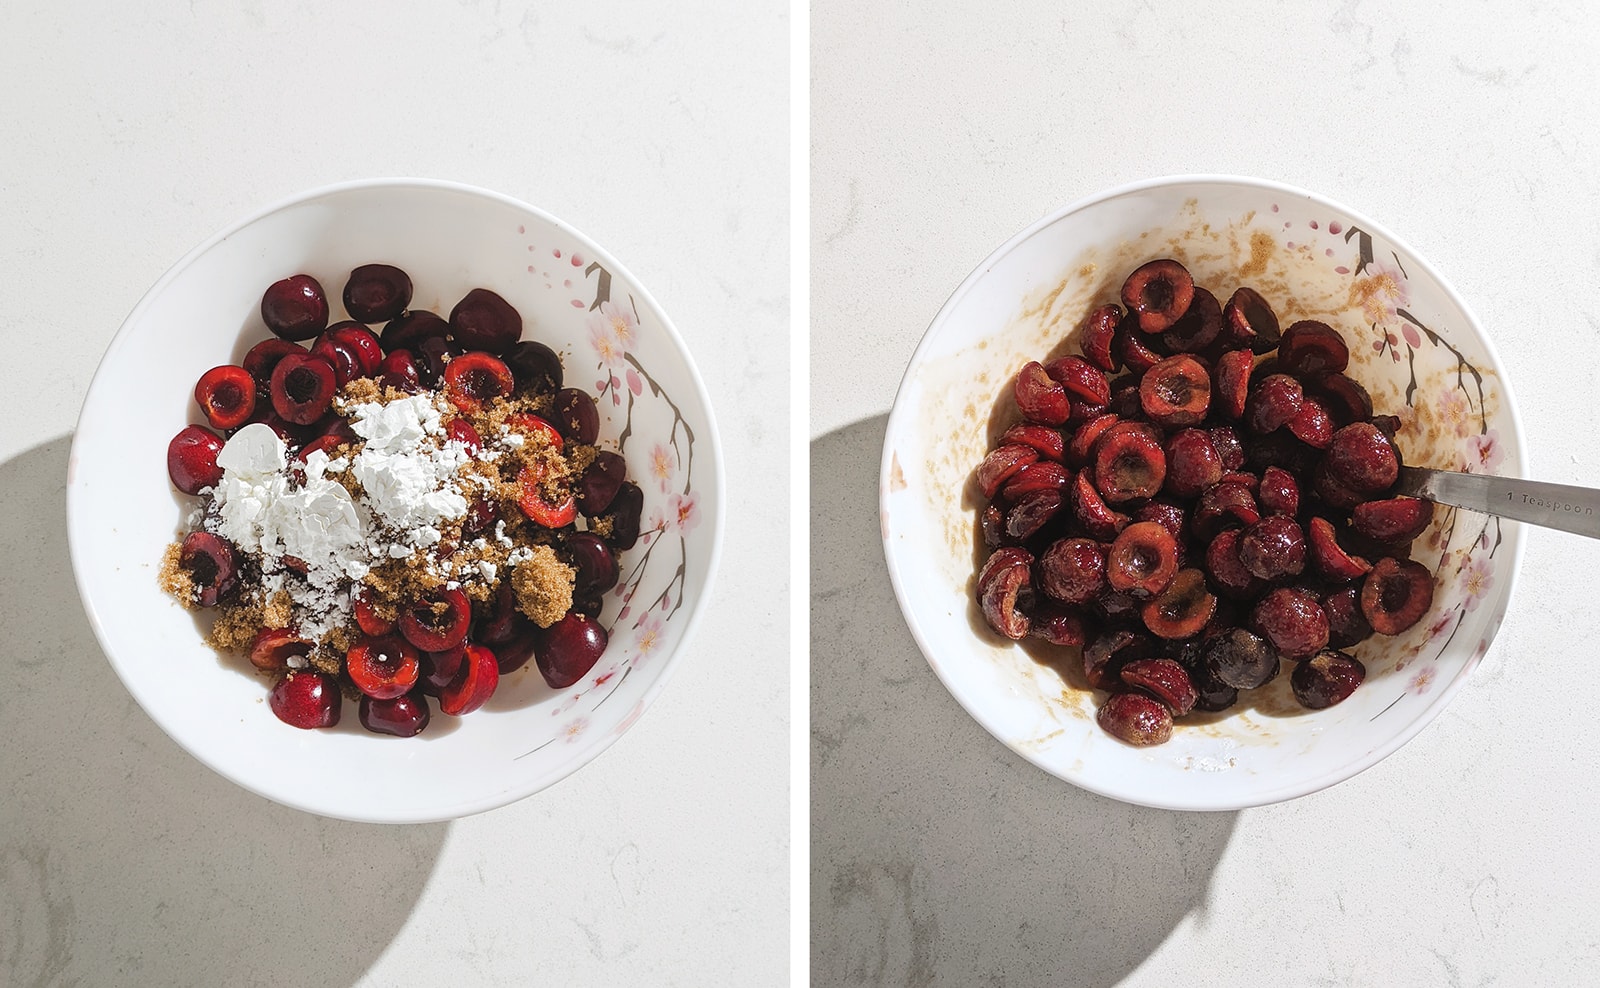
- Red cherries - You’ll want your cherries pitted and halved for the filling. You can prepare them while you wait for your dough to chill.
- Cornstarch - This helps soak up the juices and excess liquid that will come out of the cherries as they bake and turn them into jammy goodness. No soggy galette bottoms here!
- Brown sugar - This adds sweetness and flavour to your cherry filling.
- Vanilla extract
- Egg - This is for the egg wash to make your galette crust shiny and golden brown.
- Sugar crystals - This is optional but sprinkling pastries with large sugar crystals makes them extra crispy and makes them look like the pastries from bakeries. They’re large, clear sugar crystals that are usually found in the baking or sprinkles section. You can also use coarse sugar like turbinado sugar.
How to make a cherry galette
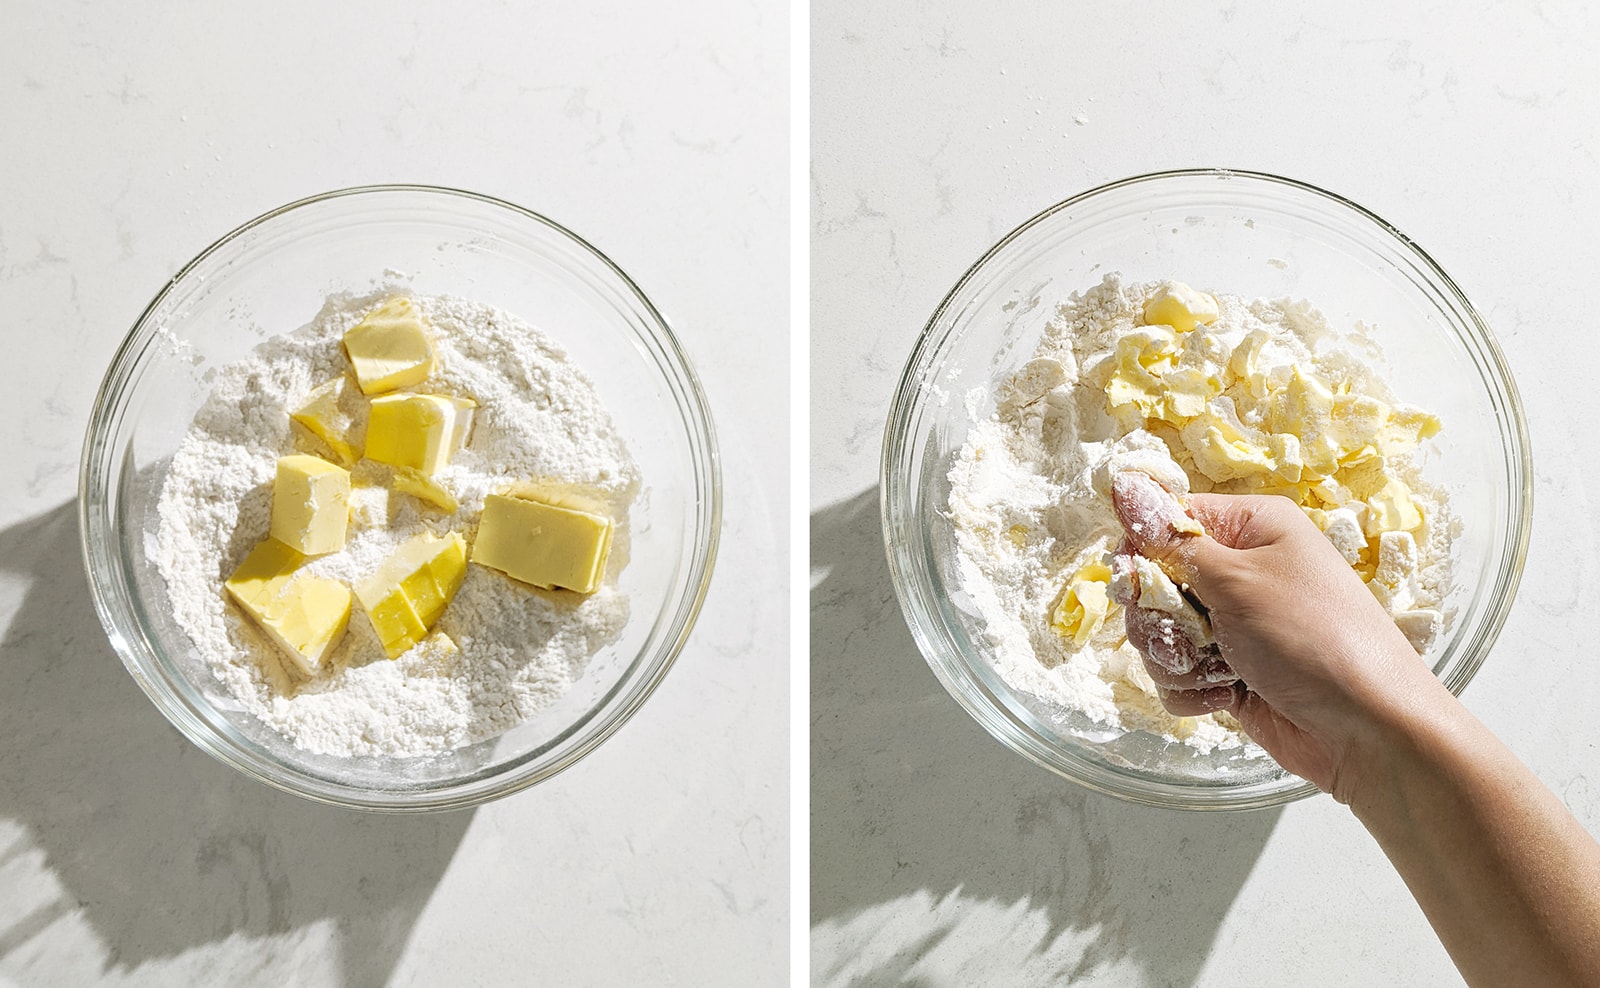
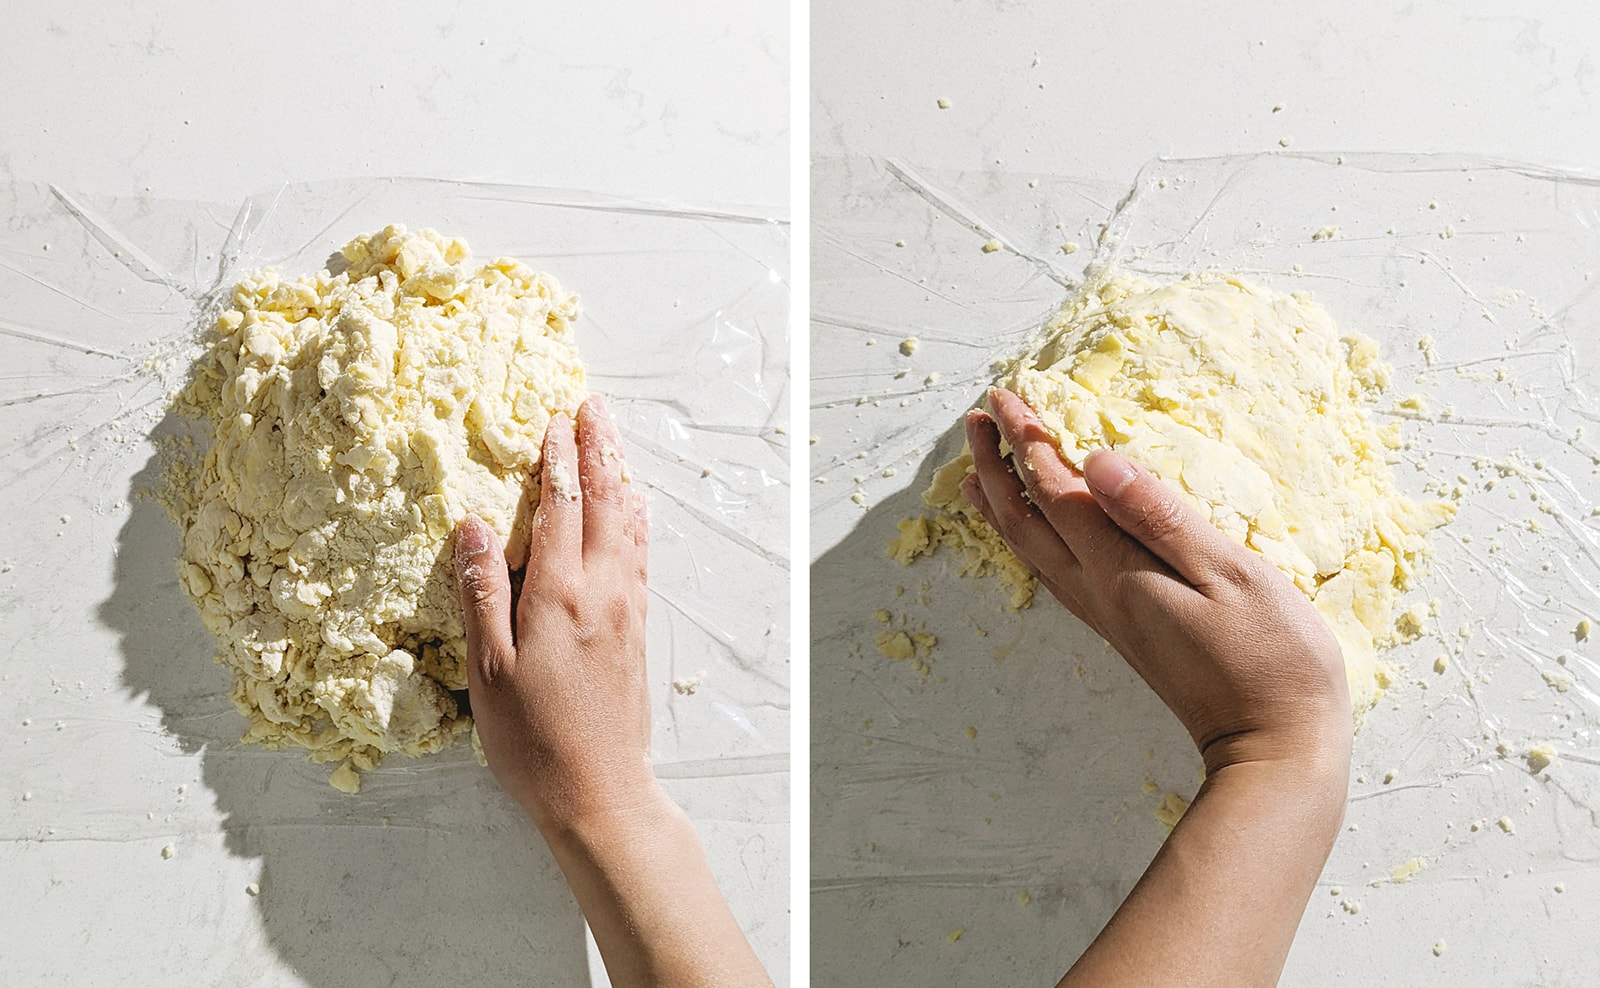
Cut butter into flour - In a mixing bowl, stir together flour and salt. Toss cold cubed butter in the flour. Use your fingers or a dough cutter to smush the butter into small pea-sized pieces, tossing them in flour occasionally. Work quickly to not warm the butter too much.
Mix in ice water - Make a well in the middle of the flour and pour in the ice-cold water. Mix it all together until it forms a shaggy dough and most of the flour is saturated.
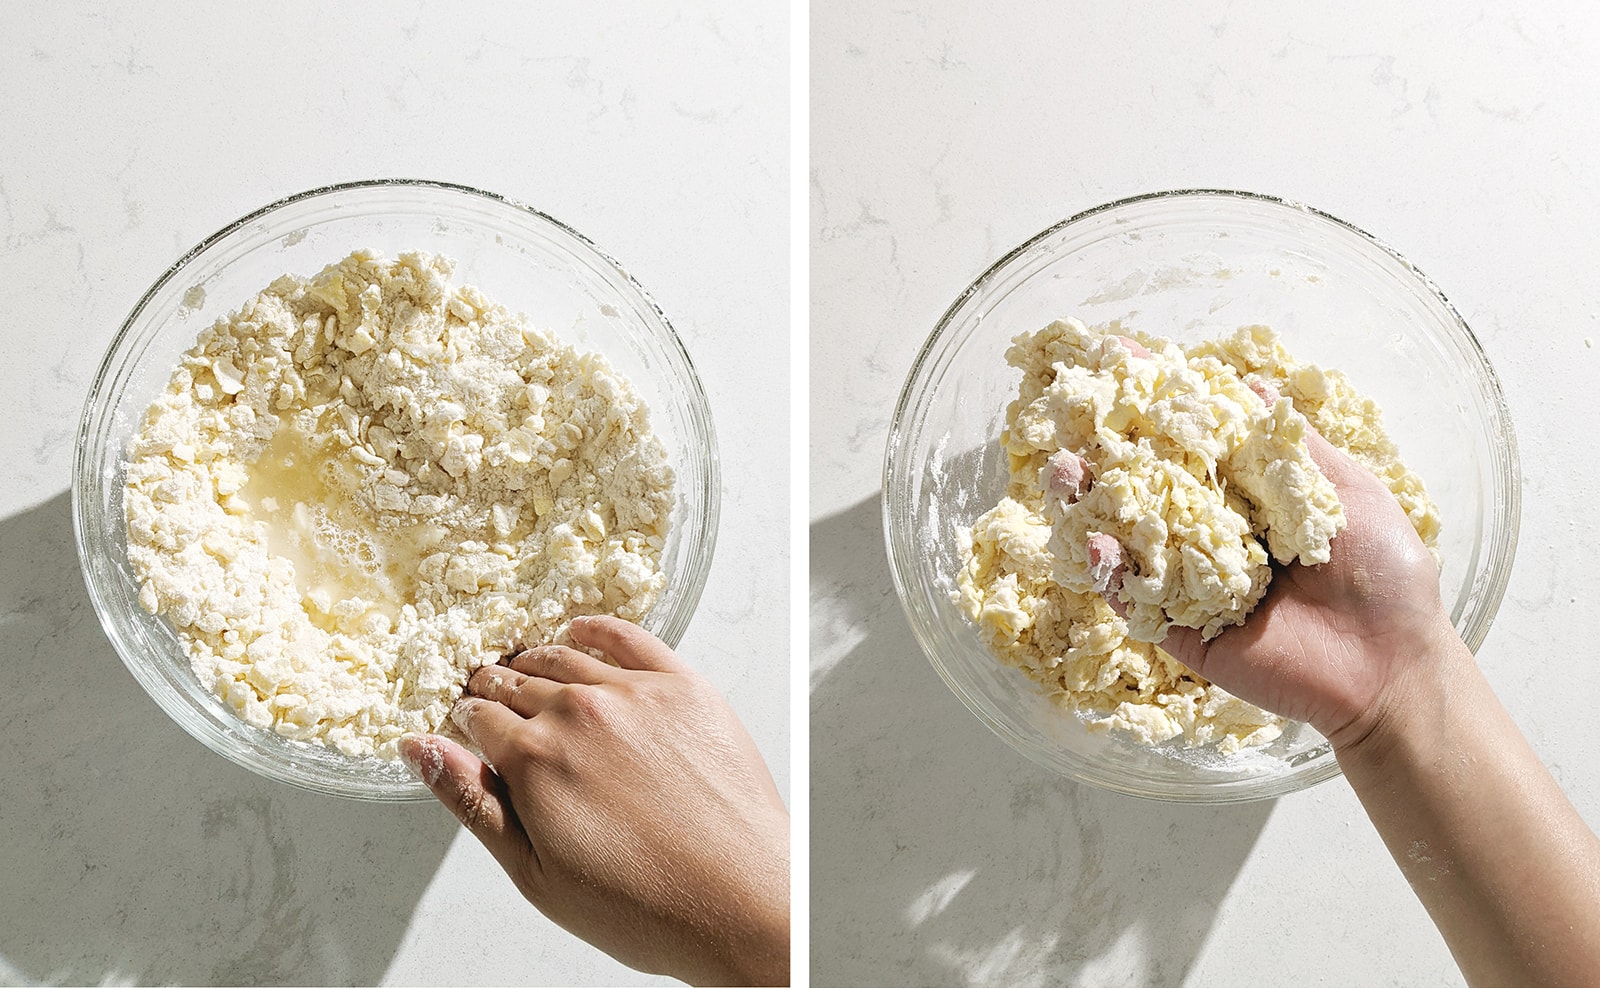
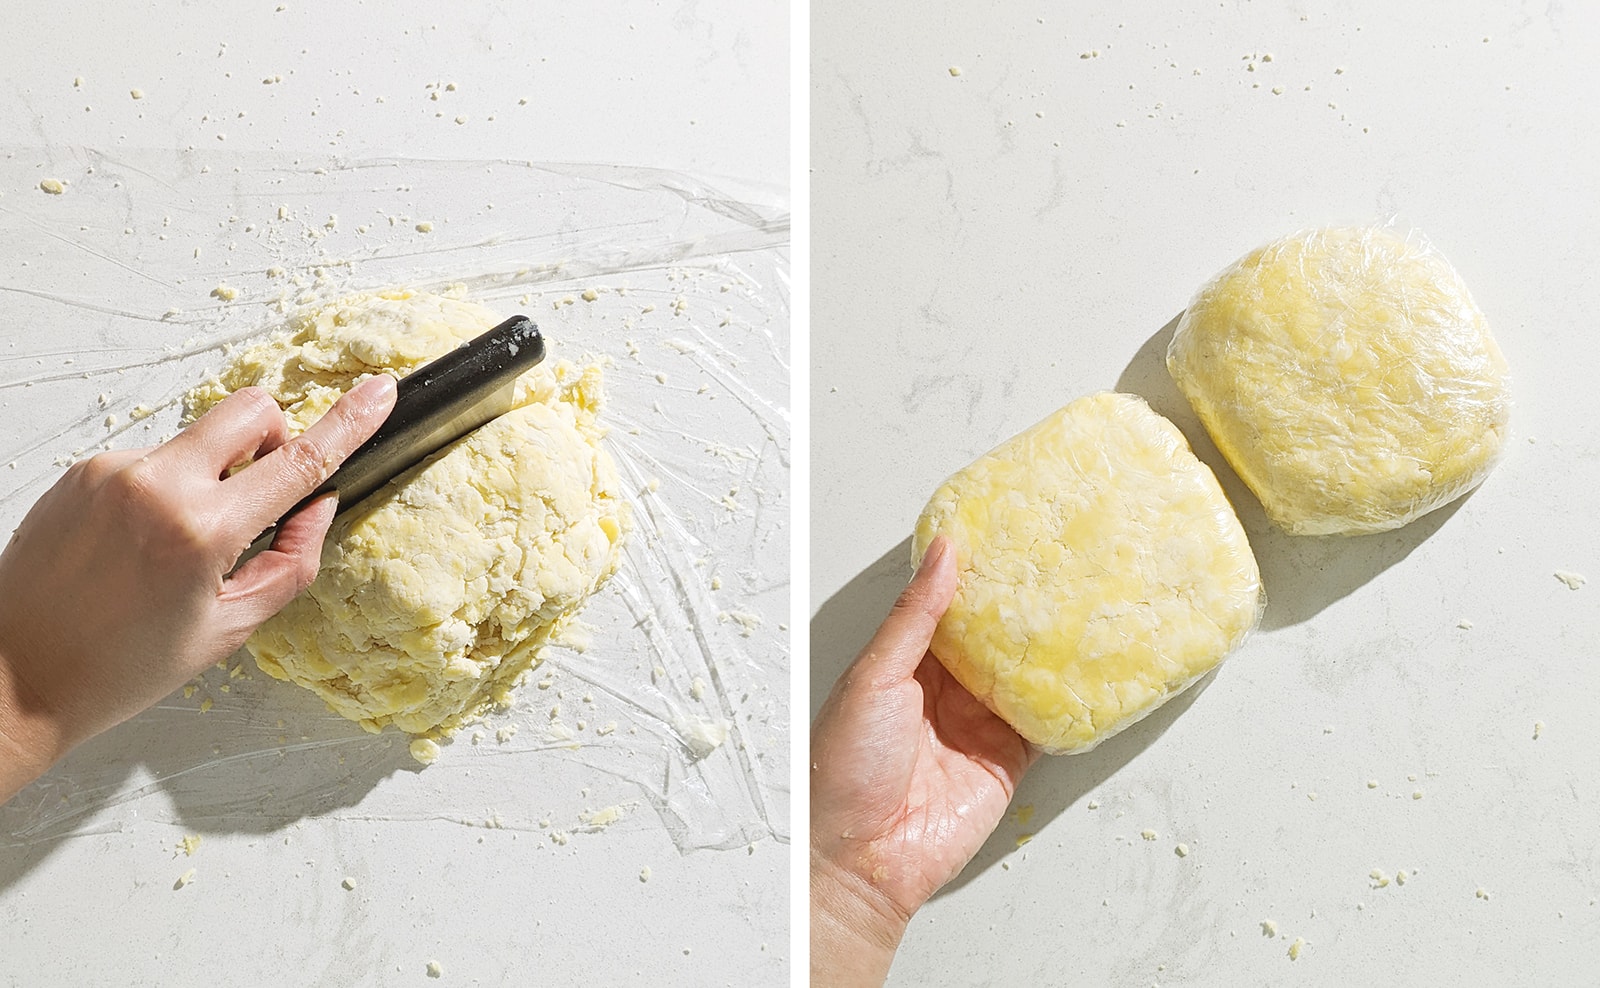
Fold dough - Turn the dough out on top of a sheet of plastic wrap. Use your hands to press the dough together and fold it onto itself about 2 times to create layers of butter. Don’t work the dough too much otherwise it will become tough. You just want it to hold together.
Chill - Form the dough into a flattened disc, wrap with plastic wrap, and chill in the fridge for at least 2 hours.
Make cherry filling - In a medium bowl, stir together the pitted cherries, cornstarch, brown sugar, and vanilla extract until all combined and coated. Set aside.
Prep - Preheat the oven to 350°F and line a baking sheet with parchment paper.
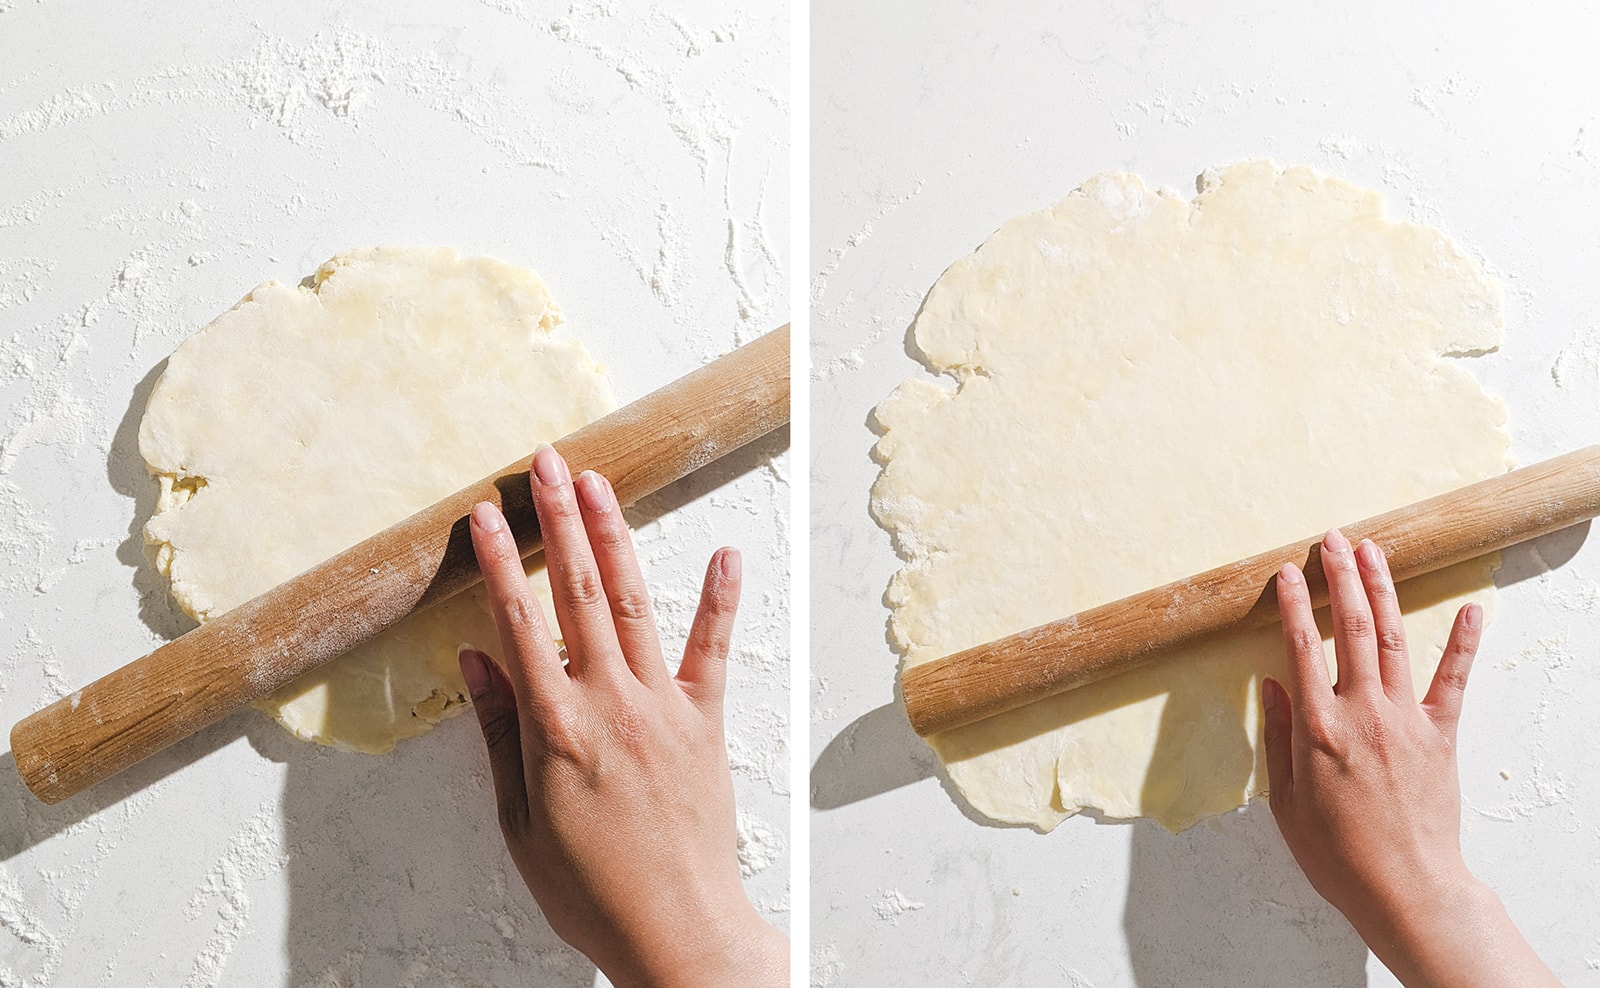
Roll out the dough - Once the dough has been chilled, place it onto a floured surface. Use a rolling pin to roll the dough out until about ⅛” thick, lifting it up and rotating it occasionally to prevent it from sticking to the counter.
Transfer to baking sheet - Transfer the sheet of dough to your lined baking sheet by folding it in quarters and unfolding it on the baking sheet. It’s important to do this now as it will be very hard to pick up later.
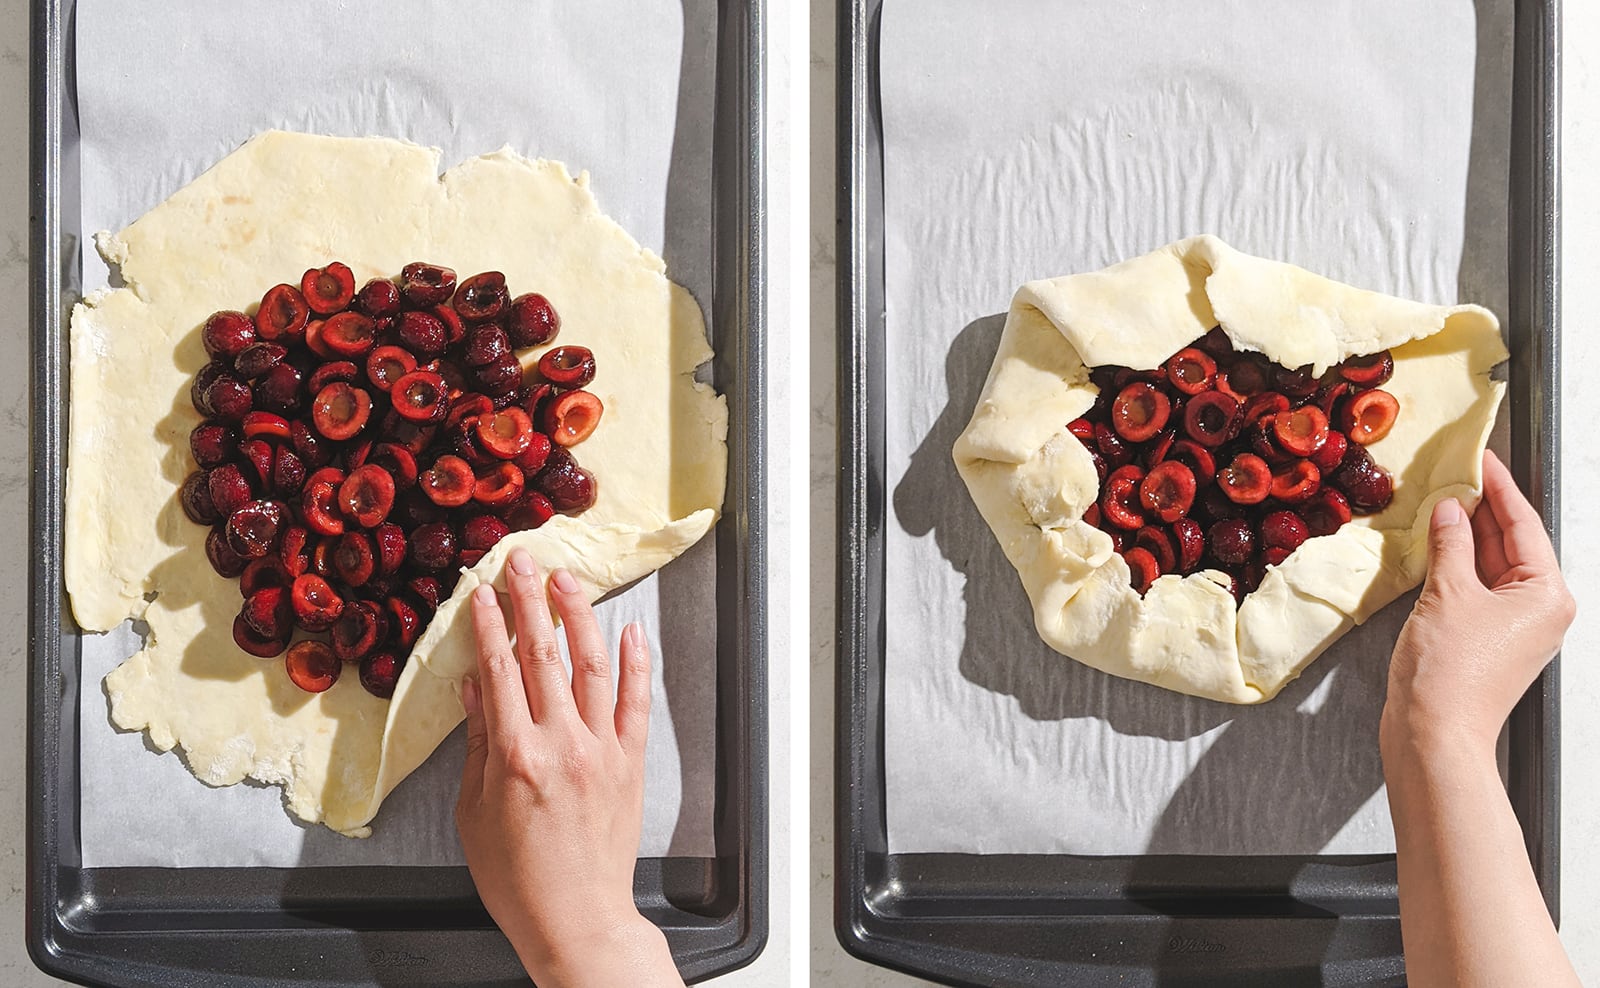
Add filling - Pile the cherry mixture onto the middle of the dough, leaving about 2” of empty space around the edges.
Fold over edges - Trim any excess dough that sticks out weirdly if needed. Fold the edges of the dough over onto the cherry filling, overlapping each fold as you work around the galette.
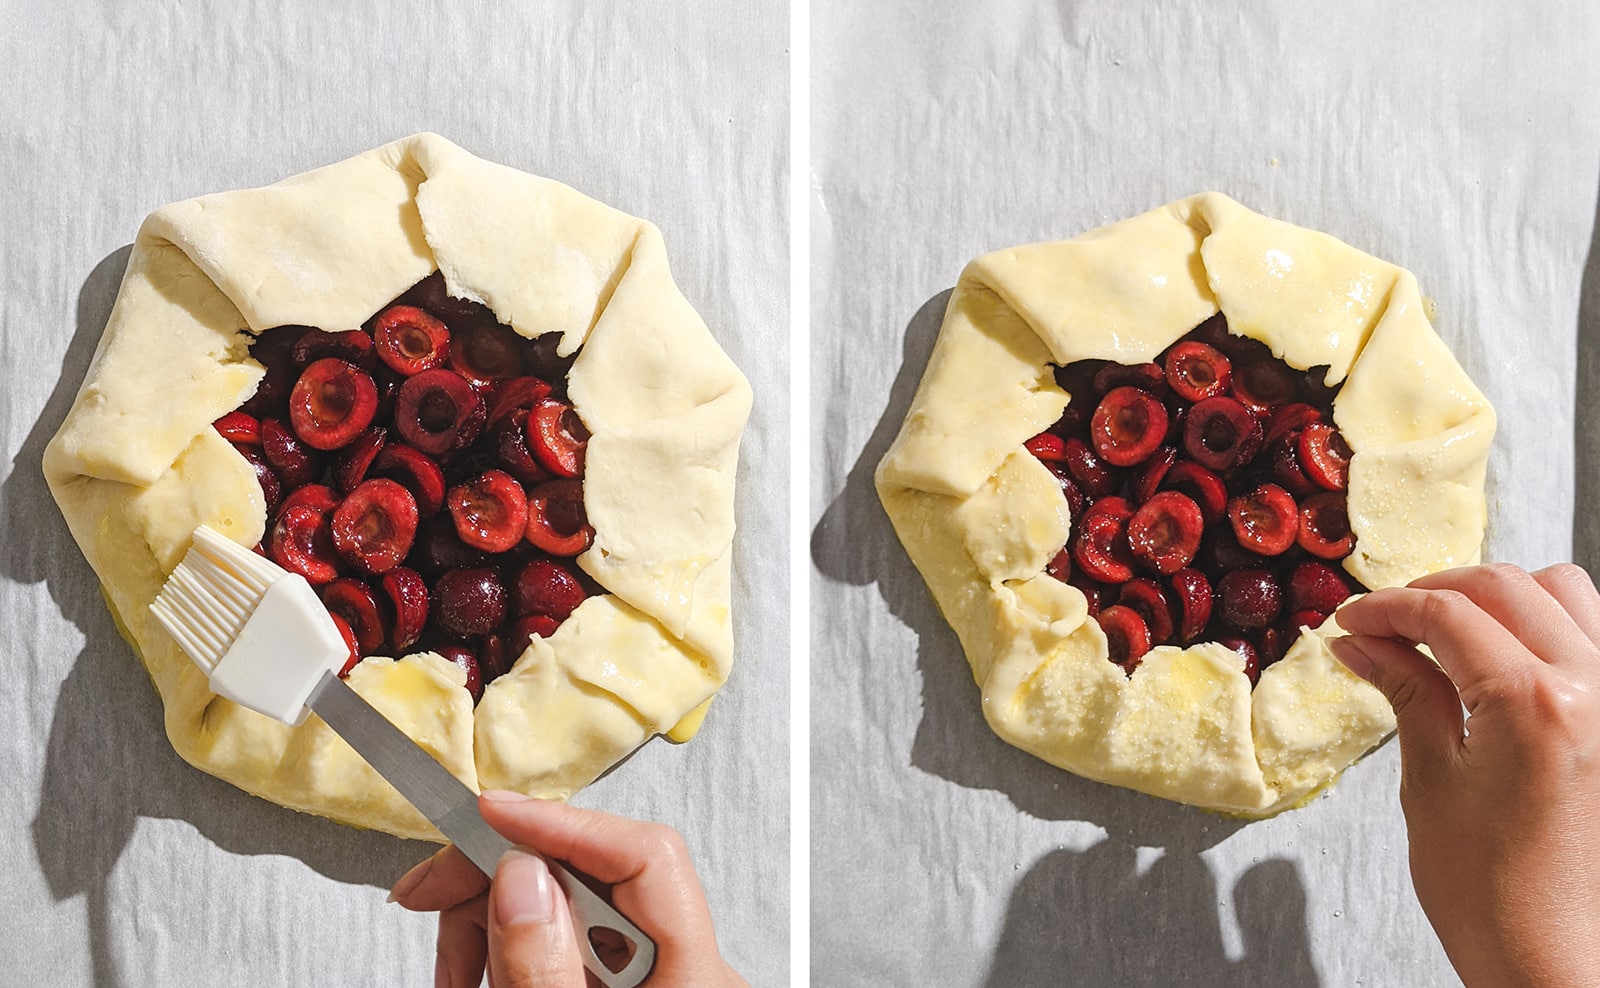
Egg wash - In a small bowl, whisk the egg. Use a pastry brush to brush a thin layer of beaten egg over all of the dough. Sprinkle with sugar crystals for extra crunch.
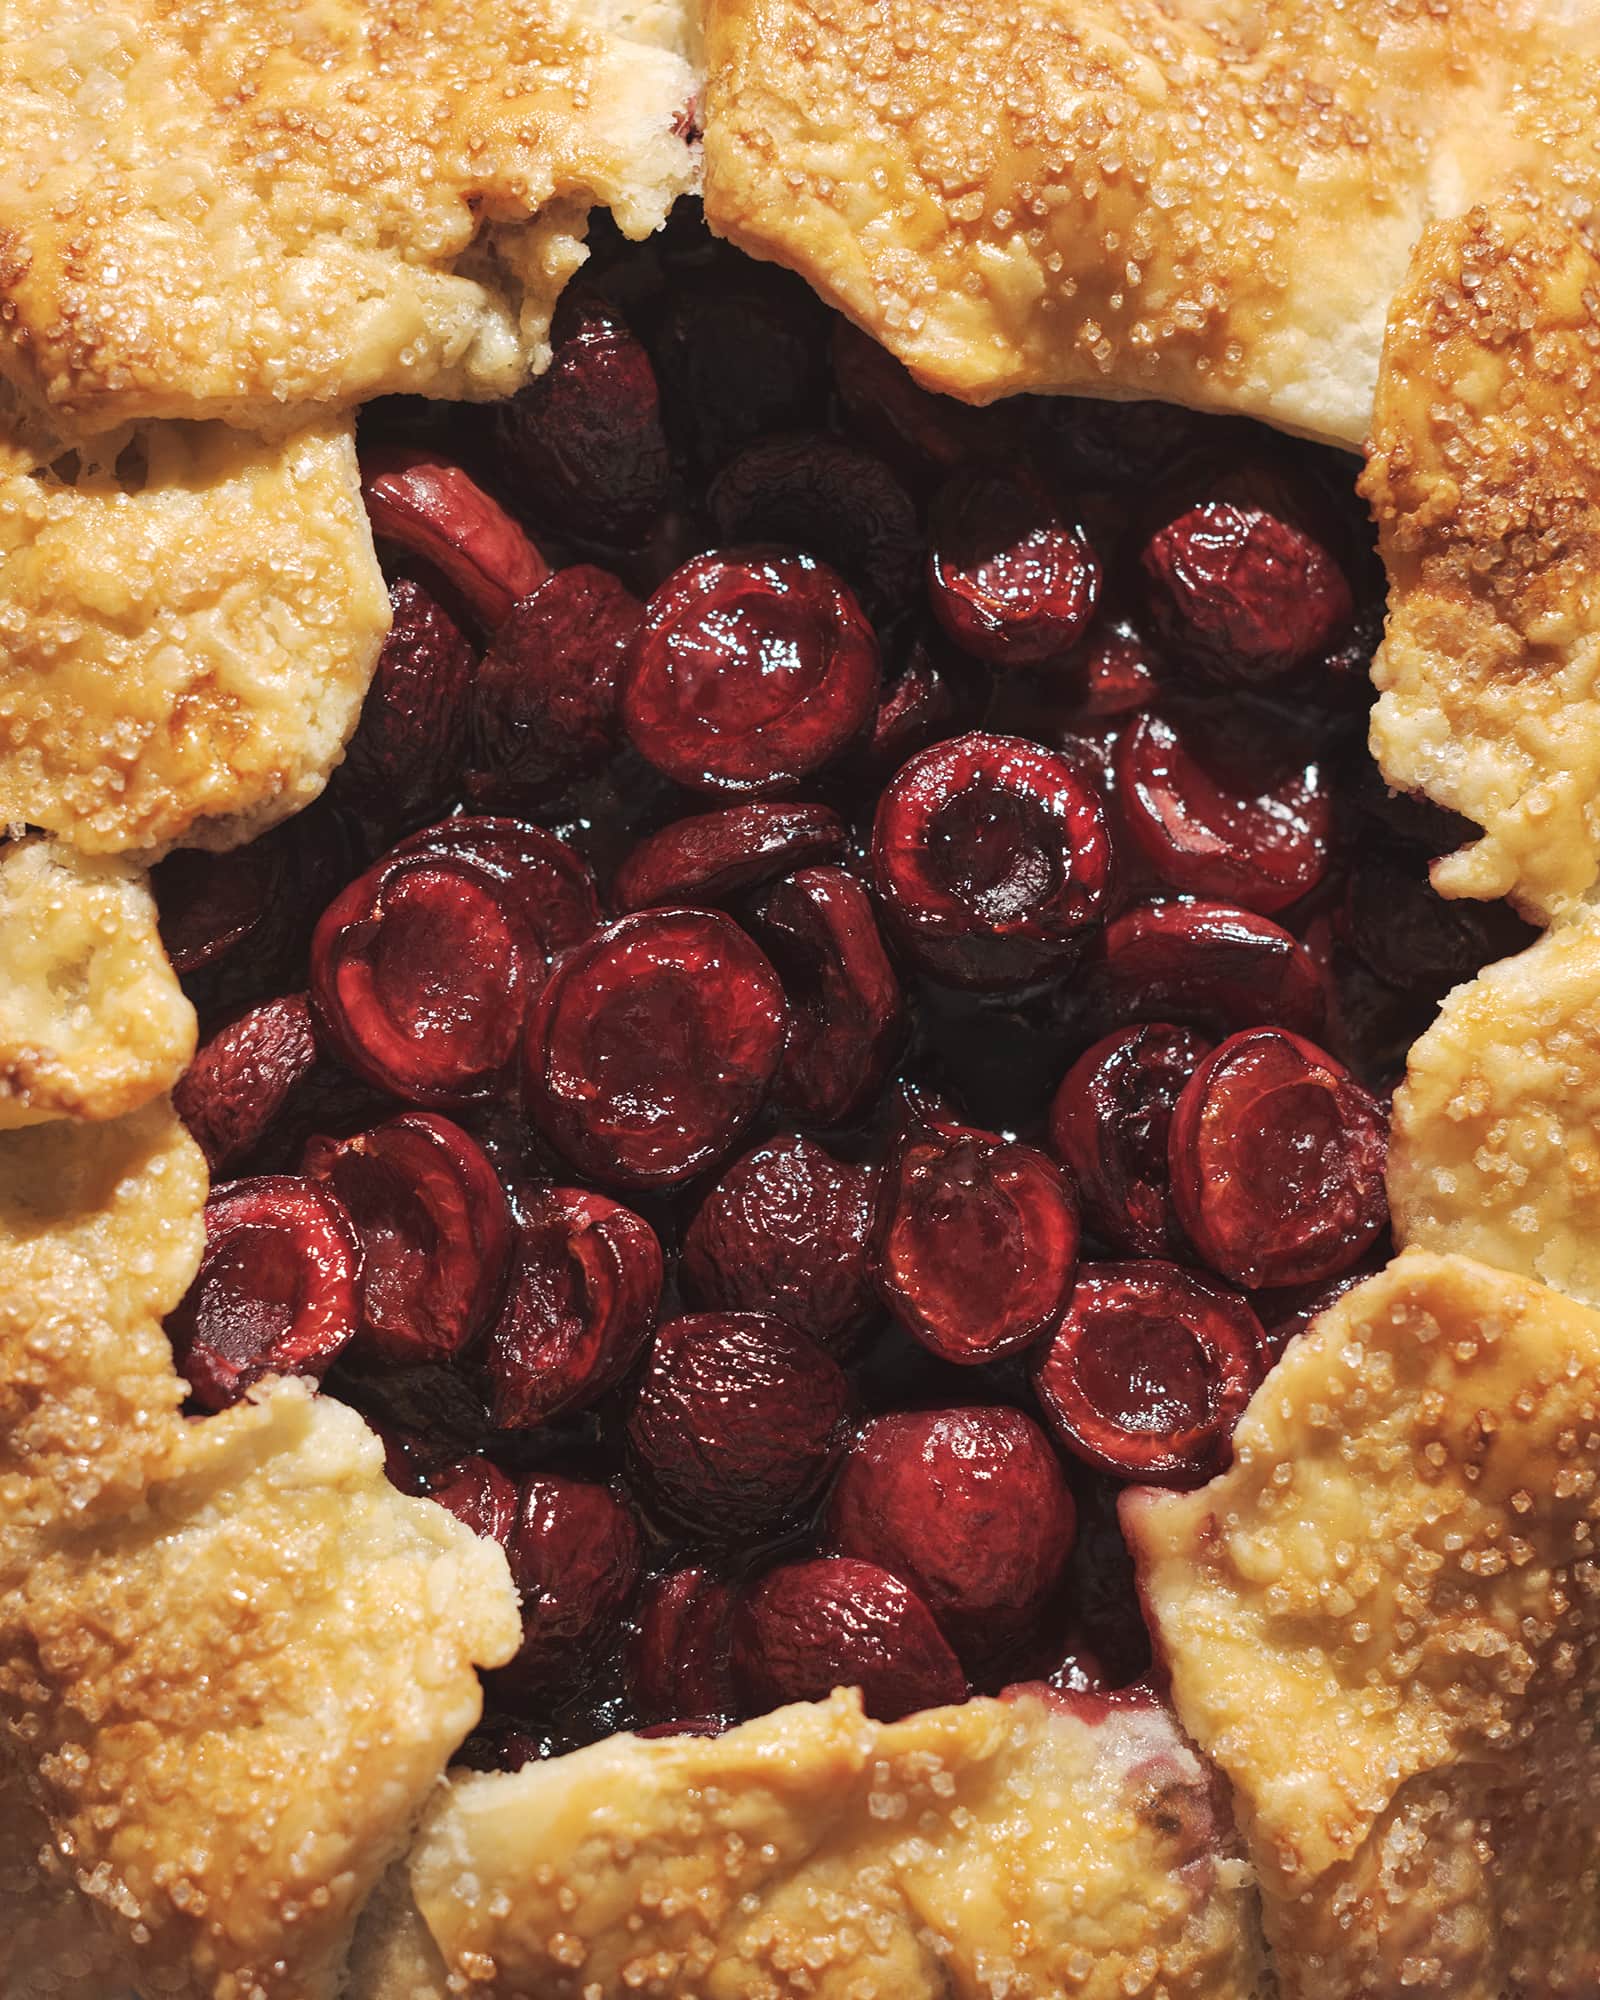
Bake galette - Bake for 40-45 minutes or until the crust is golden brown and filling is bubbling. Let cool until the bottom of the pan is cool enough to touch with your bare hand. Serve your cherry galette warm with a scoop of ice cream!
Storage
Galettes are best served the day they are baked. Any leftovers can be covered or wrapped in plastic wrap at room temperature for up to 2 days. After that, it should go in the fridge for up to another 3 days.
Before serving, reheat the galette in a toaster oven for 5-7 minutes until warm and crispy.
Freezing
Galettes can be frozen before baking and after baking, although I would recommend freezing them unbaked.
You can also freeze the galette dough itself. Wrap them tightly with plastic wrap and/or aluminum foil to prevent freezer burn.
- Unbaked galettes can be frozen for up to 1 month. Bake directly from the freezer at 350°F as instructed or for slightly longer until golden brown.
- Baked galettes can be frozen for up to 1 month. Thaw in the fridge overnight. Bake to re-heat in a toaster oven for 5-7 minutes or regular oven at 350°F for 7-10 minutes.
- Galette dough can be frozen for up to 1 month. Thaw in the fridge overnight or on the counter before rolling it out.
Tip & tricks
- Always keep the butter cold. The key to a flaky and crispy galette crust is layers of butter pieces embedded within the dough. You want these butter pieces to remain intact and cold until baking. Don’t be afraid to return the dough to the fridge for 5-10 minutes any time you feel like it’s getting too warm and melting.
- Don’t overwork the dough. Touching, folding, and kneading the dough makes the butter melt and also makes the pastry tough. Mix the flour with the water just until saturated. Fold the dough onto itself 1-2 times and press it together just until it holds together. Kneading is not needed at all - this isn’t bread dough.
- Roll the dough out thin. Your dough should be rolled out to about ⅛” thick. A thick pastry will become gummy and hard after baking.
- Stuff the galette full of fruit. The fruit will cook down and shrink as it bakes so you’ll want to fill your galette with more fruit than you think you need. The pile of fruit should be slightly domed and don’t forget to fill out the edges of the galette with fruit under the crust.
- Chill the galette before baking. Chilling this cherry galette after assembling it but before the egg wash helps the folds of the crust stay in place during baking. It also helps solidify any butter that got warm during the assembling process so that the whole galette bakes evenly and ensures all the butter melts at the same time.
- Let the galette cool but serve warm. It may be tempting to eat this cherry galette right out of the oven especially when it’s bubbling and smelling so good but the filling needs some time to set to become jammy and thick. Let the galette cool until it’s still warm but you can touch the bottom of the pan with your bare hand. You can always re-heat it before serving.
Frequently asked questions
Yes! The dough in this recipe can be used to make about 2-3 smaller galettes.
The cornstarch in this recipe helps soak up the juices released by the fruit and prevents the bottom of the galette from getting soggy. Mix the cornstarch with the fruit before filling the galette.
No, the dough used in both galettes and pies is essentially the same in terms of the ingredients used. The main difference is in how they are assembled and baked. Galettes are made with just one sheet of dough that is folded around the edges to create the crust and baked on a flat baking sheet. Pies are made with two sheets of dough on the top and bottom and baked in a deep pie dish.
Galette is a French term and crostata is an Italian term. They are basically the same thing and refer to the same kind of freeform pie pastry filled with fruit.
You can eat a galette by cutting it into slices like a pie. You can eat it with a fork or just hold it like a slice of pizza. Smaller, mini galettes are personal sized and can be enjoyed all to yourself.
Yes! You can bake the galette a day in advance and reheat it before serving. However, I would recommend assembling the galette a day in advance and keeping it in the fridge. Apply egg wash and bake it the next day before serving so that it’s fresher. You can also freeze the dough or galette for longer periods of time - see freezing instructions above.
More pie and galette recipes to try
Recipe
Cherry Galette
Ingredients
Galette Crust
- 170 g all-purpose flour
- ¼ teaspoon salt
- 115 g unsalted butter, cold & cubed
- 70 g ice cold water
Galette Filling
- 500 g red cherries, pitted & halved
- 1 tablespoon cornstarch
- 30 g brown sugar
- 1 teaspoon vanilla extract
Egg Wash
- 1 egg, beaten
- 2 tablespoons large sugar crystals
Instructions
- Cut butter into flour: In a mixing bowl, stir together flour and salt. Toss cold cubed butter in the flour. Use your fingers or a dough cutter to smush the butter into small pea-sized pieces, tossing them in flour occasionally. Work quickly to not warm the butter too much.
- Mix in ice water: Make a well in the middle of the flour and pour in the ice-cold water. Mix it all together until it forms a shaggy dough and most of the flour is saturated.
- Fold dough: Turn the dough out on top of a sheet of plastic wrap. Use your hands to press the dough together and fold it onto itself about 2 times to create layers of butter. Don’t work the dough too much otherwise it will become tough. You just want it to hold together.
- Chill: Form the dough into a flattened disc, wrap with plastic wrap, and chill in the fridge for at least 2 hours.
- Make cherry filling: In a medium bowl, stir together the pitted cherries, cornstarch, brown sugar, and vanilla extract until all combined and coated. Set aside.
- Prep: Preheat the oven to 350°F and line a baking sheet with parchment paper.
- Roll out the dough: Once the dough has been chilled, place it onto a floured surface. Use a rolling pin to roll the dough out until about ⅛” thick, lifting it up and rotating it occasionally to prevent it from sticking to the counter.
- Transfer to baking sheet: Transfer the sheet of dough to your lined baking sheet by folding it in quarters and unfolding it on the baking sheet. It’s important to do this now as it will be very hard to pick up later.
- Add filling: Pile the cherry mixture onto the middle of the dough, leaving about 2” of empty space around the edges.
- Fold over edges: Trim any excess dough that sticks out weirdly if needed. Fold the edges of the dough over onto the cherry filling, overlapping each fold as you work around the galette.
- Egg wash: Use a pastry brush to brush a thin layer of beaten egg over all of the dough. Sprinkle with sugar crystals for extra crunch. If your galette has become too warm and soft, chill it in the fridge while the oven finishes preheating.
- Bake galette: Bake for 40-45 minutes or until the crust is golden brown and filling is bubbling. Let cool until the bottom of the pan is cool enough to touch with your bare hand. Serve your cherry galette warm with a scoop of ice cream!


christine grall says
Don't generally comment on recipes. But I had to this time. Thought 300grams of sugar was a lot for a galette cause there no pan to contain the syrup. Was right. Syrup dripped from cookie sheet onto oven mat and under it. Will rethink galette.
Gail Ng says
Hi Christine, there is no 300g of sugar in this recipe. Perhaps you misread the 30g of brown sugar?
zofie says
wow very beautiful and elegant love it