

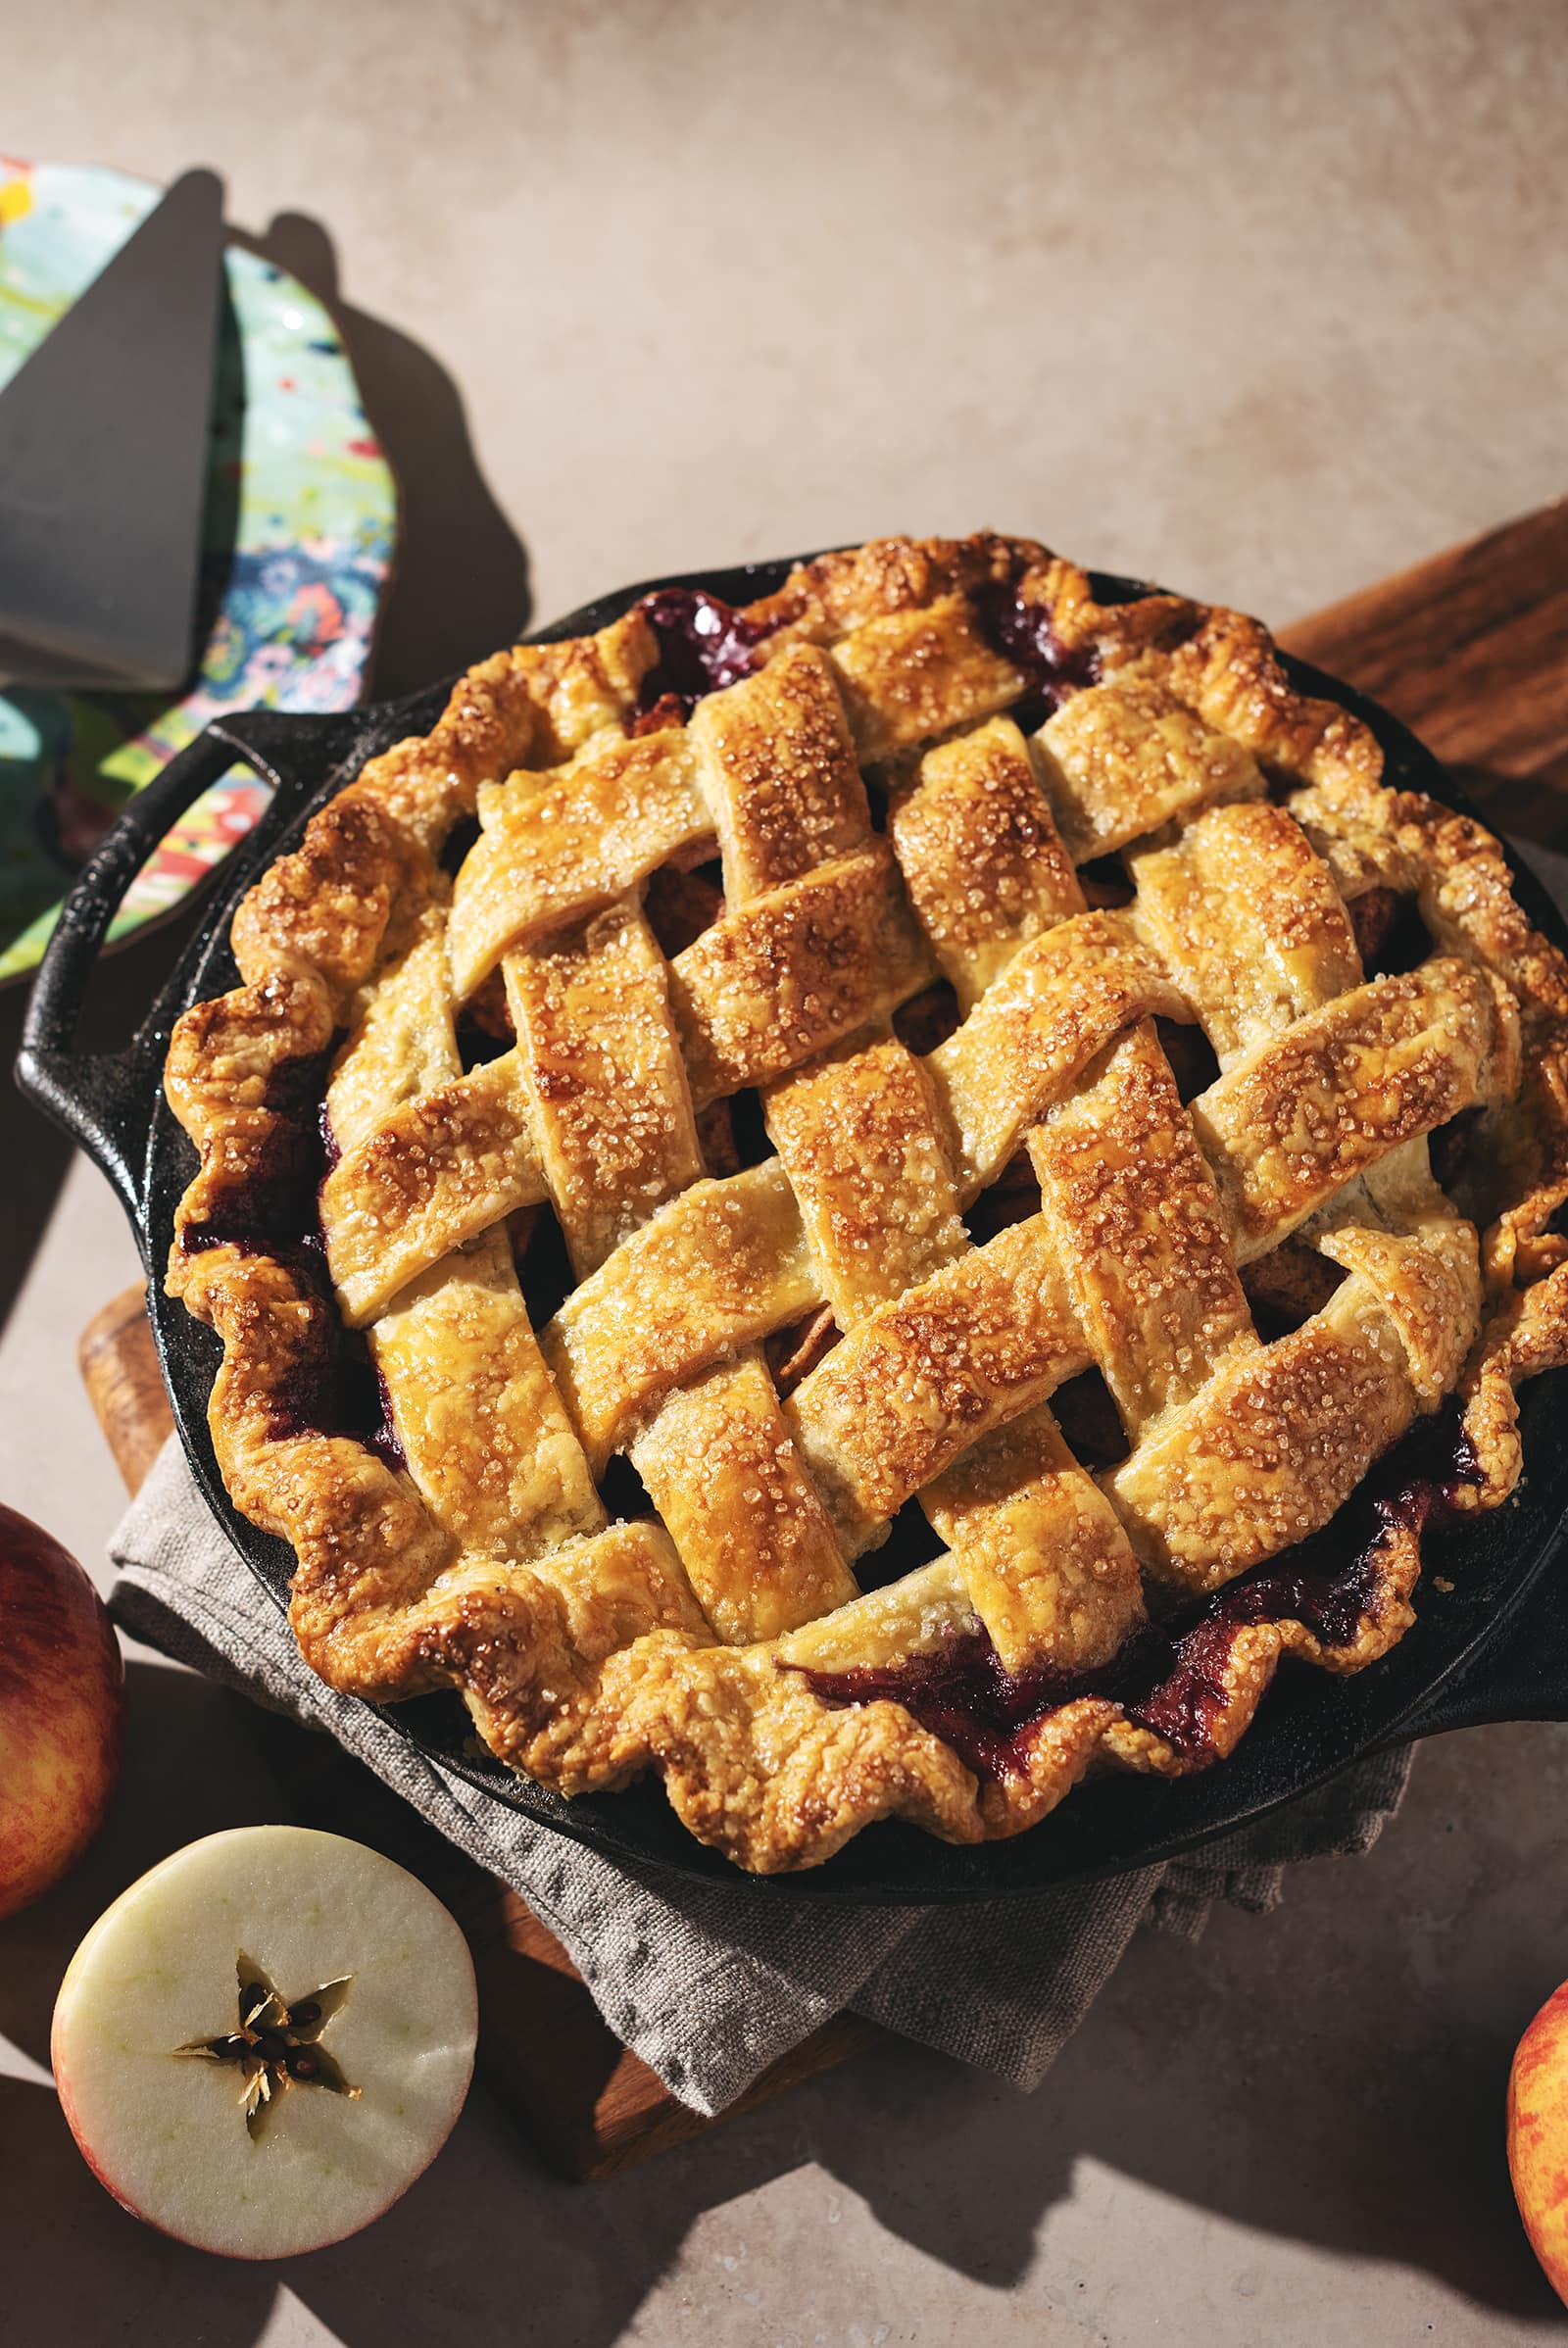
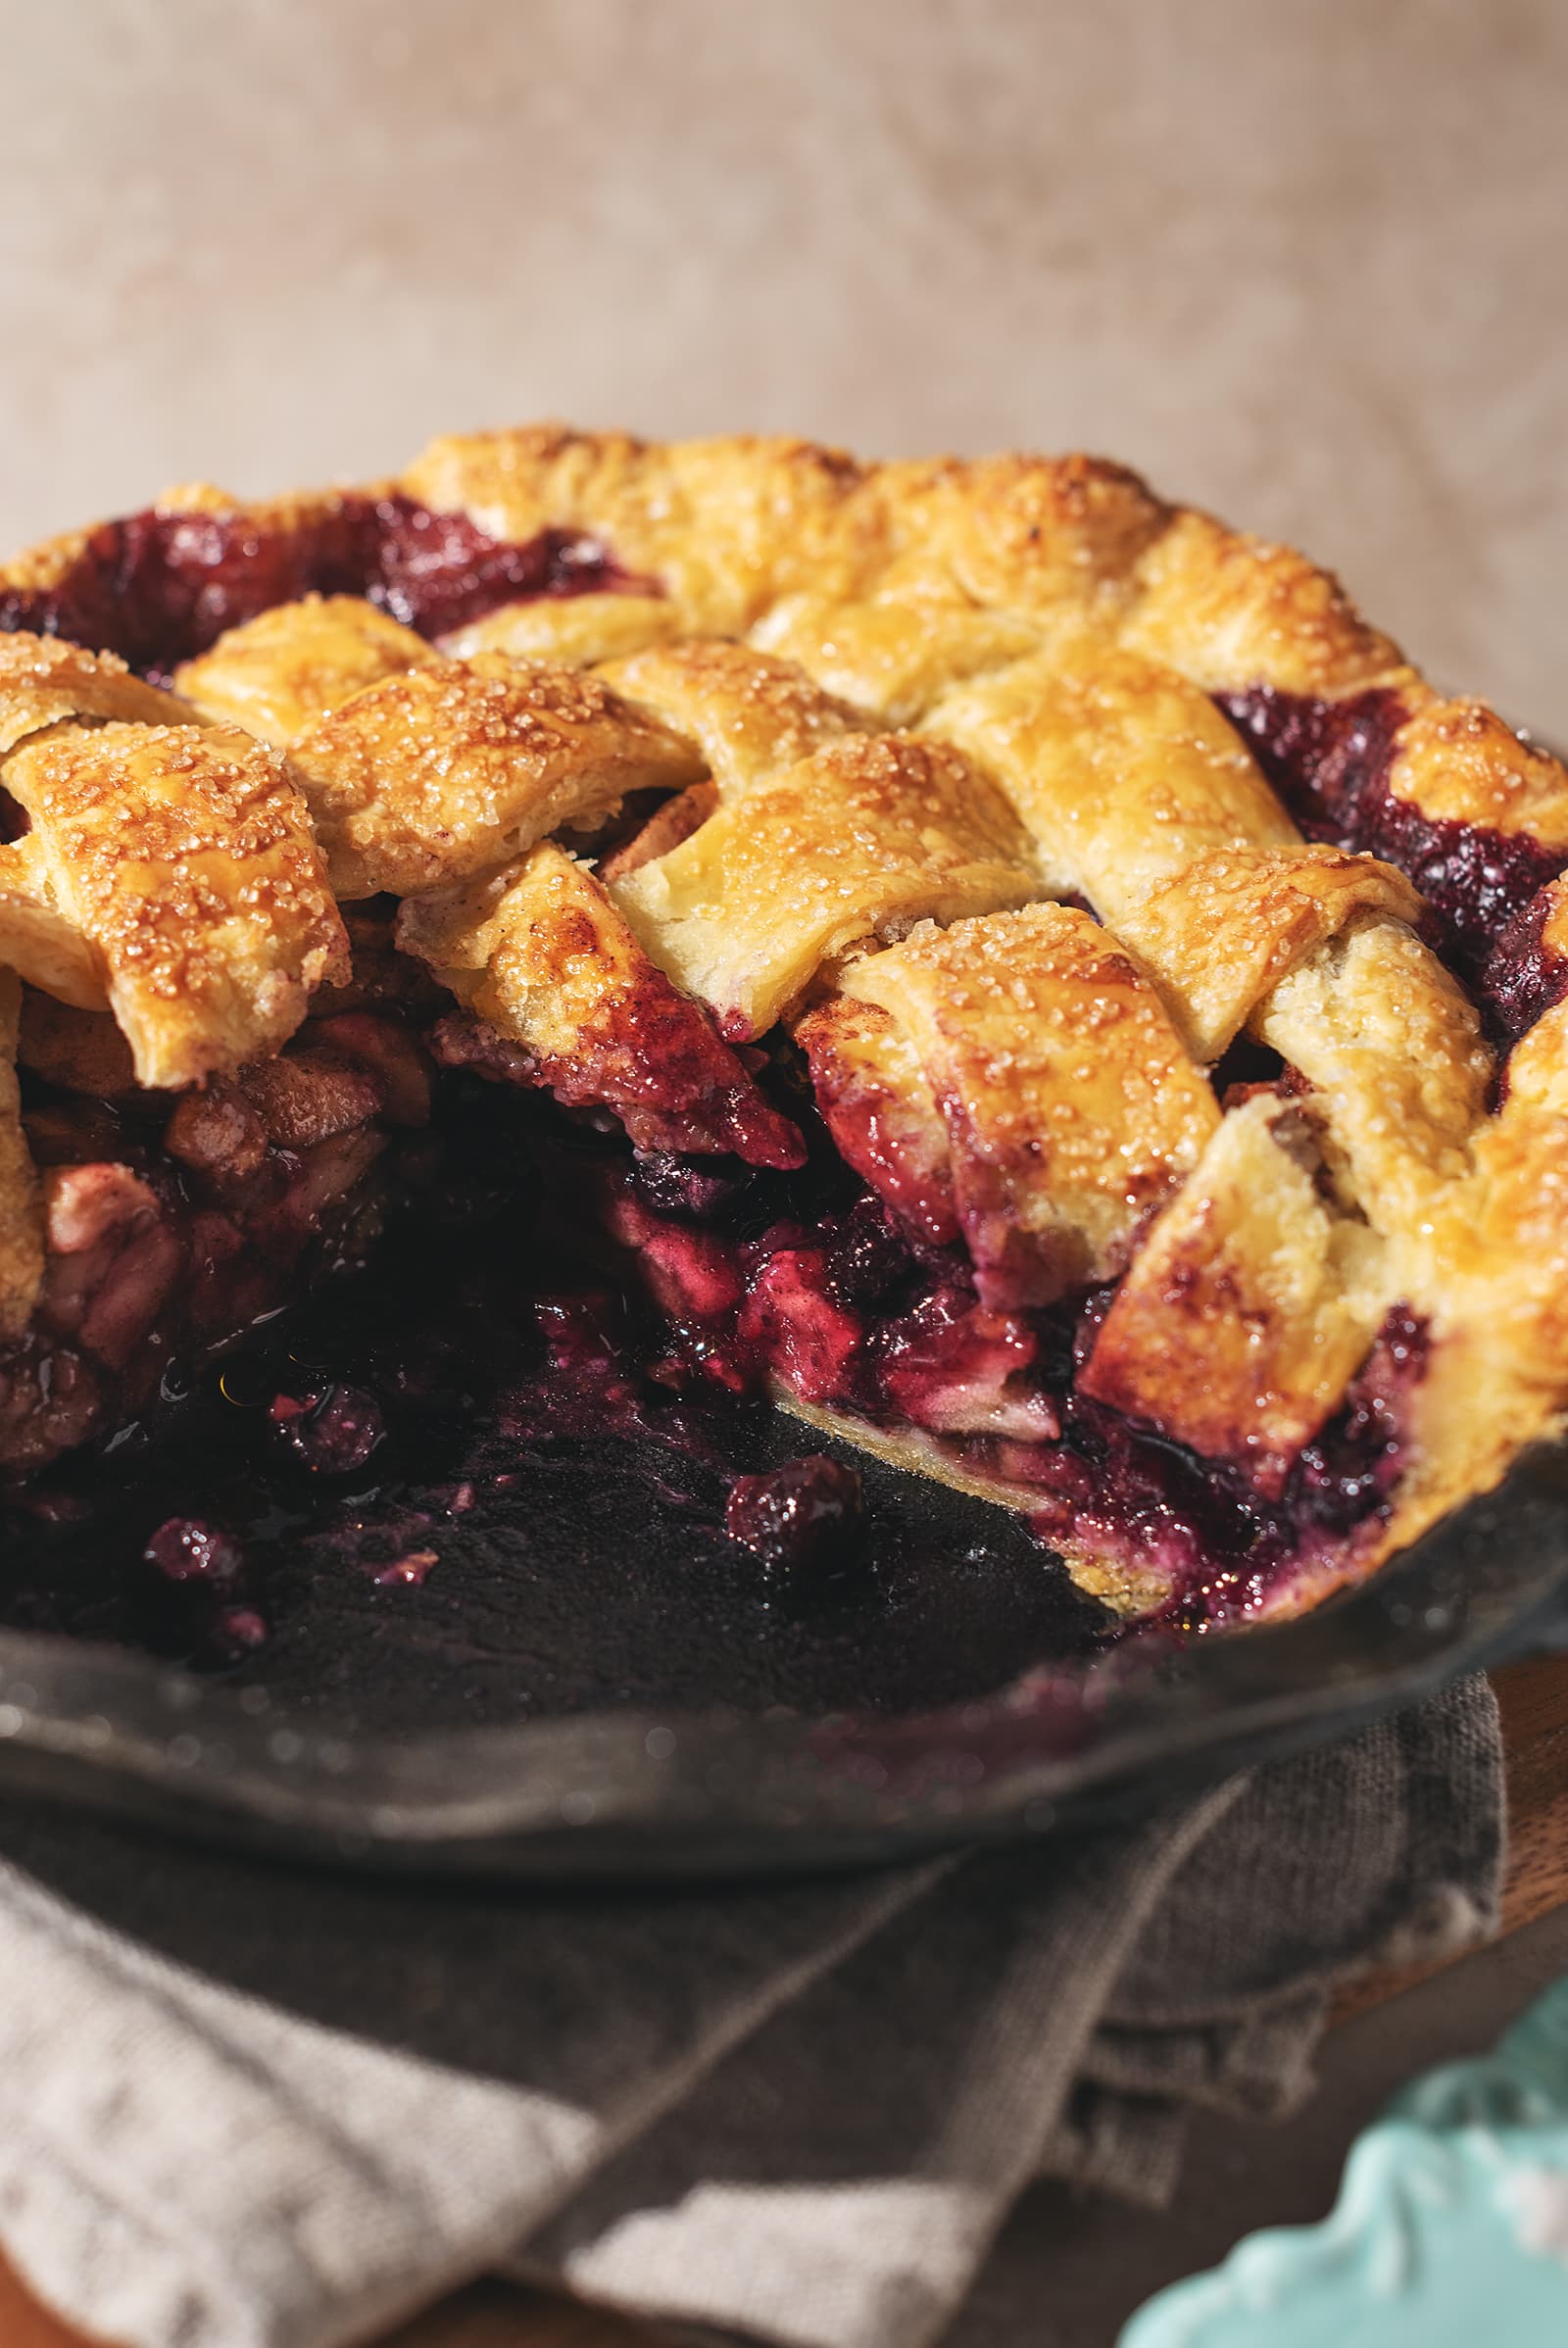
This blueberry apple pie is the perfect pie for combining freshly picked apples with frozen blueberries for a taste of both Summer and Fall. The crispy and flaky pie crust is filled with a juicy and lightly spiced filling of tart apples and blueberries.
Jump to:
Apple pie is a classic dessert but combining different fruits with the apples is what makes this blueberry apple pie special. The deep purple hue from the blueberries make this apple pie look stunning without changing the flavour too much. It adds just an extra fruity and juicy touch to a pie that you know and love.
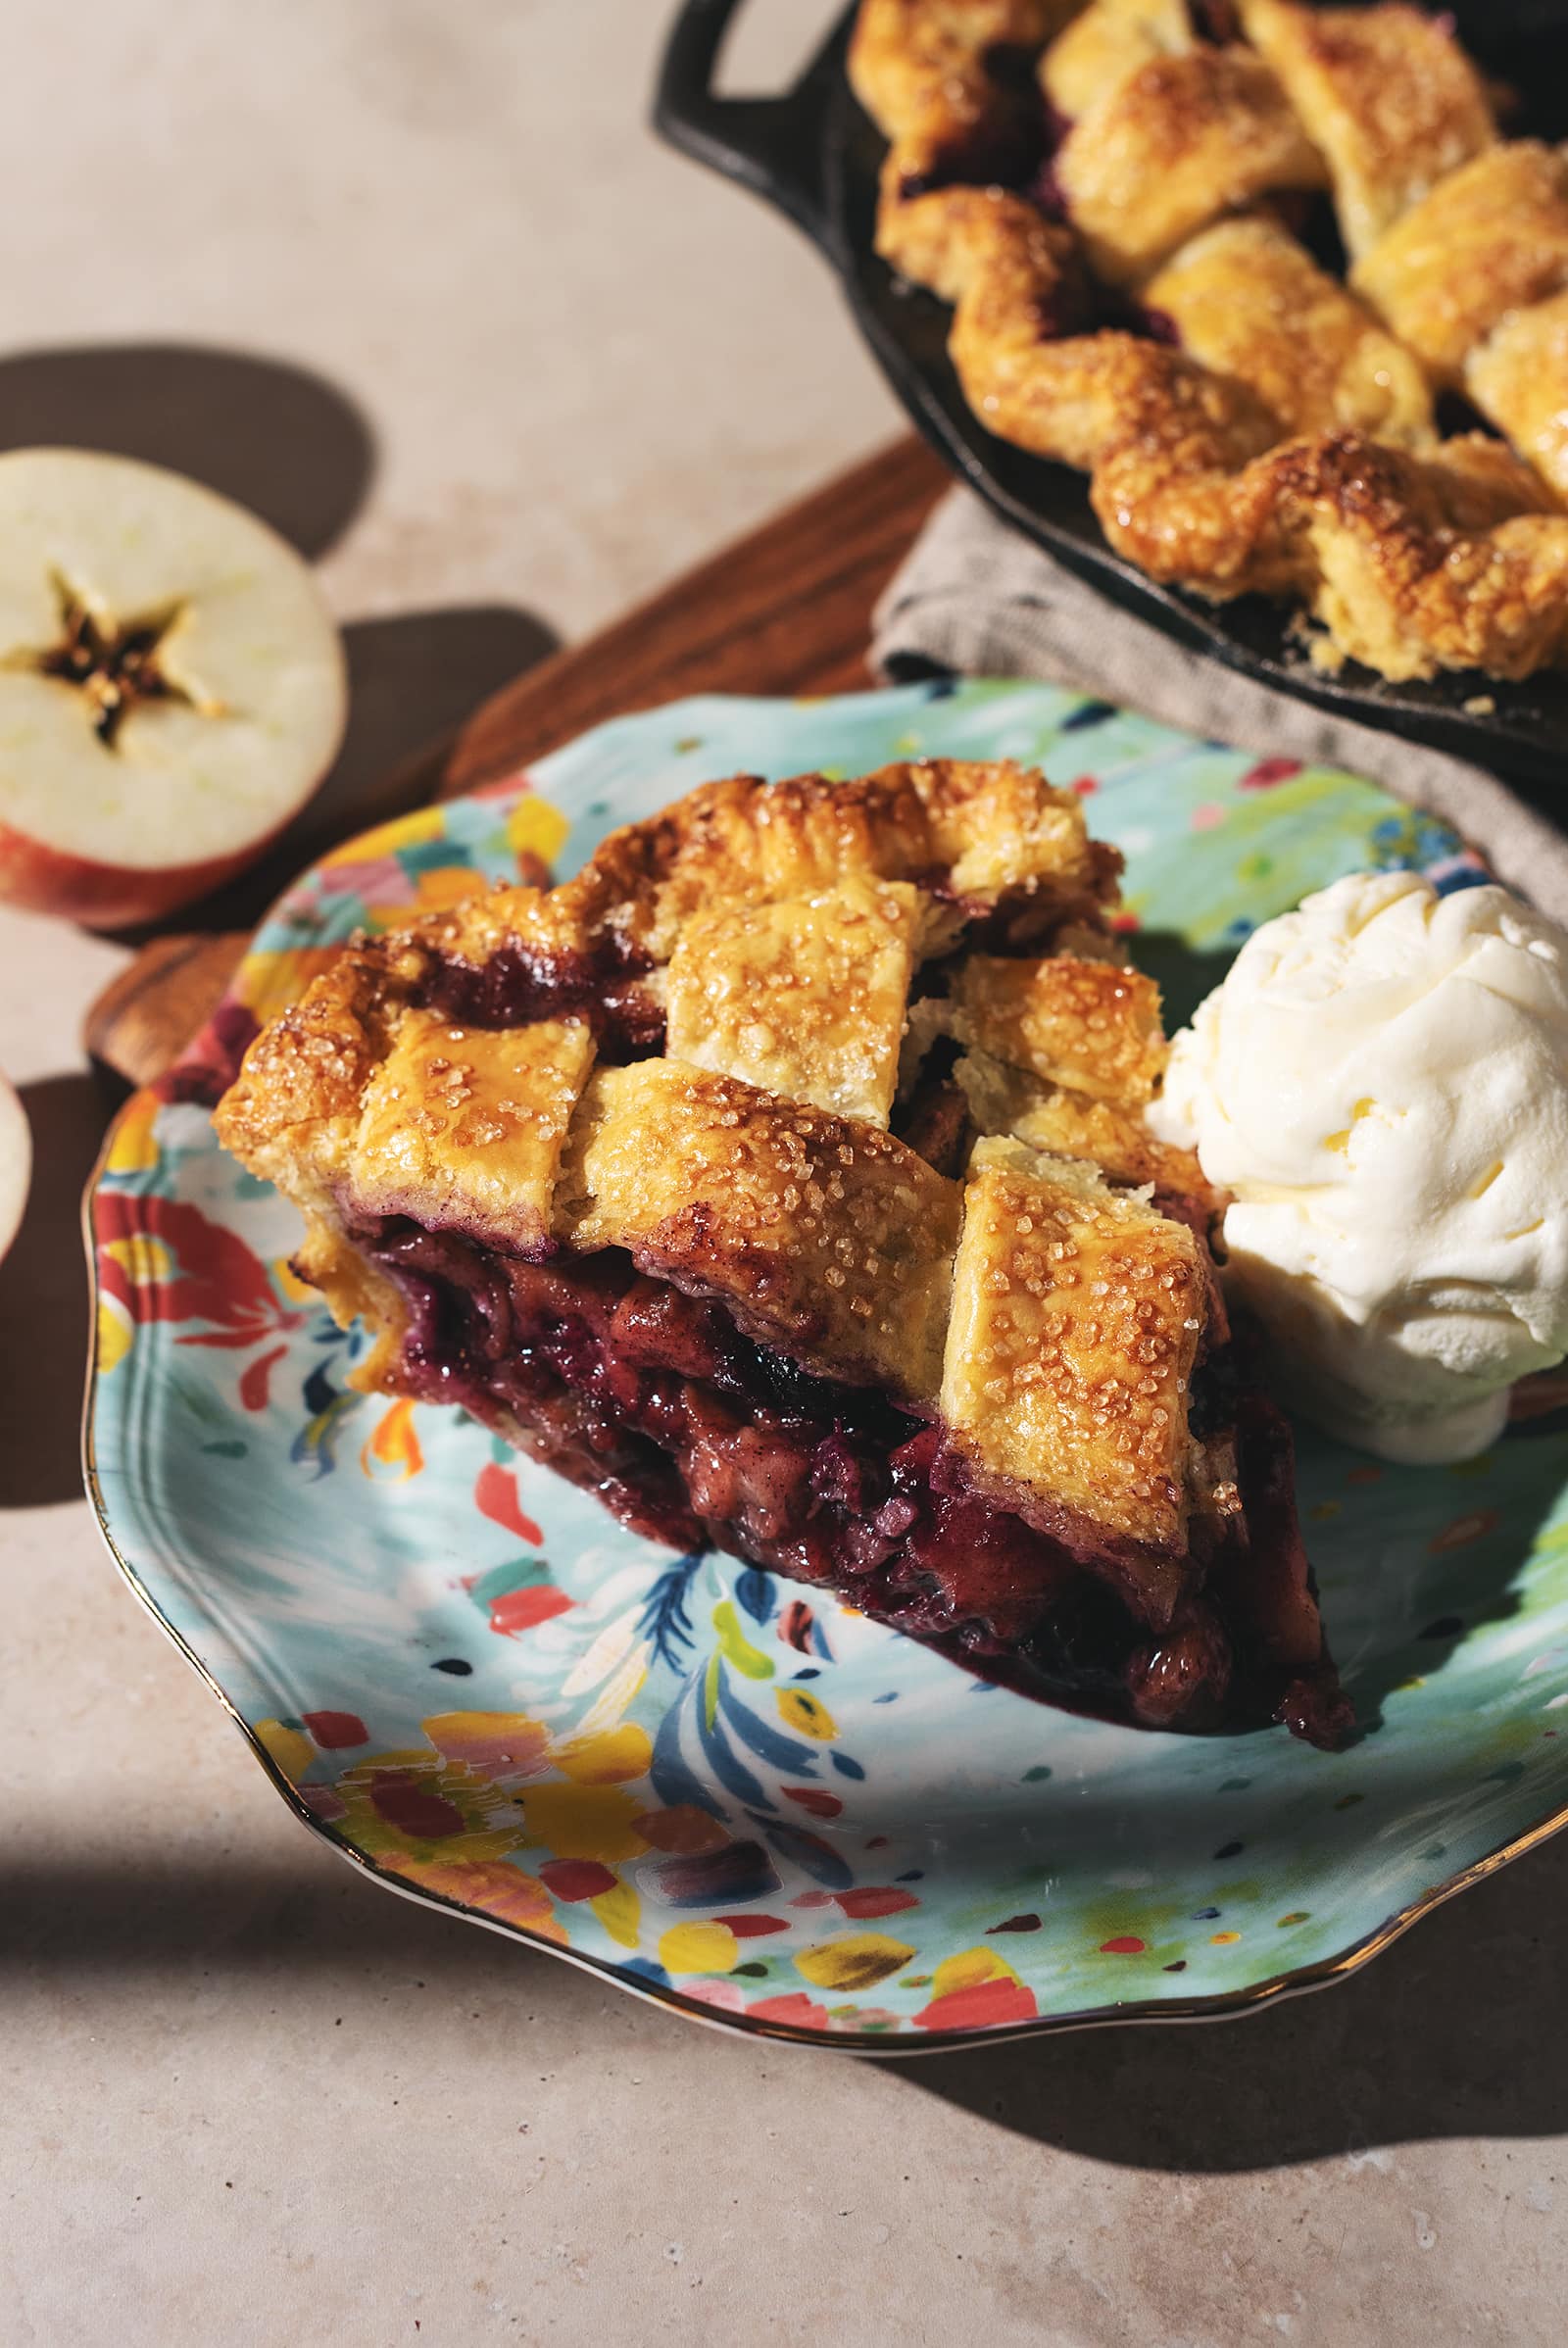
Believe me when I tell you this recipe for pie crust is unbelievably crispy, flaky, and buttery. The pie pastry is my favourite part of this apple blueberry pie. The filling is not to be overlooked either! The juicy apples and blueberries are lightly spiced with cinnamon for that classic Fall apple pie flavour. When it’s served warm with a scoop of vanilla ice cream, it honestly tastes like heaven. Not to mention, your house will smell so good for hours!
Why you’ll love this recipe
- This pie crust is incredibly crispy and flaky. It shatters like glass with every bite.
- The pie crust can easily be made in advance and frozen for later.
- It’s a great way to combine fresh Fall apples with frozen blueberries from the Summer.
- This pie recipe is customizable and adaptable for different types of pie fillings and fruit combinations. Try switching out the blueberries for raspberries, cherries, cranberries, or just use the recipe to make a classic apple pie.
Best apples to use for apple pie
Tart apples that hold their shape work best in apple pies. I also love using a combination of two different apple varieties. Granny Smith apples are easily accessible but some may find them to be too tart. In this case, using a combination of both Granny Smith and the sweeter Honeycrisp might create the flavour you want.
My favourite apples for baking are:
- Granny Smith
- Honeycrisp
- Elstar
- Braeburn
- Jonagold
- Gingergold
Avoid these apples for baking as they become mushy or just don’t have the right flavour to withstand long baking times:
- Red Delicious
- McIntosh
- Fuji
- Gala
Ingredients
- All-purpose flour
- Salt
- Unsalted butter - Your butter should be cold, straight from the fridge, and roughly cut into cubes to make them easier to work with.
- Ice cold water - Keep a cup of water in the fridge or freezer while you prep the dough. You want it to be ice cold so that it doesn’t melt the butter in the dough.
- Tart apples - Use crisp, tart apples or a combination of different apple varieties. Peel, core, and cut them into ¼” thick slices just before making the filling.
- Blueberries - You can use fresh or frozen blueberries. I used frozen but keep in mind that frozen blueberries will release more liquid as they thaw. The amount of cornstarch used in this recipe accounts for this extra liquid. You’ll still want to get the pie in the oven as soon as possible after making the filling.
- Brown sugar - Brown sugar in pies gives a lovely warm, caramelized flavour.
- Cornstarch - This helps soak up the juices released by the fruit as they bake and turns them into a jammy filling. No soggy pie crusts here!
- Ground cinnamon - You can’t have apple pie without cinnamon for flavour!
- Vanilla extract
- Egg - This is for the egg wash. When brushed over the pie pastry, it gives the crust a shiny finish and helps it turn golden brown.
- Sugar crystals - This is optional but highly recommended for sprinkling onto the pie crust for extra crunch and a bakery-worthy look. If you can’t find sugar crystals, you can also use coarse sugar, turbinado sugar, or demerara sugar.
How to make blueberry apple pie
Make the pie dough
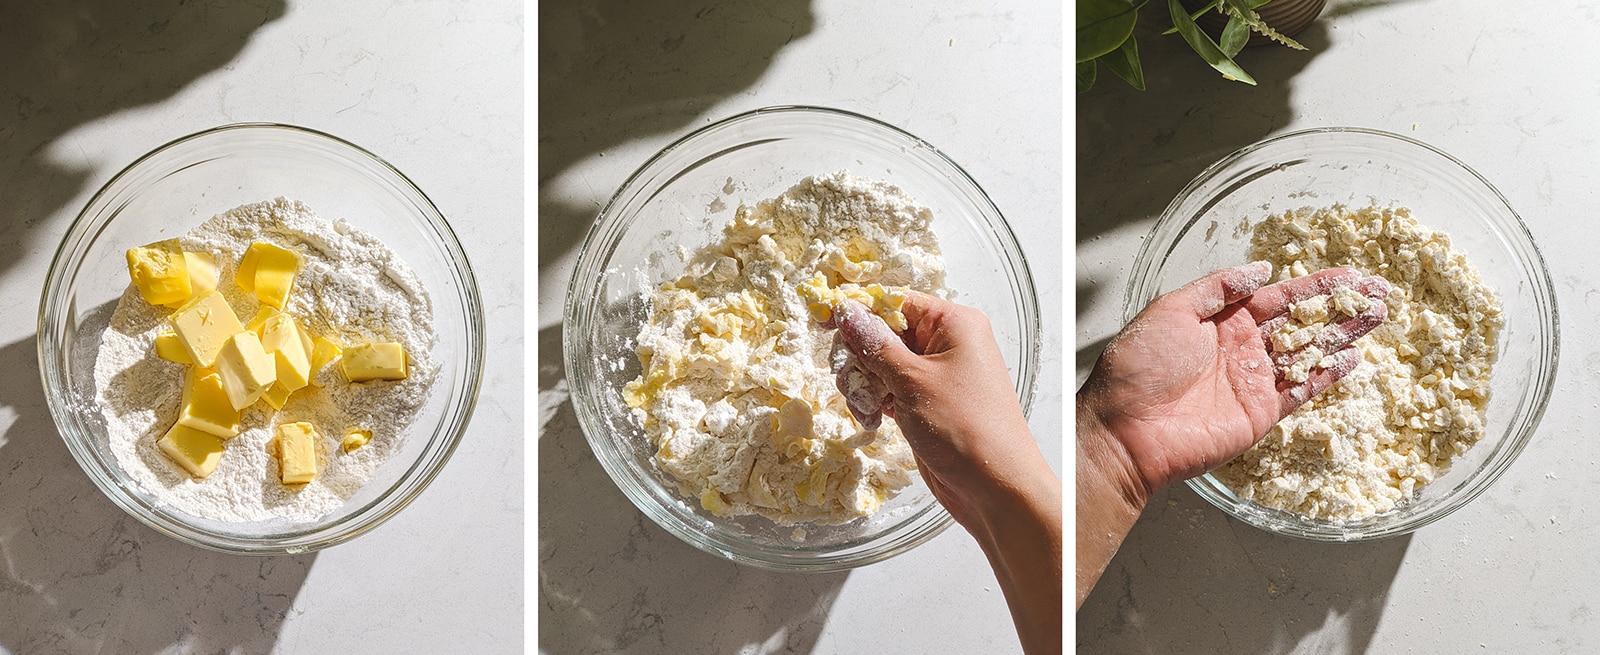
Make pea-sized butter pieces - In a medium bowl, stir together flour and salt. Add in the cold butter chunks and toss to coat in flour. Press the butter pieces between your fingers and your thumb until they break apart into smaller pieces. Repeat with all butter pieces, tossing to coat in flour occasionally. Work quickly to break butter pieces down until they are about pea-sized pieces.
Hydrate the dough - Make a well in the middle of the flour. Pour in ice cold water. Mix together to hydrate the flour until it forms a shaggy dough, making sure to incorporate any dry flour at the bottom of the bowl. If needed, add up to 20g more of water if it’s too dry (but you shouldn’t need to).
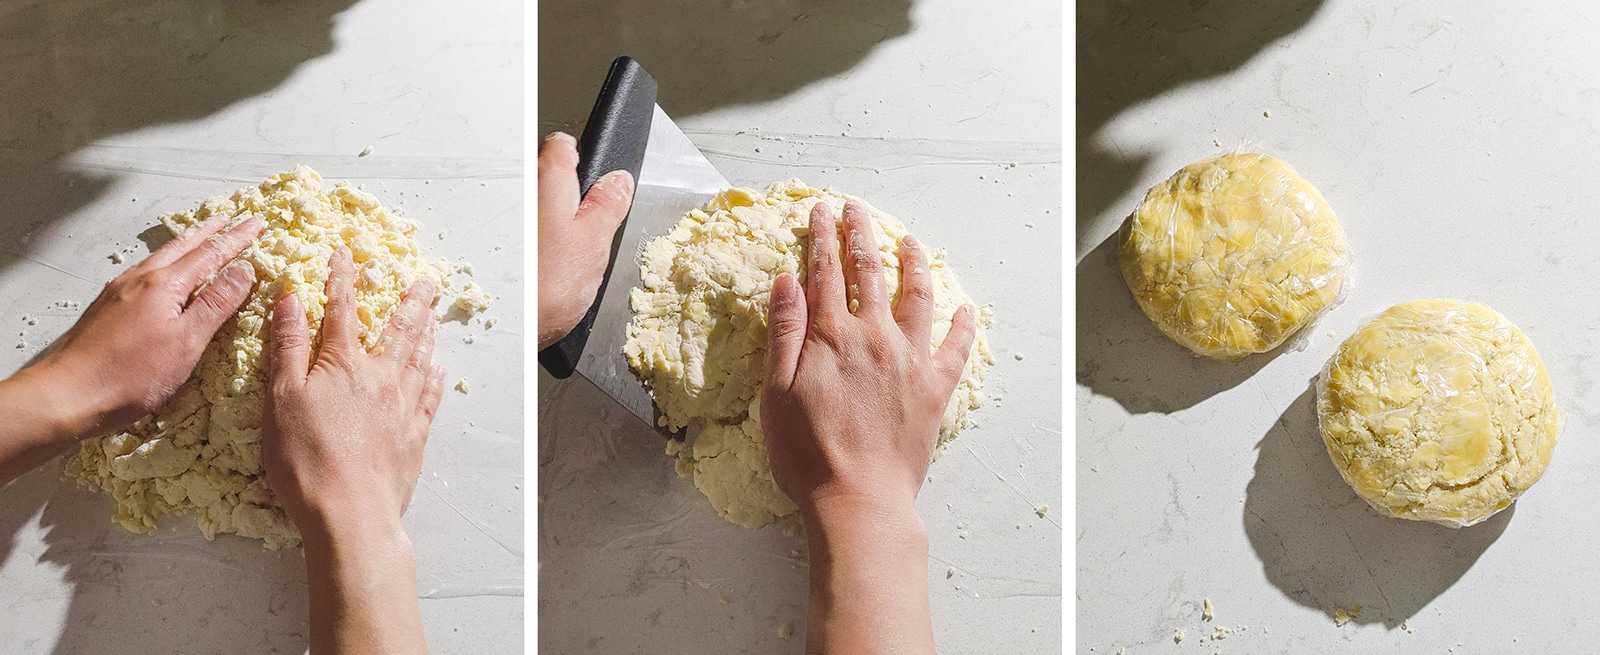
Fold the dough - Turn the dough out onto a sheet of plastic wrap. Press dough together with your hands. Use a bench scraper or your hand to fold the dough onto itself 2-3 times to create layers of butter.
Shape the dough - Use a bench scraper to divide the dough into 2 halves. Press and shape each half into a flattened disc shape. Wrap each disc of dough tightly with plastic wrap. Once wrapped, press down on the dough to compact it against the plastic wrap. Chill dough in the fridge for at least 4 hours or preferably overnight.
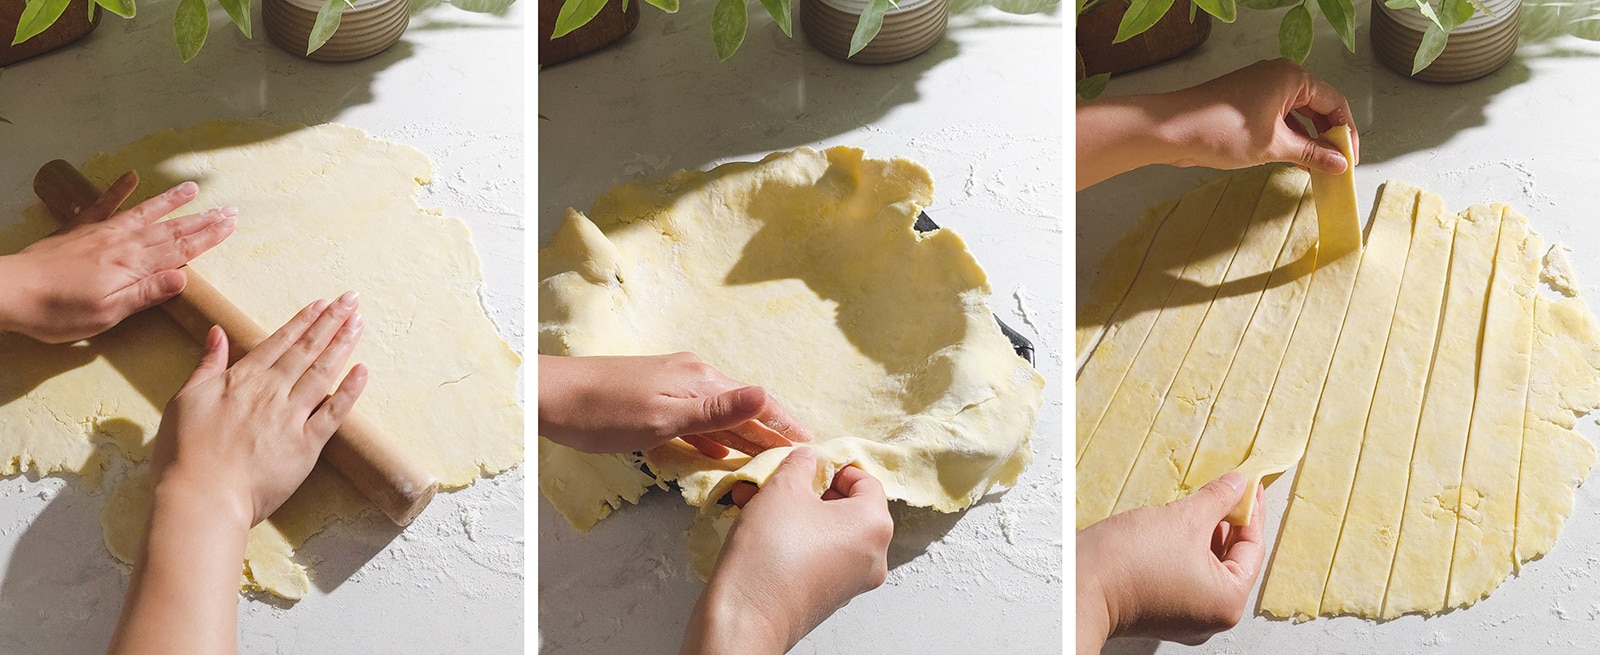
Roll out the bottom crust - On a floured surface, place down the first disc of dough. This will become the bottom crust. Firmly whack the dough with a rolling pin several times to soften it. Roll out the dough in a roughly round shape until about ⅛” thick.
Place dough into pie dish - Transfer the dough into your pie dish by rolling up the sheet of dough around your rolling pin and unrolling it over your die dish. Gently lift the edges of the dough and let it slump into the bottom edges of the dish. Trim any excess overhanging dough, keeping about a 1” overhang. Place the whole pie dish in the fridge while prepping the second disc of dough.
Roll out the top crust - Re-flour your surface and place down your second disc of dough. This will become the top lattice crust. Again, firmly whack the dough with a rolling pin several times to soften it. Roll out the dough in a roughly round shape until about ⅛” thick.
Cut dough strips - Use a long knife or pizza cutter to cut out 10 strips of dough, each about 1” wide. Transfer these strips to a cutting board or baking sheet lined with parchment paper. Chill in the fridge until you’re ready to use them.
Make the pie filling
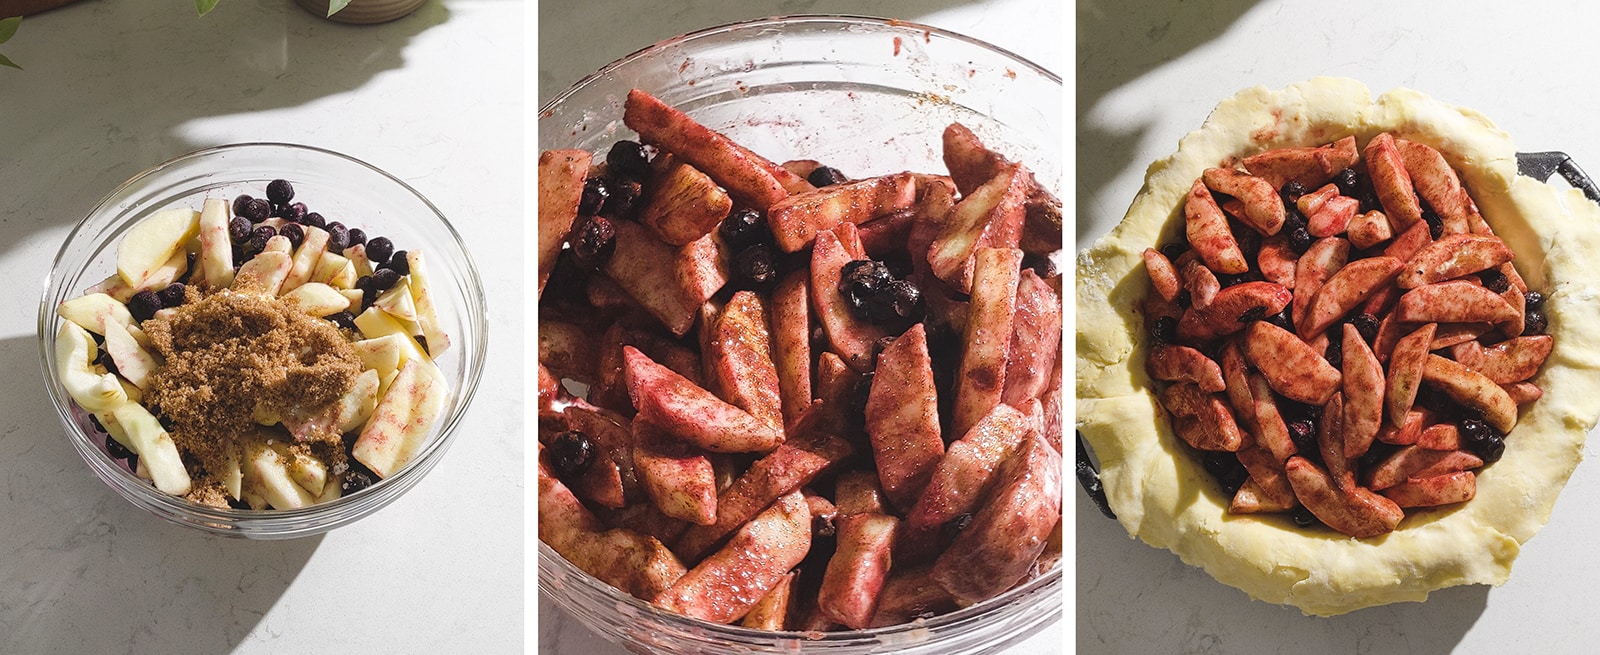
Mix pie filling - In a large mixing bowl, add in apple slices, blueberries, brown sugar, cornstarch, cinnamon, and vanilla extract. Fold together until the fruits are coated.
Fill pie with filling - Take your pie dish out of the fridge and pour all of the fruit mixture into the pie crust. There should be enough fruit fill the dish and dome up out of the dish significantly.
Make a pie crust lattice
Arrange dough strips - Take the dough strips out of the fridge and begin arranging the lattice on top of the pie. Place down two of the longest strips in the middle of the pie in an X shape. Place two more strips on either side of the strip that is on the bottom of the X.
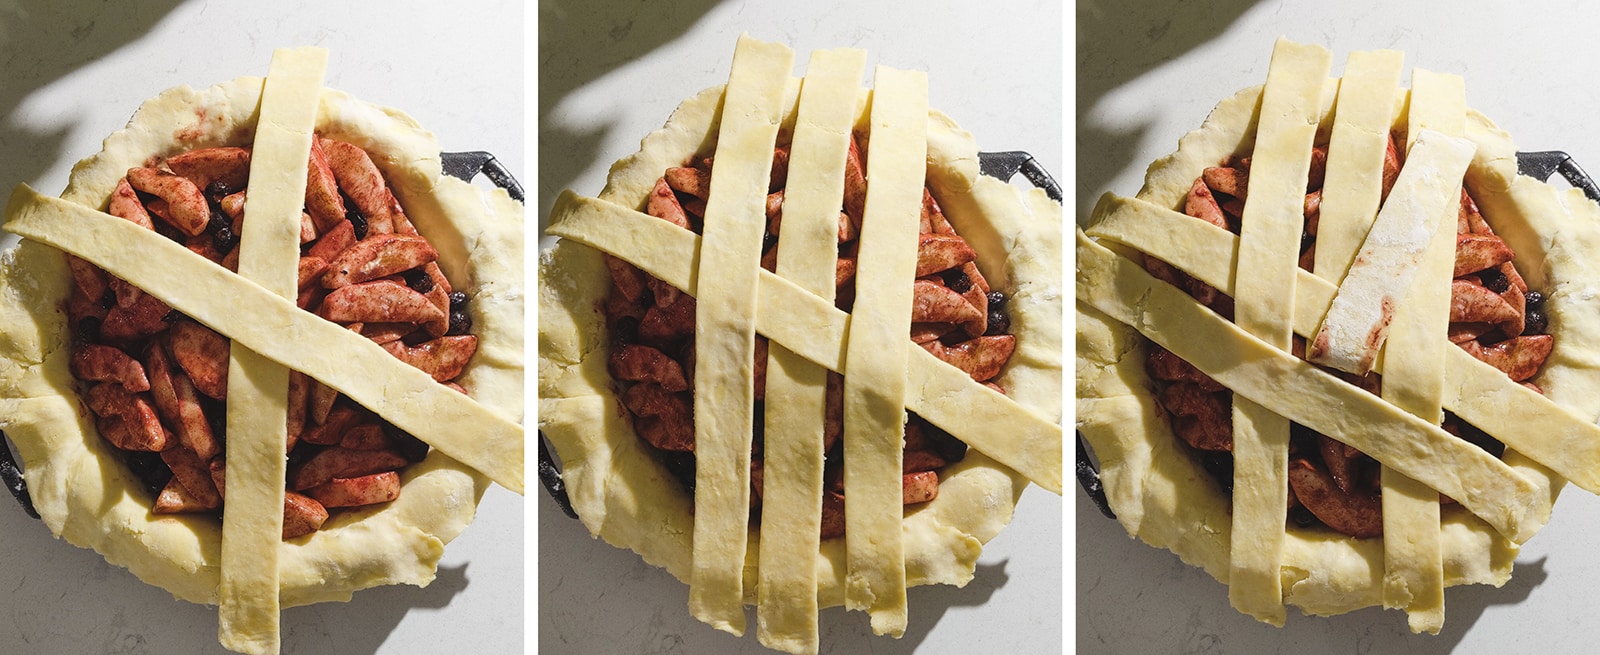
Alternate weaving dough strips - Lift up the strip that is on the bottom of the X, the “under” piece. Place a strip under the strip you lifted up but over the other two strips. Repeat lifting up all the “under” strips when placing a new strip, alternating with each new strip.
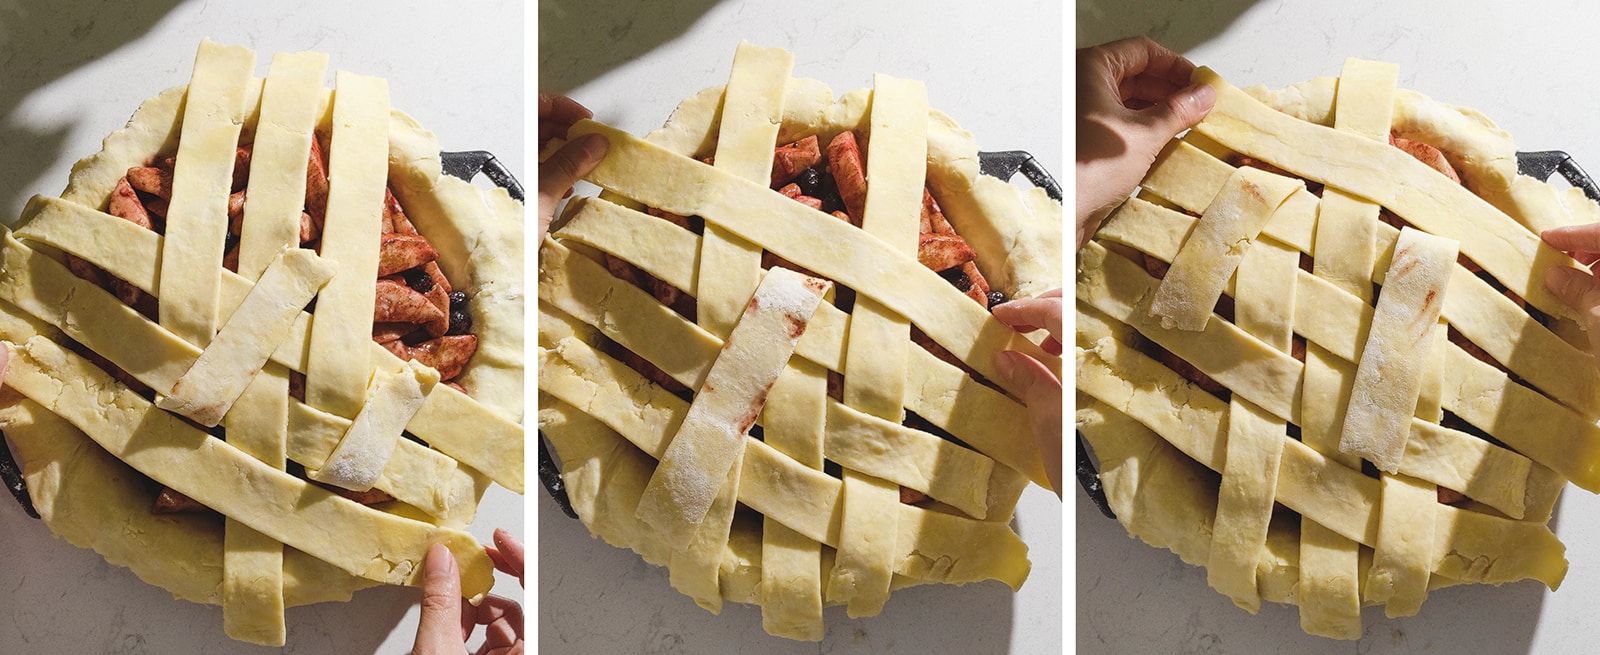
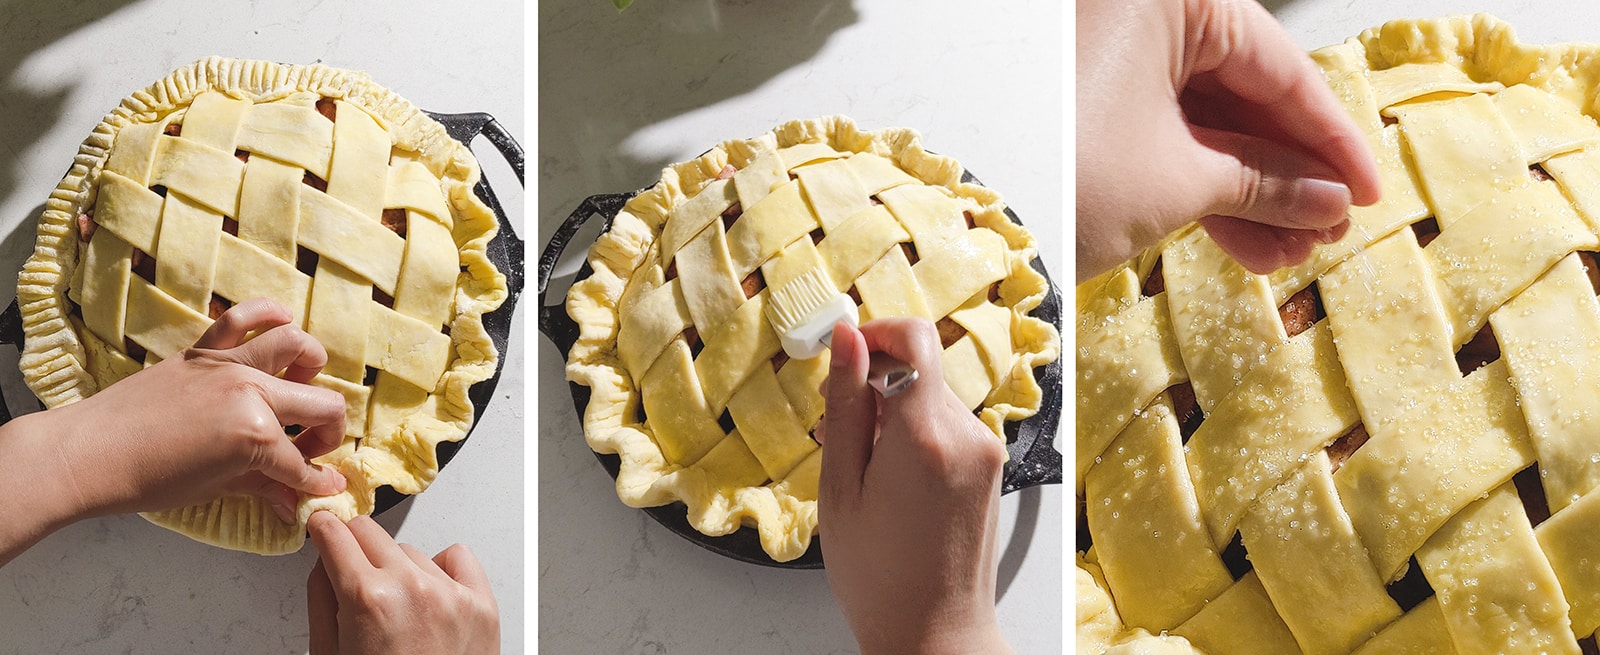
Trim the dough - Once the lattice is done, trim off any overhanging ends of the strips. Fold the overhang of the bottom crust inwards, sealing off the lattice ends. Press the crust with a fork to remove some bulk.

Crimp the crust - Press your index finger and thumb on one hand against the inside of the crust while pressing your index finger on the other hand against the outside of the crust to crimp the crust into a wavy pattern.
Prep - Preheat the oven to 425°F.
Apply egg wash - Use a pastry brush to apply a thin layer of egg wash over all of the pie pastry. Sprinkle generously with sugar crystals or coarse sugar. Chill the pie in the fridge while the oven finishes preheating. This allows the butter to solidify again before baking to retain the shape of the crimped crust and for a flaky crust.
Bake pie - Place an empty tray on the bottom rack to catch any juices that bubble over. Bake for 15 minutes. Lower the heat to 350°F and continue baking for 50-55 minutes or until the crust is golden brown and filling is bubbling.
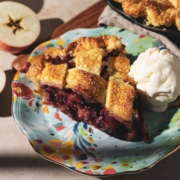
Cool pie to set the filling - Cool on a cooling rack for at least 1 hour or until you can touch the bottom of the pie dish with your bare hand as the filling needs time to set. Serve your blueberry apple pie warm with a big scoop of vanilla ice cream.
Storage
This blueberry apple pie is best served on the same day it’s baked for maximum crispiness. After the first day, the pastry won’t be as crispy but it still tastes good. Leftovers can be stored covered at room temperature for up to 2 days or in the fridge for up to 4 days. I like to turn a large mixing bowl upside down to cover the pie. Reheat in the oven before serving.
Freezing
Both an unbaked and baked pie can be frozen. There will be a difference in quality and texture the longer you freeze it. Freeze pies in metal or single-use tin pans but avoid freezing them in glass pie dishes as they can shatter.
Wrap the pie and pie dish well in plastic wrap and/or aluminium foil and freeze for up to 3 months. Thaw in the fridge overnight. Bake as instructed for an unbaked pie and for a shorter amount of time to reheat a baked pie.
Tip & tricks
- Lift and rotate the dough as you roll it out to avoid it sticking to the counter. Be sure to sprinkle more flour as you lift up the dough and flour any buttery spots that start to melt. Work quickly when rolling the dough. Once the dough is in the pie dish, you can chill it in the fridge again to firm up as it will have gotten warm during the rolling process.
- Chill the dough in the fridge any time it gets too warm. Don’t be shy to chill the dough at any time during the process if it gets too warm and soft or when you’re not actively working on it. It’s important to keep the butter cold and intact until baking so that they create flaky layers.
- Overfill the pie with fruit filling. The fruit filling bakes down significantly and loses about half its volume by the time the pie has cooled. You want to start with enough filling to dome out of the pie to account for the shrinkage.
- Chill the pie before baking. Chilling this blueberry apple pie again right before baking ensures even baking and helps the crimped crust hold its shape.
- Let the pie cool for several hours before serving. Pies need more time to cool than you probably think. You might want to dig in while it’s still hot but trust me, it will just fall apart into more of an apple crisp! It’s better to let a pie cool almost completely and then re-heat it before serving if you want to enjoy it warm.
Frequently asked questions
Be sure to include cornstarch in the filling to help absorb the juices released by the fruit. Cornstarch thickens the filling and prevents it from soaking into the crust.
Allow the pie to cool completely before cutting it. The filling needs to set and have enough structure to hold up the crust. Use a sharp serrated knife and a sawing motion to cut through the crust without pushing it down into the filling.
Pies should cool for a minimum of 1 hour but ideally for several hours. They need more time than you might think to completely cool and for the filling to set. The pie dish should be cool enough for you to touch with your bare hand. The cooler the pie is, the easier it will be to slice without the crust collapsing or filling spilling out.
Apple peels can become tough after being baked in comparison to the softened flesh of the apple. For best results, peel your apples before using them in a pie.
While apples will turn brown soon after they are peeled and cut, if you’re baking them in a pie, it doesn’t matter since they will be cooked down anyway! It’s totally fine to cut your apples ahead of time and keep them in the fridge to cut down on prep time.
An 8” or 9” pie will generally serve about 6 people.
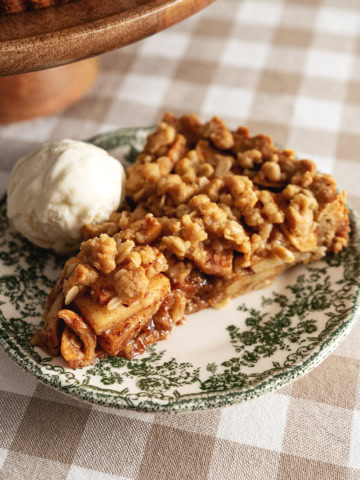
More pie recipes to try
Recipe
Blueberry Apple Pie
Ingredients
Pie Crust
- 340 g all-purpose flour
- ½ teaspoon salt
- 230 g unsalted butter, cold and cubed
- 140 g ice cold water
Pie Filling
- 4 small tart apples (about 700g), peeled, cored, and cut into ¼” slices
- 200 g blueberries, fresh or frozen
- 50 g brown sugar
- 3 tablespoons cornstarch
- 1 tablespoon ground cinnamon
- 2 teaspoons vanilla extract
- 1 egg, beaten
- 2 tablespoons sugar crystals or coarse sugar
Instructions
Pie Crust
- In a medium bowl, stir together flour and salt. Add in the cold butter chunks and toss to coat in flour.
- Press the butter pieces between your fingers and your thumb until they break apart into smaller pieces. Repeat with all butter pieces, tossing to coat in flour occasionally. Work quickly to break butter pieces down until they are about pea-sized pieces.
- Make a well in the middle of the flour. Pour in ice cold water. Mix together to hydrate the flour until it forms a shaggy dough, making sure to incorporate any dry flour at the bottom of the bowl. If needed, add up to 20g more of water if it’s too dry (but you shouldn’t need to).
- Turn the dough out onto a sheet of plastic wrap. Press dough together with your hands. Use a bench scraper or your hand to fold the dough onto itself 2-3 times to create layers of butter.
- Use a bench scraper to divide the dough into 2 halves. Press and shape each half into a flattened disc shape. Wrap each disc of dough tightly with plastic wrap. Once wrapped, press down on the dough to compact it against the plastic wrap. Chill dough in the fridge for at least 4 hours or preferably overnight.
- On a floured surface, place down the first disc of dough. This will become the bottom crust. Firmly whack the dough with a rolling pin several times to soften it. Roll out the dough in a roughly round shape until about ⅛” thick.
- Transfer the dough into your pie dish by rolling up the sheet of dough around your rolling pin and unrolling it over your die dish. Gently lift the edges of the dough and let it slump into the bottom edges of the dish. Trim any excess overhanging dough, keeping about a 1” overhang. Place the whole pie dish in the fridge while prepping the second disc of dough.
- Re-flour your surface and place down your second disc of dough. This will become the top lattice crust. Again, firmly whack the dough with a rolling pin several times to soften it. Roll out the dough in a roughly round shape until about ⅛” thick.
- Use a long knife or pizza cutter to cut out 10 strips of dough, each about 1” wide. Transfer these strips to a cutting board or baking sheet lined with parchment paper. Chill in the fridge until you’re ready to use them.
Pie Filling
- In a large mixing bowl, add in apple slices, blueberries, brown sugar, cornstarch, cinnamon, and vanilla extract. Fold together until the fruits are coated.
- Take your pie dish out of the fridge and pour all of the fruit mixture into the pie crust. There should be enough fruit fill the dish and dome up out of the dish significantly.
- Take the dough strips out of the fridge and begin arranging the lattice on top of the pie. Place down two of the longest strips in the middle of the pie in an X shape. Place two more strips on either side of the strip that is on the bottom of the X.
- Lift up the strip that is on the bottom of the X, the “under” piece. Place a strip under the strip you lifted up but over the other two strips. Repeat lifting up all the “under” strips when placing a new strip, alternating with each new strip. See photos in the post - it’s easier to understand this by seeing it rather than reading it.
- Once the lattice is done, trim off any overhanging ends of the strips. Fold the overhang of the bottom crust inwards, sealing off the lattice ends. Press the crust with a fork to remove some bulk.
- Press your index finger and thumb on one hand against the inside of the crust while pressing your index finger on the other hand against the outside of the crust to crimp the crust into a wavy pattern.
- Preheat the oven to 425°F.
- Use a pastry brush to apply a thin layer of egg wash over all of the pie pastry. Sprinkle generously with sugar crystals or coarse sugar. Chill the pie in the fridge while the oven finishes preheating. This allows the butter to solidify again before baking to retain the shape of the crimped crust and for a flaky crust.
- Place an empty tray on the bottom rack to catch any juices that bubble over. Bake for 15 minutes. Lower the heat to 350°F and continue baking for 50-55 minutes or until the crust is golden brown and filling is bubbling.
- Cool on a cooling rack for at least 1 hour or until you can touch the bottom of the pie dish with your bare hand as the filling needs time to set.


Leave a comment or review