


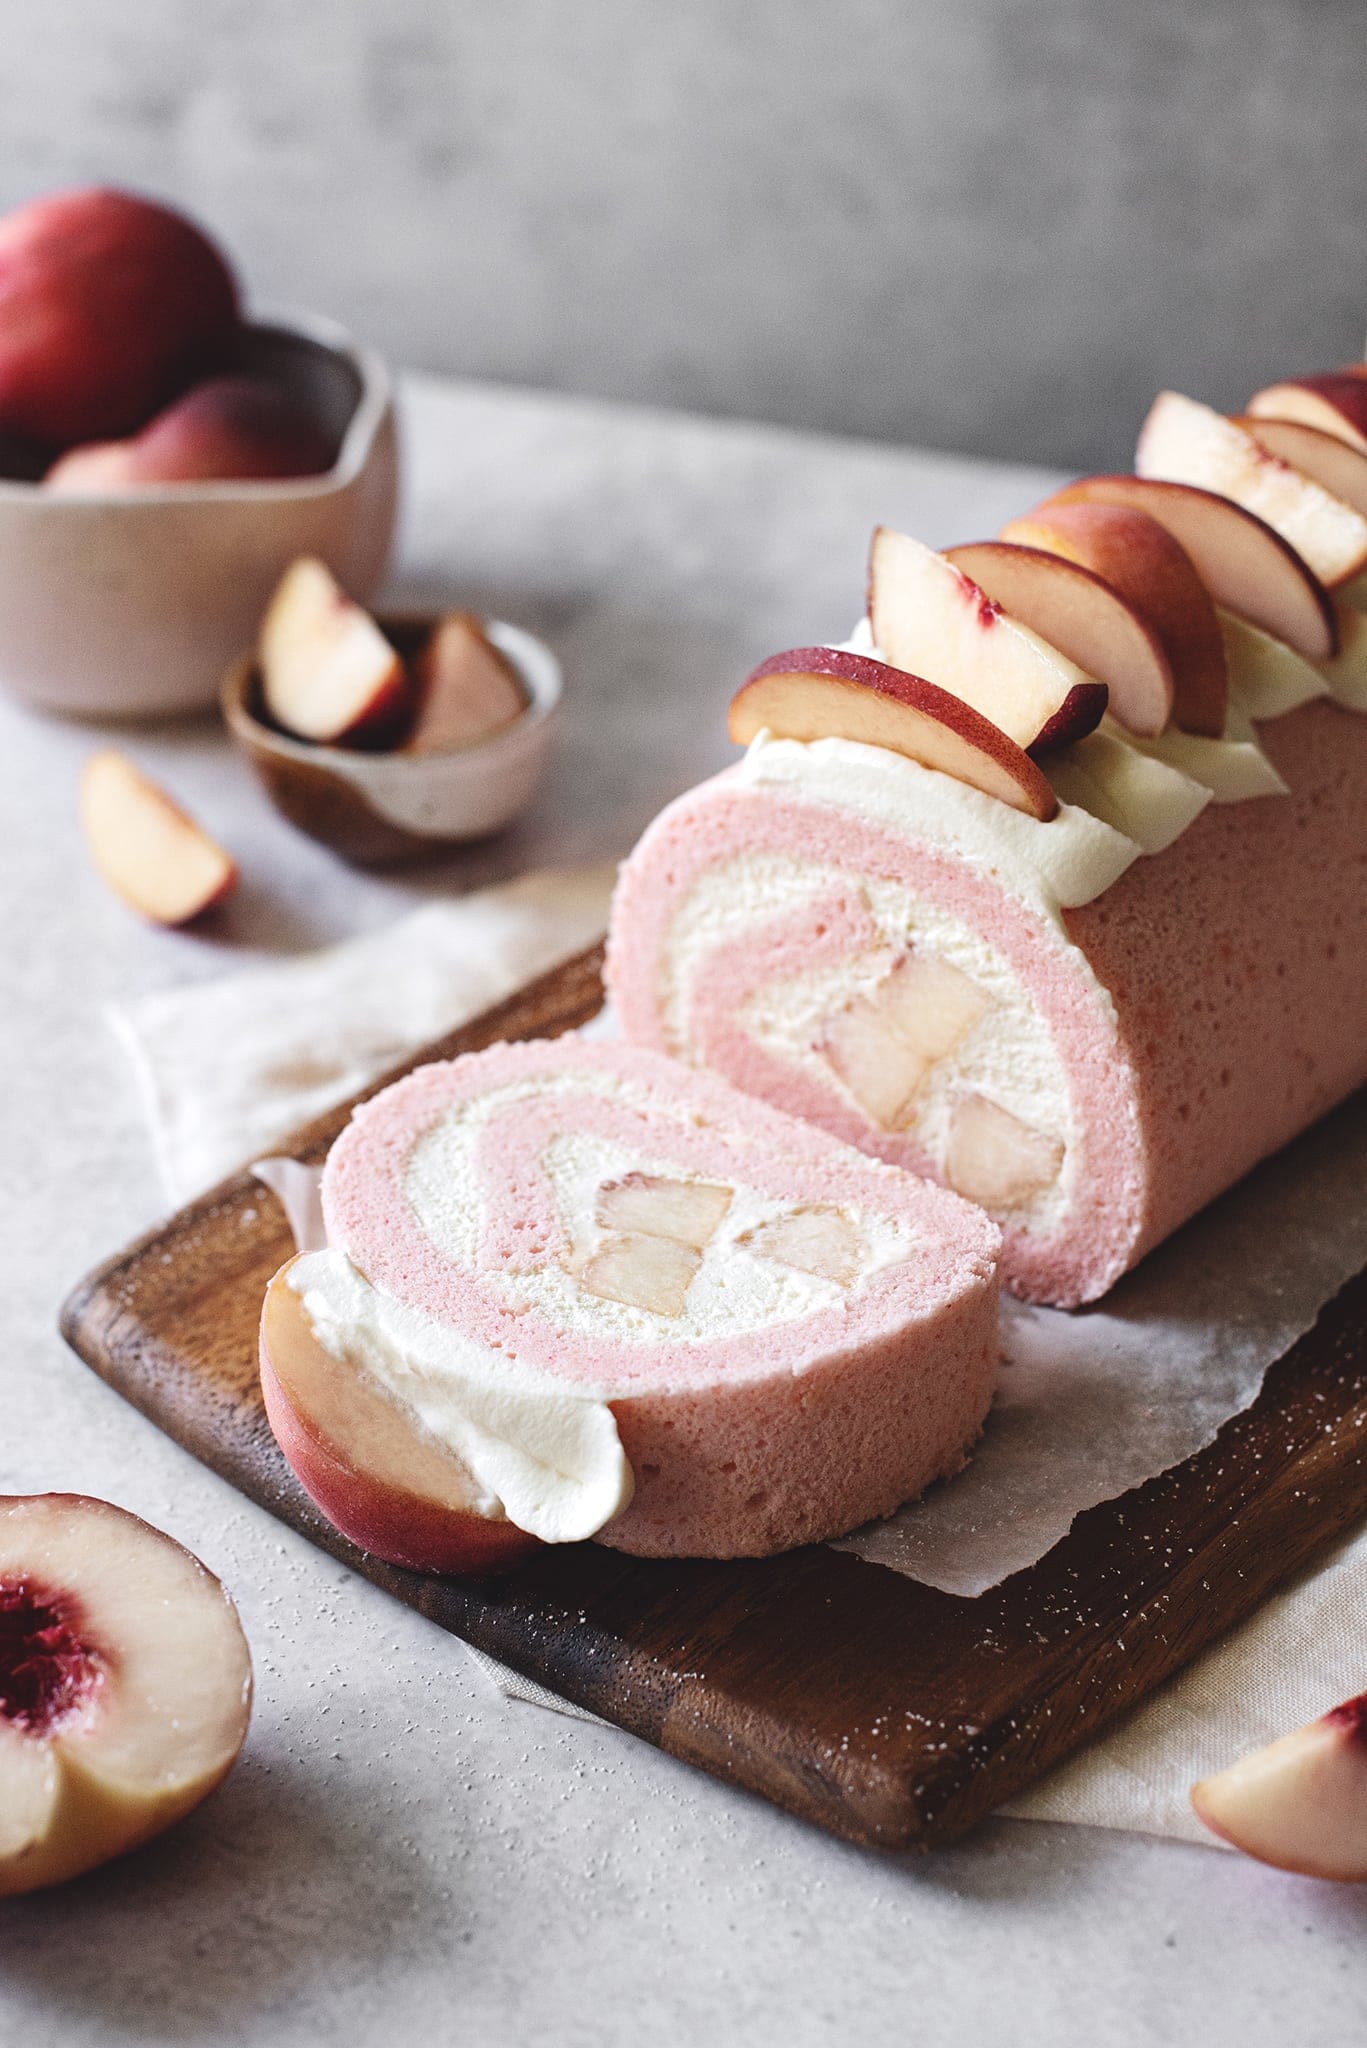
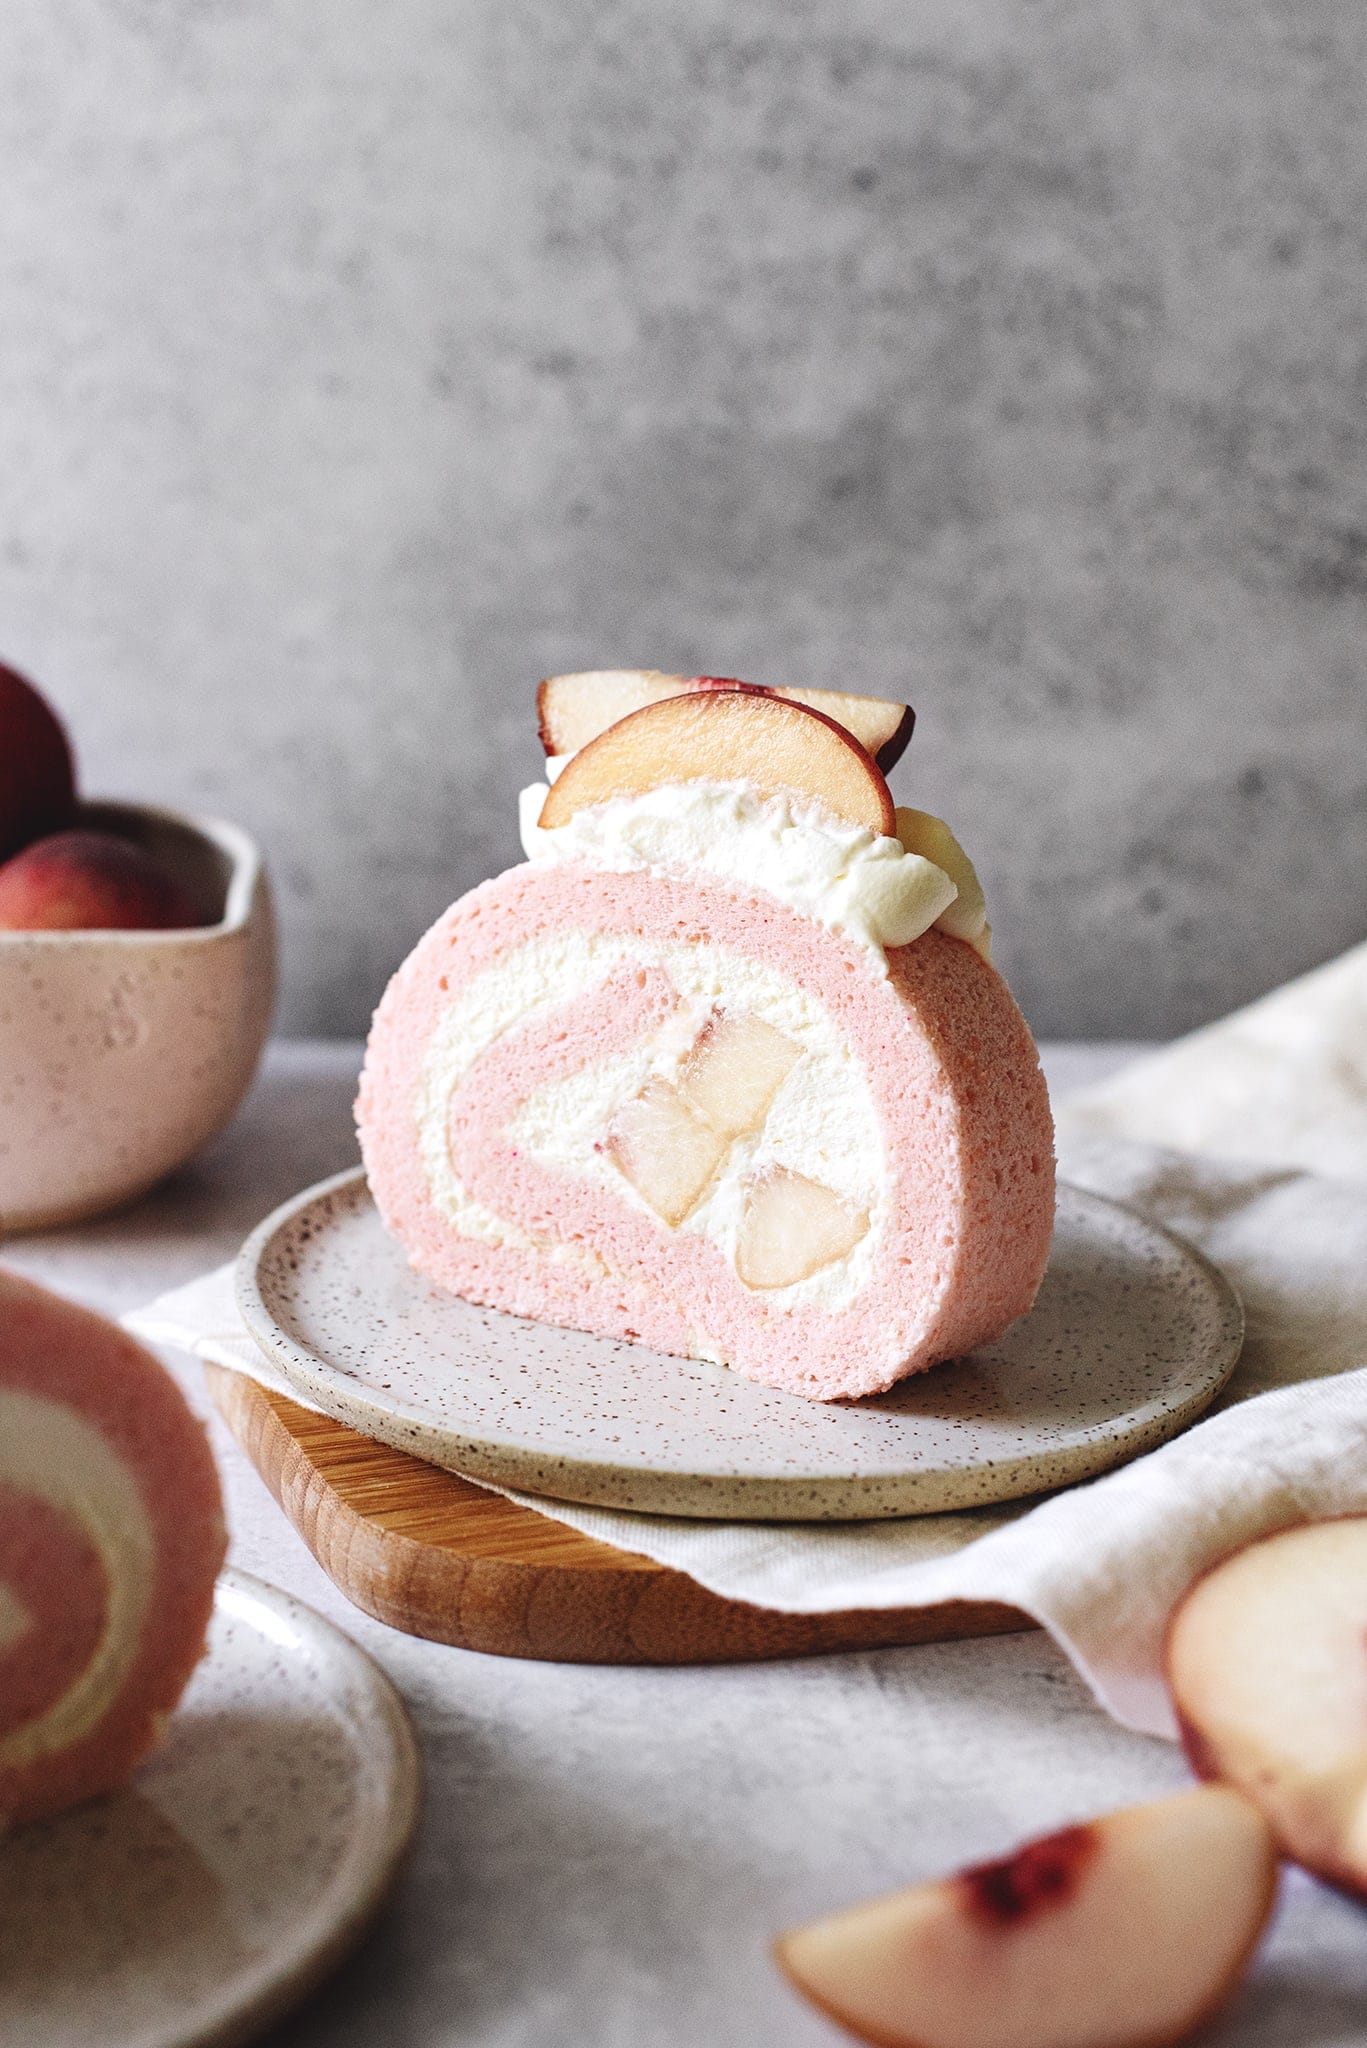
This white peach swiss roll cake is made with a soft and fluffy sponge cake, whipped cream, and fresh white peaches. It’s a light and airy cake that's as cute as it is delicious.
I fell in love with this idea of a white peach swiss roll with the light and mildly sweet flavour of white peaches. It’s all wrapped up in this pretty, peachy-pink roll cake. This swiss roll was inspired by cakes you would find in a Japanese or Korean bakery. The majority of the sweetness comes from the peaches. The combination of fluffy sponge cake and fresh whipped cream makes this cake feel light as air. It’s not heavy at all - which is what I love about typical cakes from Asian bakeries.
How to make a white peach swiss roll
For the cake
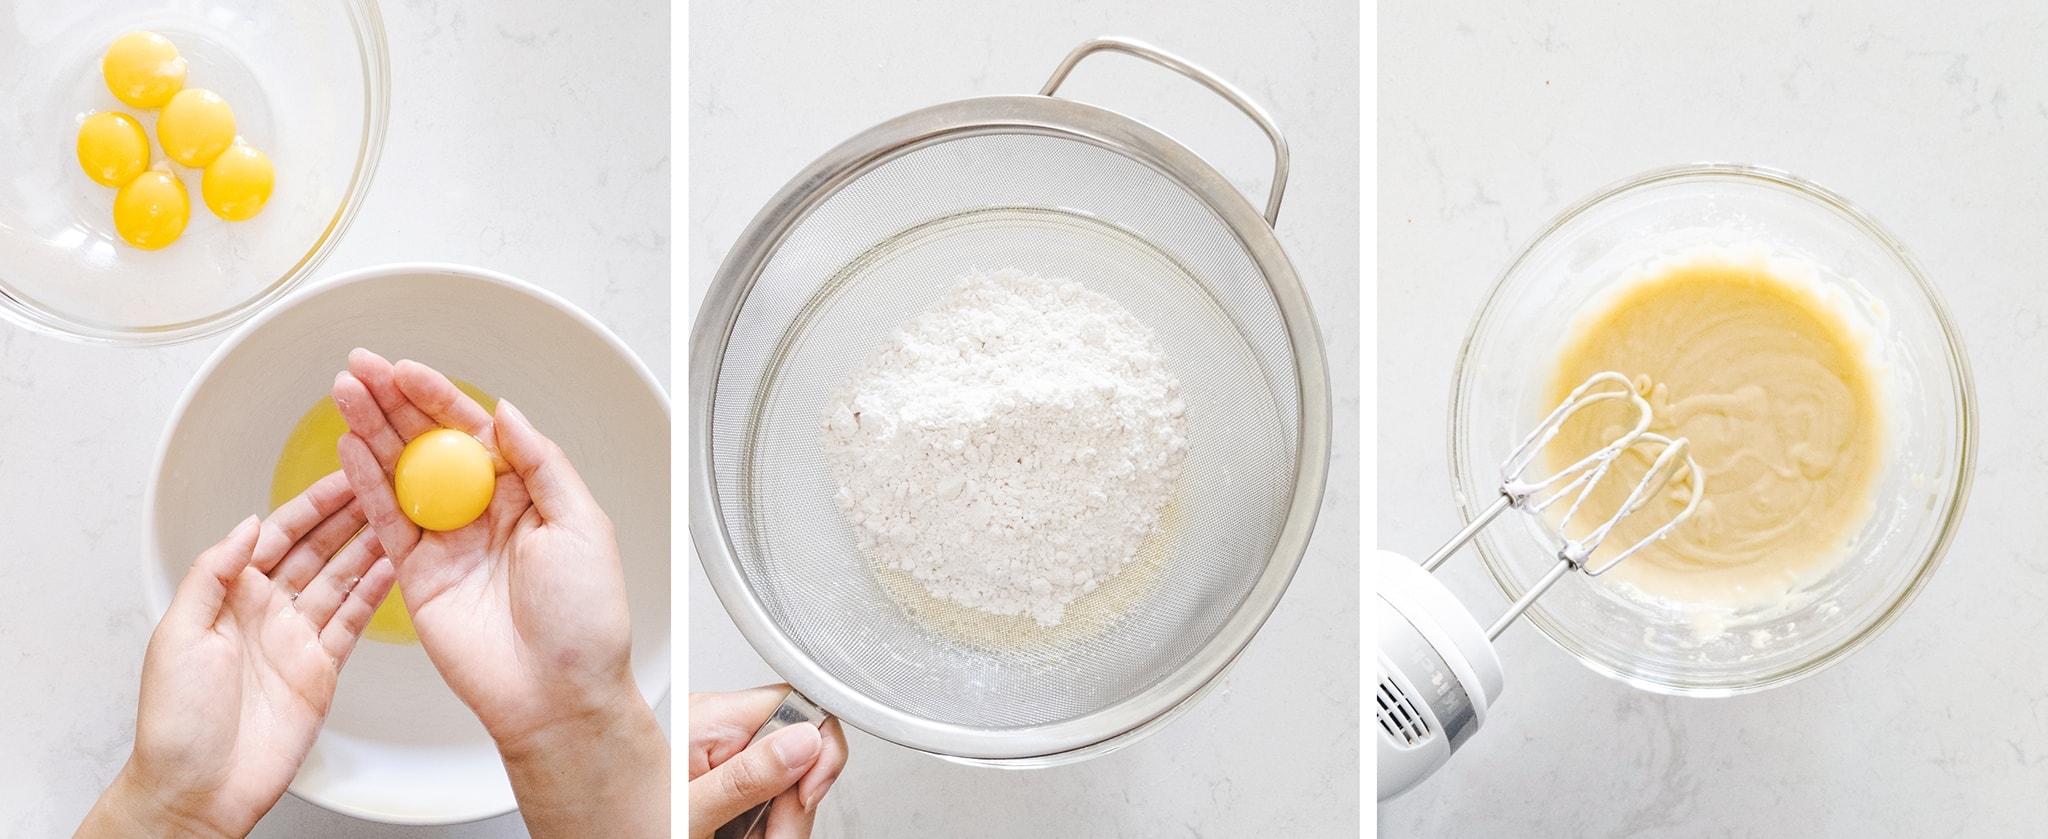
Prep - Preheat your oven to 375°F and line an 11x17" rectangular baking tray with parchment paper cut to fit. Set aside. Separate out your egg whites from the egg yolks into two large mixing bowls. Set the yolks aside.
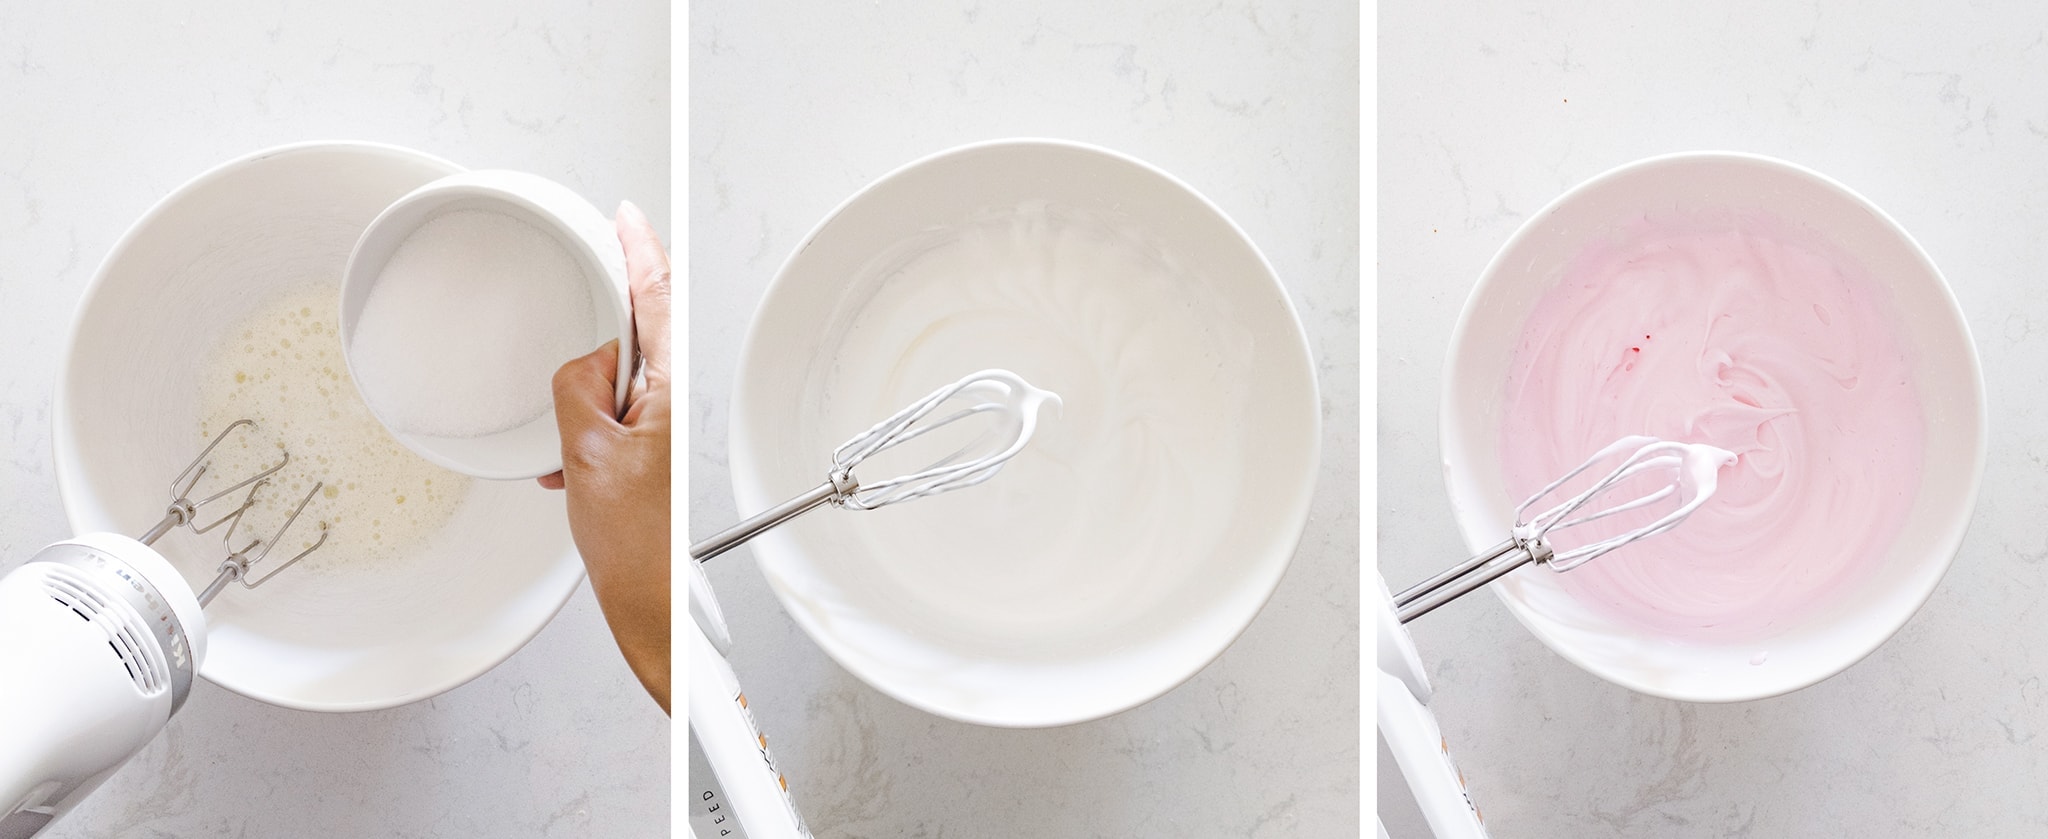
Whip meringue - With an electric mixer with a whisk attachment, beat the egg whites on medium speed until they become foamy. Add in the cream of tartar and slowly add in 100g of the granulated sugar, beating in between additions.
When the meringue is at the soft peaks stage, add in the pink gel food colouring. It should be opaque white and thick but gooey when you lift the whisk out of it. Continue beating until it reaches stiff peaks. When the mixer is lifted out of it, the meringue should form a pointy tip that stands up by itself. Set aside.
Mix egg yolk mixture - To the egg yolks, add the remaining 50g granulated sugar, milk, oil, and vanilla extract and mix with the same mixer to combine. Sift in the cake flour and mix on low speed until just combined and smooth.
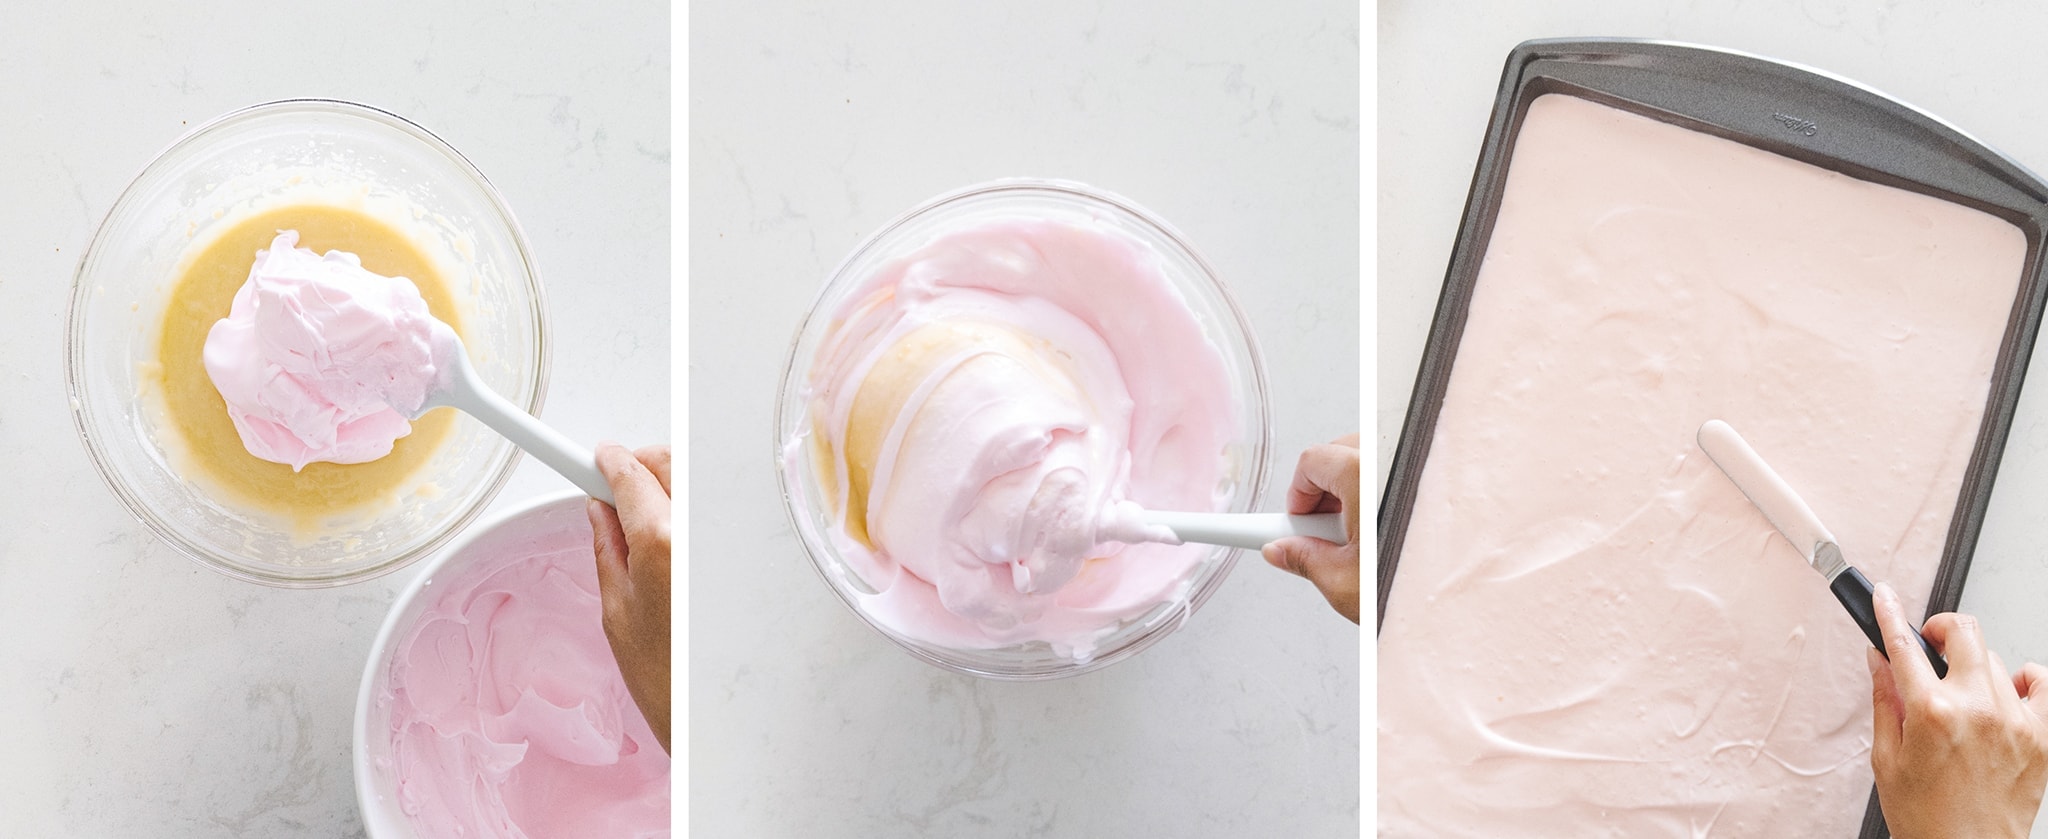
Fold airy batter - Add all of the meringue to the egg yolk mixture and use a spatula to gently fold together in an upward motion. Fold well until you no longer see streaks of egg yolk mixture. Don't overmix to prevent deflating too much air from the batter.
Spread batter - Pour the batter into the baking tray. Use an offset spatula to spread into an even layer into the corners and edges of the tray.
Bake - Bake cake for about 12-13 minutes or until a toothpick inserted in the middle comes out almost clean. The cake should puff up significantly during baking but deflates into a flat sheet once removed from the oven. Let cool in the tray for 5-10 minutes until warm enough to handle.
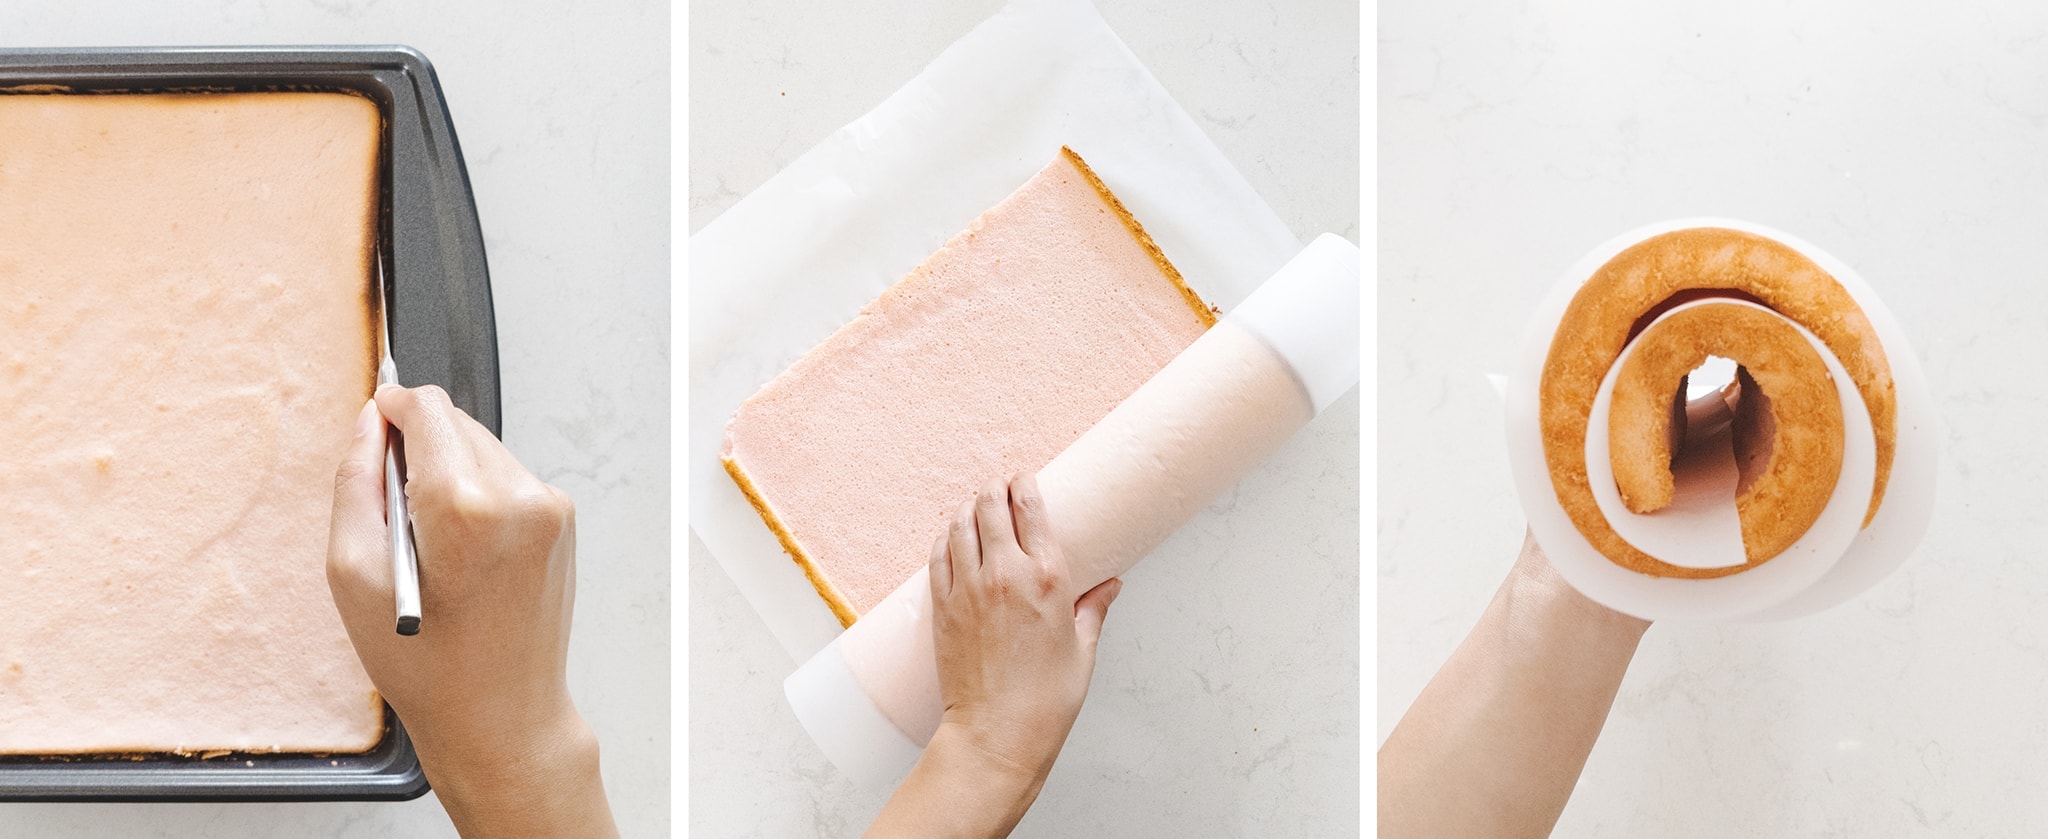
Release cake - Run a knife along the edges of the tray to release the cake from the sides. Place a new sheet of parchment paper on top of the cake. Grasp both sides of the baking tray and parchment paper together and flip the tray over in one motion to release the cake onto the parchment paper. Peel off the bottom (now top) piece of parchment paper.
Roll while warm - Cut off thin strips of browned edges of the cake on the two shortest sides. Loosely roll the cake (with the parchment paper) and let it cool completely while resting in this log shape.
For the filling
Make whipped cream - In a large mixing bowl, add whipping cream, powdered sugar, and vanilla extract. Use an electric mixer with a whisk attachment to whip together until it becomes stiff peaks.
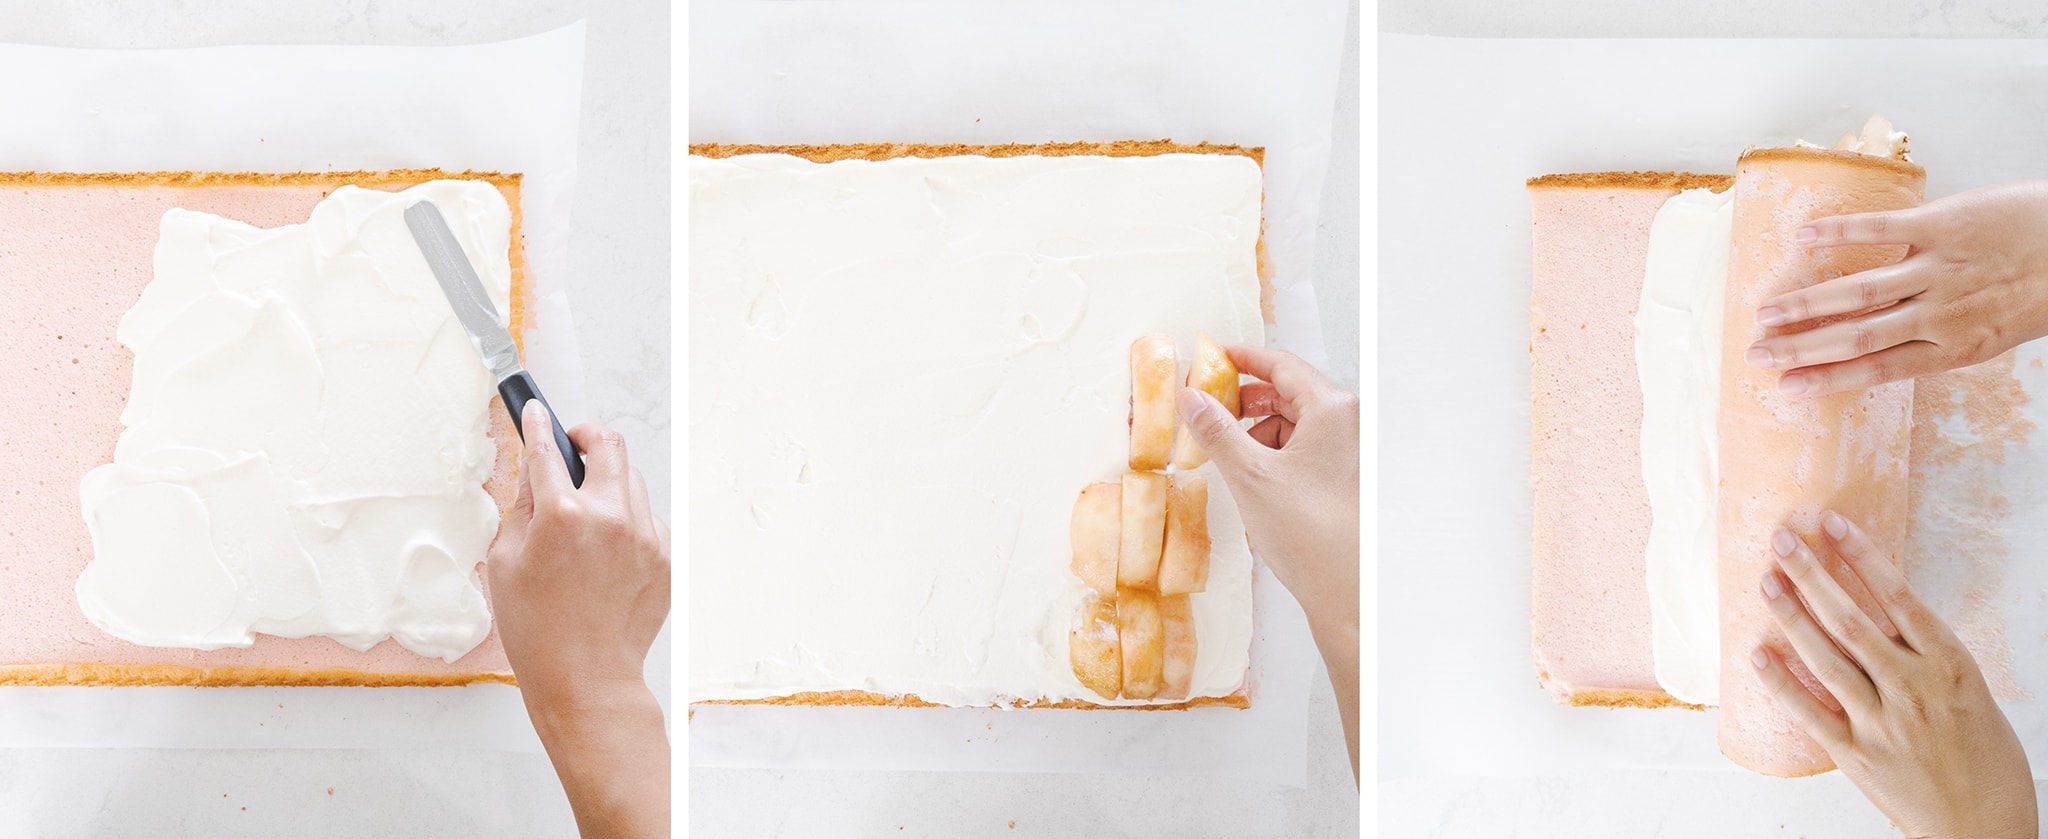
Assemble swiss roll - Gently unroll your cooled cake so that it's laying flat and transfer onto a new, clean sheet of parchment paper (optional). Spread a thick layer of whipped cream across the cake, leaving a 2" empty gap at one of the short ends. This will be the end of the roll cake.
Arrange peeled white peach slices in 2-3 rows about 1" from the other short end of the cake. Roll the cake up starting from the peach end to the empty end. If a lot of whipped cream has been pushed forwards and out of the roll at the end, wipe away some of the excess before "sealing" the roll. Let the roll cake rest with the last edge on the bottom of the roll.
Chill overnight: Any browned "skin" on the outside surface of the cake that wasn't peeled off with the parchment paper can just be gently rubbed off. Wrap the swiss roll up in the parchment paper and plastic wrap and let chill in the fridge for at least 4 hours or overnight for the cream to stiffen up.
Decorate: After chilling, slice off the two messy ends of the swiss roll cake to reveal a (hopefully) beautiful swirl! Pipe the remaining whipped cream on the top of the roll cake and arrange your remaining peach slices on top.
Variations and substitutions on this white peach swiss roll cake
Since this swiss roll doesn't actually have any flavourings in the cake or whipped cream itself, it makes a great base recipe to use for many different kinds of swiss rolls.
- Fruit substitutions - Replace the white peaches in this recipe for most seasonal fruits that aren't too watery. Strawberries, nectarines, plums, raspberries, figs, and mangoes work well in swiss rolls.
- Gel food colouring - Replace the pink gel food colouring with any other colour you like. Keep in mind the colour will be mixed with the yellow tone of the egg yolk mixture. The final colour of the cake will have yellow and/or brown tone, especially after baking. This works well in this peach roll cake since the hot pink food gel mixed with the yellow batter to create the perfect peachy pink colour. Also remember to always use a gel colouring only. Any addition of liquid colouring will ruin the meringue.
- Decorating your swiss roll - You can get creative and decorate your roll cake in any way you want. You can even leave it bare. Try changing the piping tip you use to pipe whipped cream on the top of the roll for different designs. Try decorating the top of the roll with different fruits, chocolate, meringues, biscuits, or macarons for a beautiful bakery-style look.
Frequently asked questions
This swiss roll should be stored wrapped or in an airtight container in the fridge for up to 5 days.
Yes, you can freeze leftover roll cake slices by wrapping them well in plastic wrap and freezing for up to 1 month. Thaw the cake in the fridge overnight before eating.
You can make the sponge cake 1-2 days in advance and keep it stored well-wrapped in the fridge before assembling with the filling. The whipped cream should be made fresh on the day you assemble the cake. The entire roll cake needs to be chilled for 4-6 hours or preferably overnight so it should be made 1 day ahead anyways.
When the sponge cake batter is done right, the cake should be soft, fluffy, and elastic enough to never rip when rolling. Be sure the batter is airy and fluffy and don't deflate too much air from it when mixing. Pre-rolling the cake while it's still warm helps the cake u0022rememberu0022 the rolled shape once it has cooled.
Your whipped cream should be whipped to stiff peaks so that it isn't too liquidy. When you move the mixing bowl around, the whipped cream should be quite stiff and shouldn't slide around the bowl too much. Chilling your swiss roll in the fridge after assembling is also a must to allow the whipped cream to stiffen up and absorb into the cake. Don't skip this chilling time. Keep the swiss roll tightly wrapped in parchment paper and plastic wrap while it's chilling and you can also occasionally push the sides of the roll together to form it into a rounder shape.
Other swiss roll cake recipes to try
Recipe

White Peach Swiss Roll
Ingredients
Cake
- 6 large egg whites
- 100 g + 50g granulated sugar, divided
- ¼ teaspoon cream of tartar
- 6 large egg yolks
- 50 g milk
- 50 g flavourless oil
- 1 teaspoon vanilla extract
- 120 g cake flour
- pink gel food colouring
Filling
- 500 g whipping cream
- 5 tablespoons powdered sugar
- 1 teaspoon vanilla extract
- 4 white peaches, 2 peeled & sliced into wedges for inside of cake, 2 sliced in any way for garnish on top
Instructions
Cake
- Preheat your oven to 375°F and line an 11x17" rectangular baking tray with parchment paper cut to fit. Set aside.
- Separate out your egg whites from the egg yolks into two large mixing bowls. Set the yolks aside.
- With an electric mixer with a whisk attachment, beat the egg whites on medium speed until they become foamy. Add in the cream of tartar and slowly add in 100g of the granulated sugar, beating in between additions. When the meringue is at the soft peaks stage (opaque white and thick but gooey when you lift the whisk out of it), add in the pink gel food colouring. Continue beating until it reaches stiff peaks (when the mixer is lifted out of it, the meringue should form a pointy tip that stands up by itself). Set aside.
- To the egg yolks, add the remaining 50g granulated sugar, milk, oil, and vanilla extract and mix with the same mixer to combine. Sift in the cake flour and mix on low speed until just combined and smooth.
- Add all of the meringue to the egg yolk mixture and use a spatula to gently fold together in an upward motion. Fold well until you no longer see streaks of egg yolk mixture but don't overmix to prevent deflating too much air from the batter.
- Pour the batter into the baking tray and use an offset spatula to spread into an even layer into the corners and edges of the tray.
- Bake cake for about 12-13 minutes or until a toothpick inserted in the middle comes out almost clean. The cake should puff up significantly during baking but deflates into a flat sheet once removed from the oven. Let cool in the tray for 5-10 minutes until warm enough to handle.
- Run a knife along the edges of the tray to release the cake from the sides. Place a new sheet of parchment paper on top of the cake. Grasp both sides of the baking tray and parchment paper together and flip the tray over in one motion to release the cake onto the parchment paper. Peel off the bottom (now top) piece of parchment paper.
- Cut off thin strips of browned edges of the cake on the two shortest sides. Loosely roll the cake (with the parchment paper) and let it cool completely while resting in this log shape.
Filling
- In a large mixing bowl, add whipping cream, powdered sugar, and vanilla extract. Use an electric mixer with a whisk attachment to whip together until it becomes stiff peaks.
- Gently unroll your cooled cake so that it's laying flat and transfer onto a new, clean sheet of parchment paper (optional). Spread a thick layer of whipped cream across the cake, leaving a 2" empty gap at one of the short ends. This will be the end of the roll cake.
- Arrange peeled white peach slices in 2-3 rows about 1" from the other short end of the cake. Roll the cake up starting from the peach end to the empty end. If a lot of whipped cream has been pushed forwards and out of the roll at the end, wipe away some of the excess before "sealing" the roll. Let the roll cake rest with the last edge on the bottom of the roll.
- Any browned "skin" on the outside surface of the cake that wasn't peeled off with the parchment paper can just be gently rubbed off. Wrap the swiss roll up in the parchment paper and plastic wrap and let chill in the fridge for at least 4 hours or overnight for the cream to stiffen up.
- After chilling, slice off the two messy ends of the swiss roll cake to reveal a (hopefully) beautiful swirl! Pipe the remaining whipped cream on the top of the roll cake and arrange your remaining peach slices on top.

Anonymous says
Can I make Swiss roll without eggs ? If so what would I use and what’s the measurement ?
Gail Ng says
I've never made one without eggs so I can't help with this! You would need an entirely different recipe. I would recommend searching for a vegan chiffon cake or vegan swiss roll recipe instead.
Camila says
Obsessed with this one. Me and my mom like to put rose jam sometimes instead of fruits. It amazing!
Elana says
Why have I always been scared of chiffon and roll cakes?? This was so easy and SO delicious, and the instructions were so clear. I'm already planning my next chiffon adventures!
Ess Kay says
Hello. What size is your " rectangular baking tray"?
Thx!
Gail Ng says
Sorry for not specifying! It's 11x17".