


These mini lemon meringue tarts are made with a shortcrust (pâté sucrée) tart shell, sweet and tangy lemon filling, and topped with toasted Swiss meringue. They look like a slice of sunshine and are perfect for lemon season or as a Spring or Summer dessert.
Something about mini tarts is so precious. Mini tarts take a little bit longer to make - they are smaller but you're repeating the same steps several times - but once you get in the flow of making them, their cuteness is worth it. Mini 4" tarts are the perfect personal size or for sharing with someone else.
These mini lemon meringue tartlets always make me think of beautiful bakery displays with many little pastries. Cue me pressing my face up to the glass before deciding on my own personal-sized lemon tart. Now you can have that bakery feeling at home!

How these mini lemon meringue tarts are different from lemon meringue pie
Lemon meringue pie is generally made in a pie dish instead of a fluted tart pan. The pie crust is usually blind-baked (baked halfway without any filling) and then filled with lemon filling and topped with French meringue (the egg whites are not heated while making the meringue since it's going to be baked) before baking again to set the filling and toast the meringue in the oven.
In this mini lemon meringue tart recipe, I've opted to fully bake the tart shells and fill them with a no-bake lemon curd filling. The tarts are then topped with Swiss meringue (the egg whites are heated during the process so that they are safe to eat) and toasted with a kitchen blowtorch instead of in the oven.
I love the way these tarts look this way and breaking down all three components makes them a bit easier for me to handle especially if you make each component on separate days before assembling them together.
How to make mini lemon meringue tarts
These lemon meringue tarts have 3 separate components: the tart shell, lemon filling, and meringue.
For the shortcrust tart shell
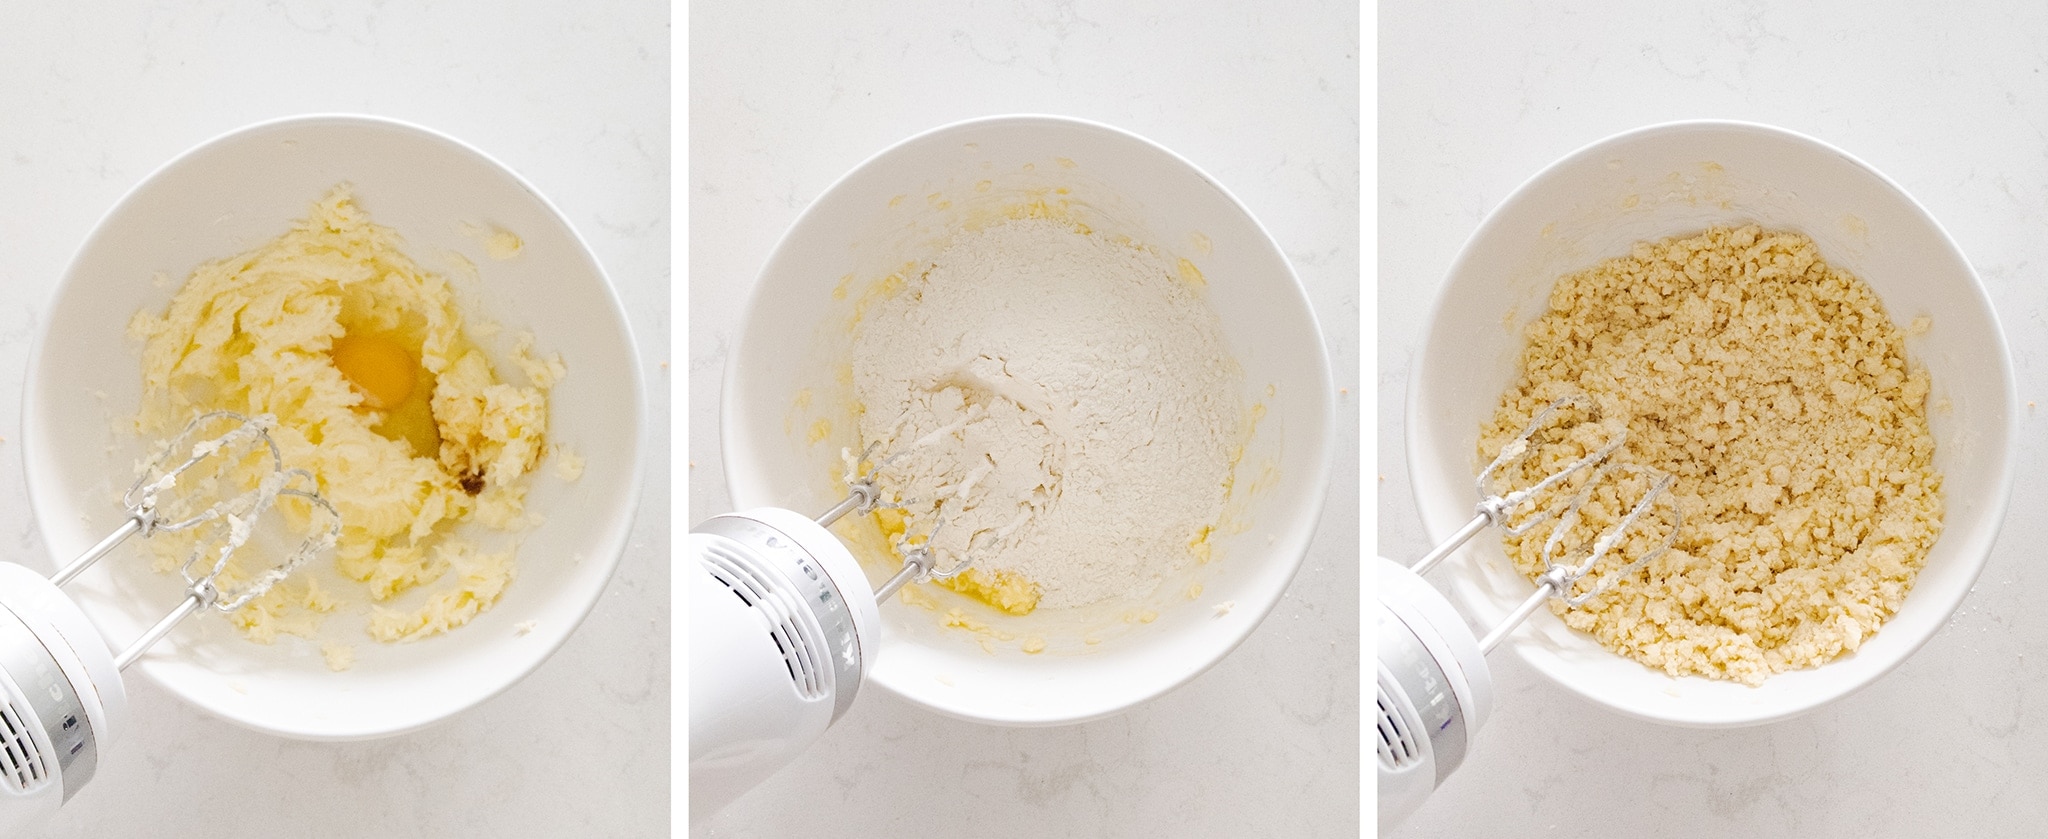
In a mixing bowl, use an electric mixer to beat softened butter until creamy. Add in the powdered sugar and salt and mix on low until combined.
Mix in the egg and vanilla extract until thoroughly combined. Finally, add in the flour and mix on low until just combined into a dough that is soft and crumbly.
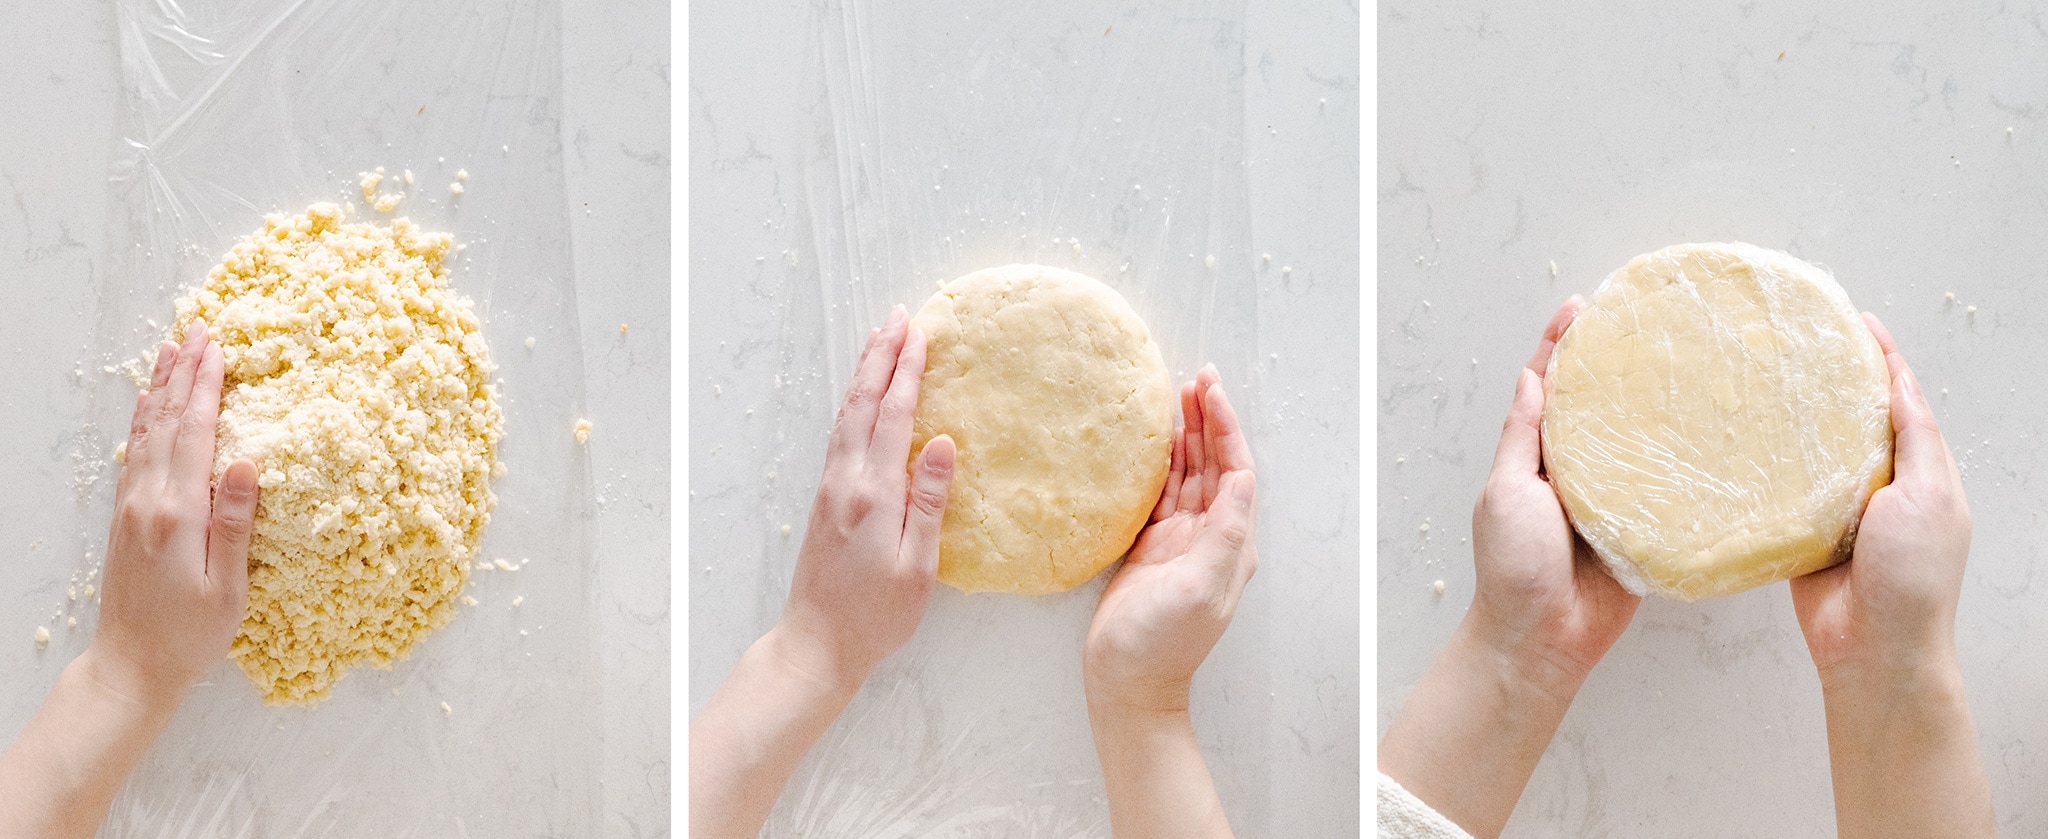
Turn the dough out onto a sheet of plastic wrap. Use your hands to press the dough together into a flattened disc. Wrap in plastic wrap and chill in the fridge for at least 1 hour or overnight.
Preheat oven to 350°F. Let the chilled dough sit on the counter for 10 minutes before rolling.
Rolling dough about ⅛" thick. Use a knife to cut out a rough circle about 1" bigger than your tart pans. Re-roll the scraps for the rest of your mini tarts.

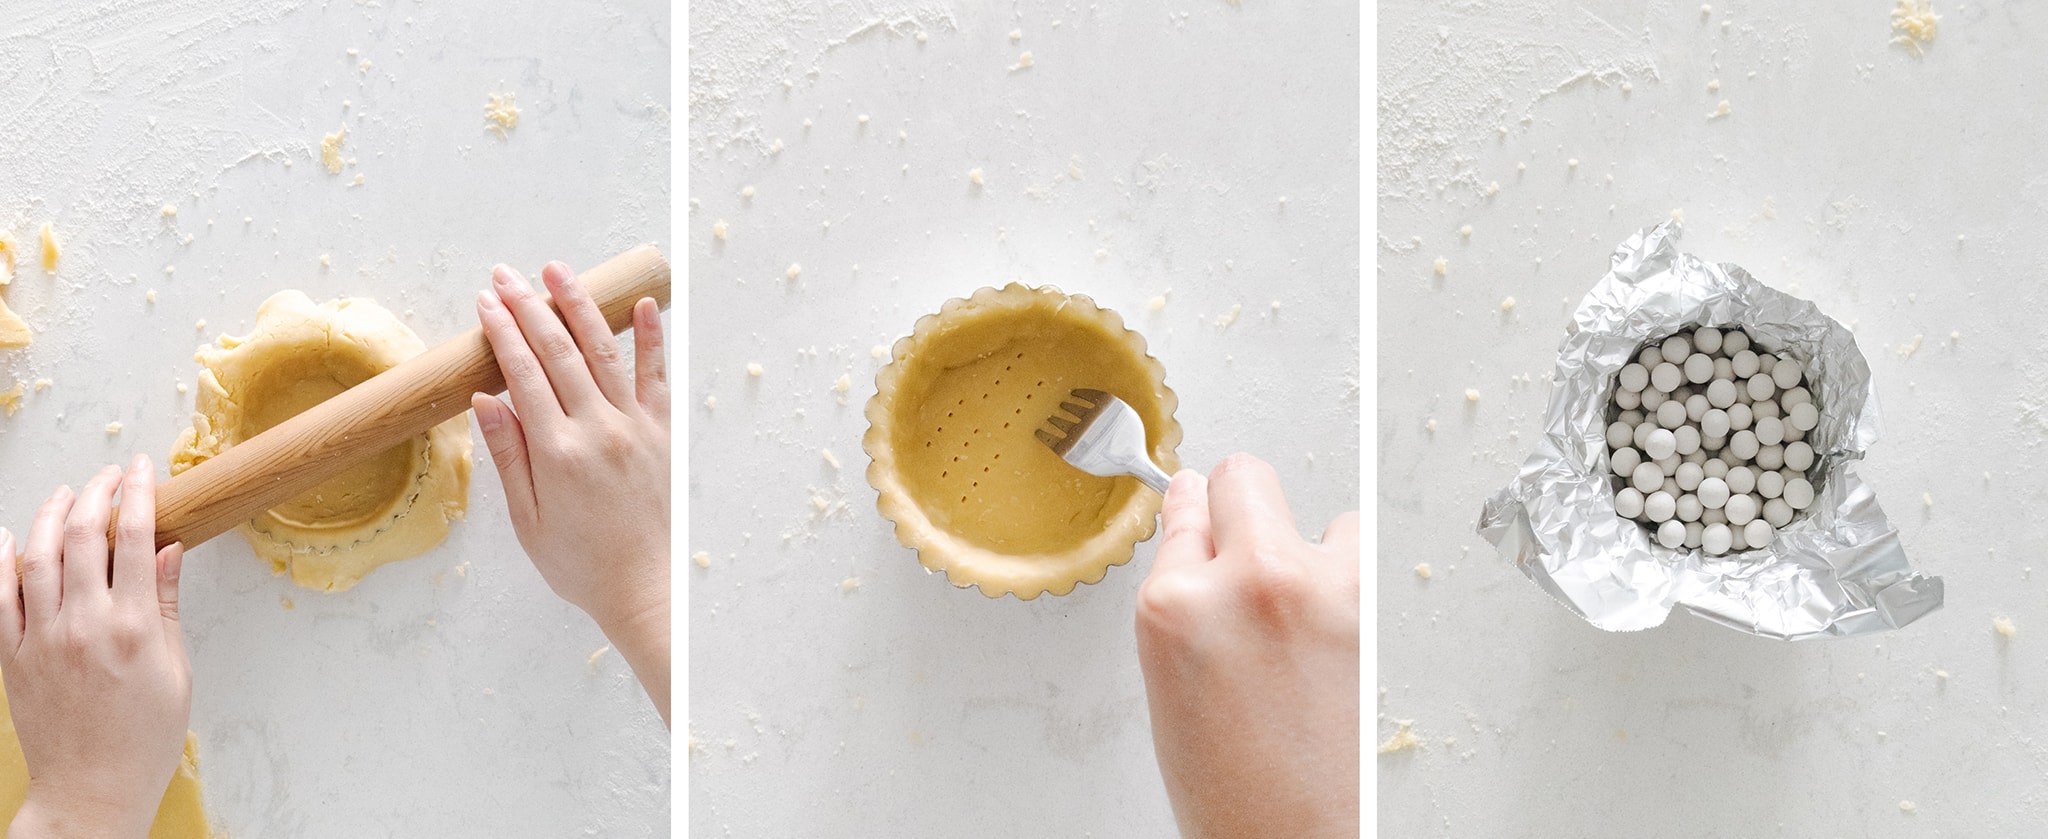
Place the sheet of dough into the tart pan and press the dough into the bottom and side ridges of the pan. Use your rolling pin to roll over the top edges of the pan to "cut" the excess dough off. Use a fork to prick some holes in the bottom of the tart shell.
Gently form a piece of aluminum foil into the tart shell and fill with pie weights or uncooked rice. Repeat with the rest of the mini tarts. Bake for 15 minutes, then remove the foil and weights and bake for another 10 minutes until the edges are golden brown. Let the tart shells cool for 5- 10 minutes before removing them from the tart pans to cool completely.
For the lemon curd filling
In a small pot, stir together all the eggs, sugar, and lemon juice.
Heat on medium heat, stirring constantly until the mixture thickens considerably into a custard consistency, about 15 minutes.
Stir in the butter, one cube at a time, until all the butter has melted and incorporated.
Transfer filling to a bowl and press a piece of plastic wrap onto the surface of the custard to prevent a skin from forming while it's cooling.
Once the lemon filling has cooled to about room temperature, spoon the filling into each tart shell until full. Chill the tarts in the fridge for at least 4 hours or overnight until set.

For the Swiss meringue
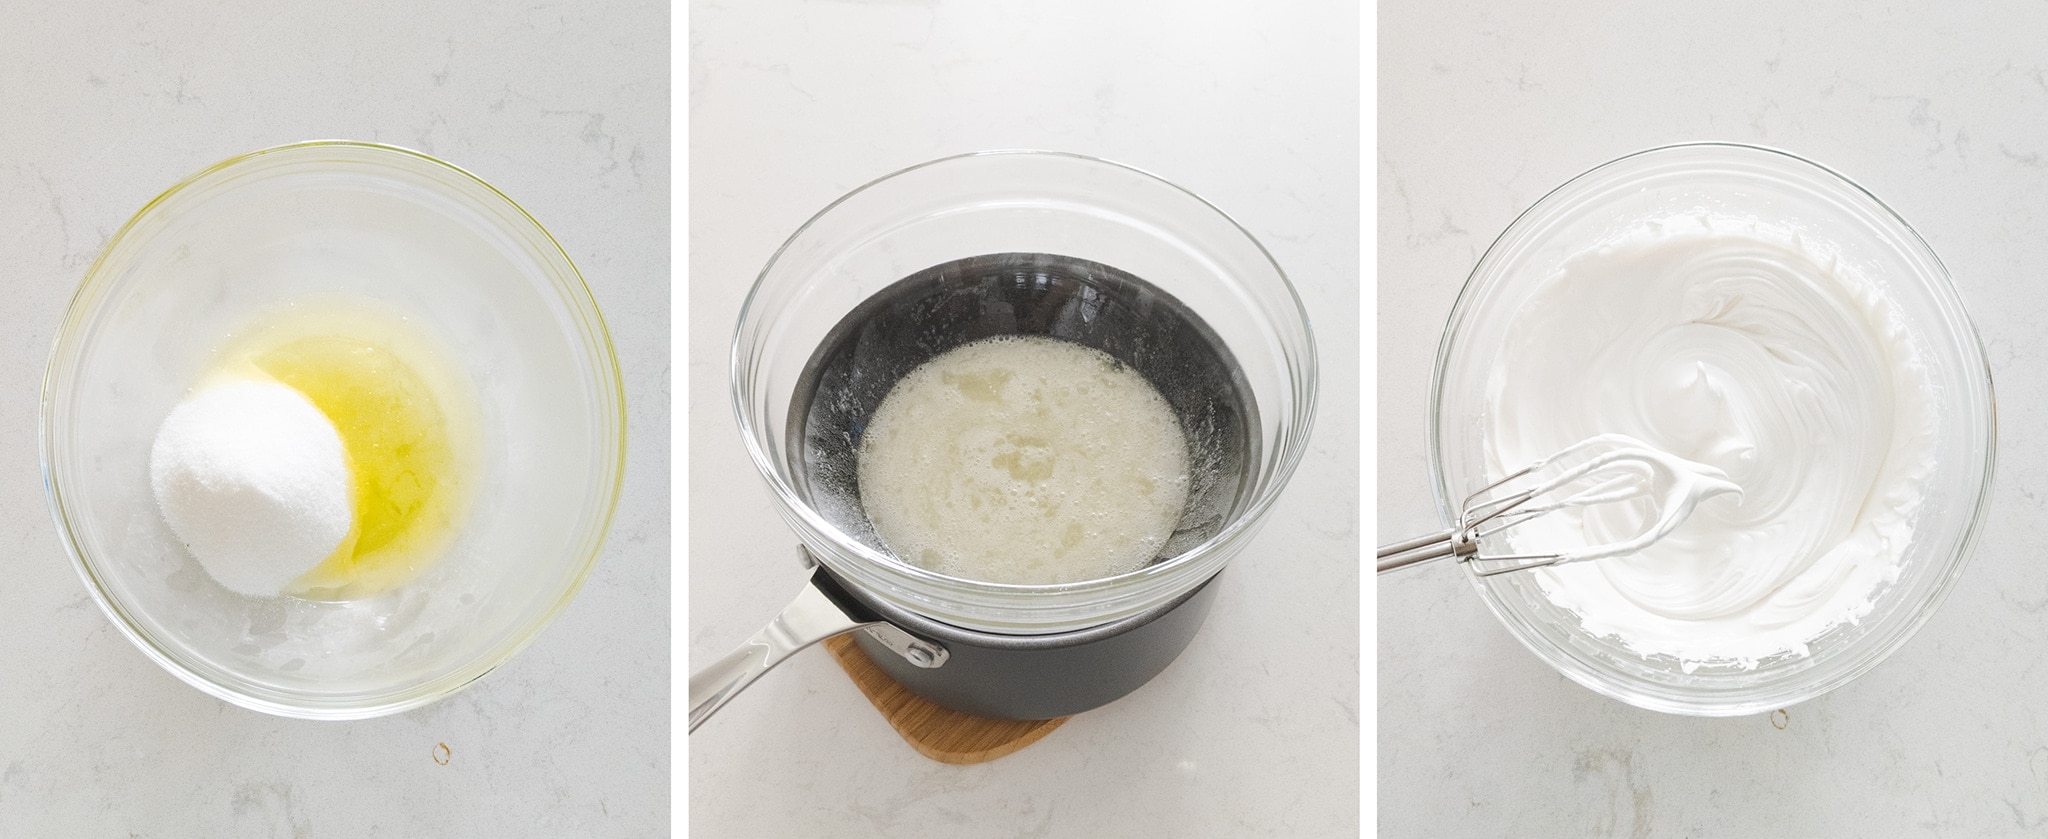
In a pot, bring about 1" of water to a simmer. In a large mixing bowl, stir together the egg whites and sugar. Place the bowl on top of the pot of simmering water to create a double boiler. Make sure the bottom of the bowl does not touch the water.
Heat the egg and sugar mixture while stirring constantly until all the sugar has dissolved, about 4 minutes. When you rub a small amount of the syrup between your fingers, it should be smooth without any grittiness.
Remove the bowl from the pot. Add in the vanilla extract. Use an electric mixer to whisk the egg whites on high speed until it becomes stiff peaks, about 5-7 minutes.
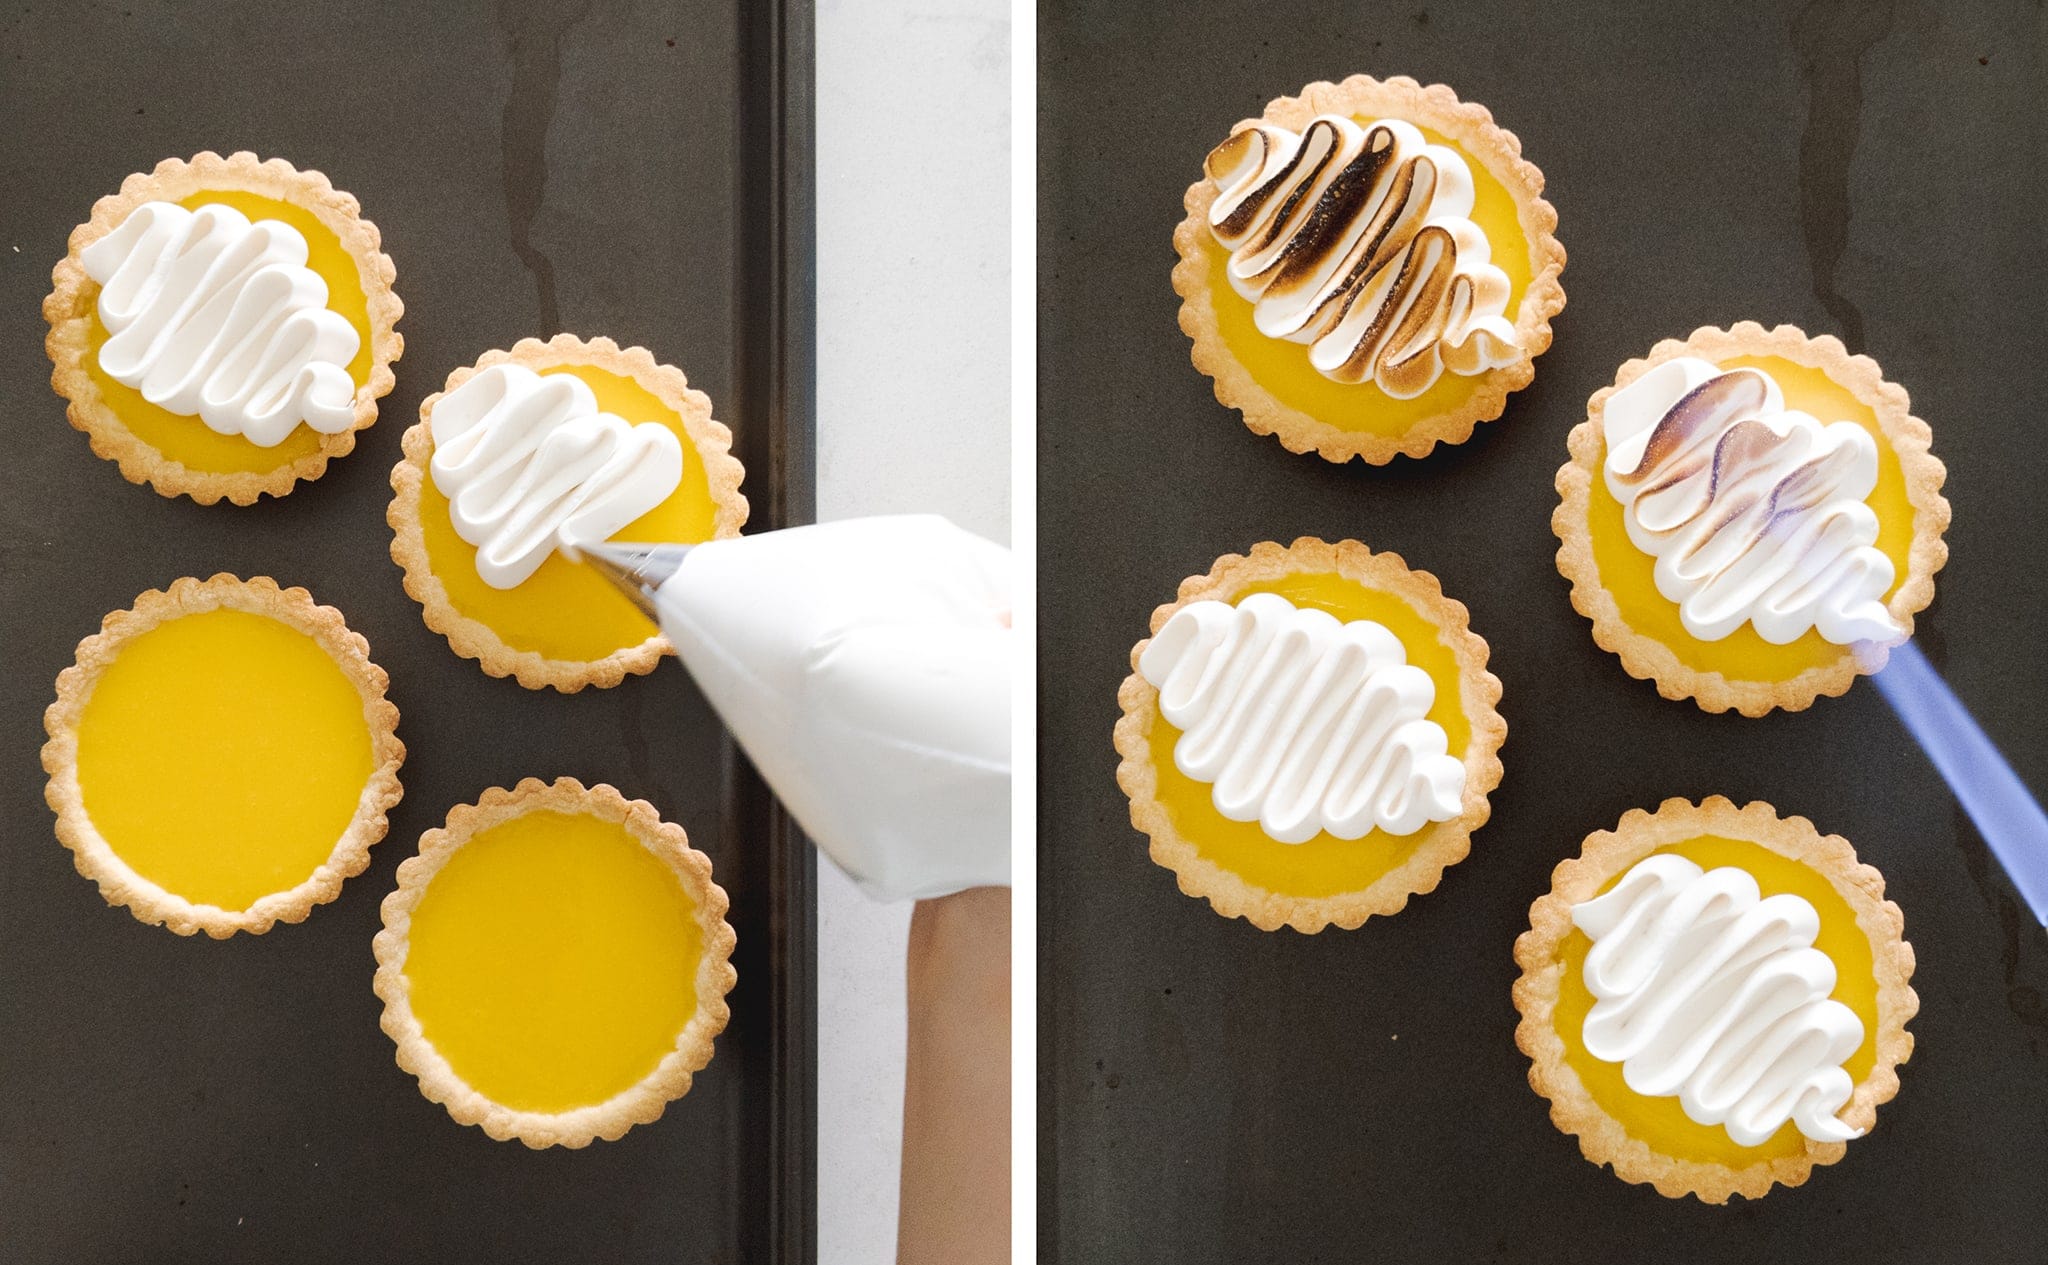
Transfer the meringue to a piping bag fitted with a piping tip of your choice. Pipe the meringue on top of the lemon filling. Use a kitchen torch to toast the meringue before serving.
Recipe Variations and Substitutions
- Tart shell - The shortcrust tart shell pastry can be replaced with a classic graham cracker crust for an easy and completely no-bake variation. You can try using the graham cracker crust in my No-Bake S'mores Tart recipe.
- Filling - If you're not a fan of lemon or just want to change it up and repurpose this recipe for other fillings, you can replace the lemon juice with orange juice, blood orange juice, lime juice, or even something like raspberry juice (after straining out the seeds) for delicious fruity variations on this meringue tart. You could go even further and fill these tartlets with chocolate ganache or a thick pudding for an entirely different but delicious taste.
- Mini tarts vs. large tart - I've used this recipe to make several mini 4" tarts but the ingredient amounts are also enough to make one large 8" or 9" tart with some extra.
Commonly Asked Questions
You can store mini lemon meringue tarts in the fridge for up to 3 days in a sealed container or gently covered in plastic wrap.
Yes, you can freeze lemon meringue tarts without the meringue topping for up to 3 months. Wrap the tarts well in plastic wrap and/or aluminum foil and freeze. Let them thaw in the fridge overnight. I would recommend adding the meringue topping right before serving. You can freeze the meringue too but the texture will change after defrosting.
I always recommend using a kitchen torch to toast meringue for the most control and best look but if you don't have a kitchen blowtorch, you can toast meringue in the oven by putting it under the broiler for 3-5 minutes. Keep watching it because it can burn quickly.
Yes! You can make the tart shells up to 5 days in advance and store them in the fridge or freeze them for up to 3 months. You can also make the tartlets and fill them with the lemon curd filling up to 3 days in advance and store them in the fridge or freezer. The meringue will look and taste its best if you add it and toast it right before serving the tarts.

Other lemon dessert recipes to try
Recipe

Mini Lemon Meringue Tarts
Ingredients
Tart Shell
- 170 g unsalted butter, softened
- 120 g powdered sugar
- ½ teaspoon salt
- 1 large egg, room temperature
- 1 teaspoon vanilla extract
- 350 g all-purpose flour
Lemon Filling
- 3 large whole eggs
- 3 large egg yolks, save the egg whites for the meringue
- 150 g granulated sugar
- juice of 2 lemons
- 100 g unsalted butter, softened & cubed
Meringue
- 3 large egg whites
- 125 g granulated sugar
- 1 teaspoon vanilla extract
Instructions
Tart Shell
- In a mixing bowl, use an electric mixer to beat softened butter until creamy. Add in the powdered sugar and salt and mix on low until combined.
- Mix in the egg and vanilla extract until thoroughly combined. Finally, add in the flour and mix on low until just combined into a dough that is soft and crumbly.
- Turn the dough out onto a sheet of plastic wrap. Use your hands to press the dough together into a flattened disc. Wrap in plastic wrap and chill in the fridge for at least 1 hour or overnight.
- Preheat oven to 350°F. Let the chilled dough sit on the counter for 10 minutes before rolling.
- Rolling dough about ⅛" thick. Use a knife to cut out a rough circle about 1" bigger than your tart pans. Re-roll the scraps for the rest of your tarts.
- Place the sheet of dough into the tart pan and press the dough into the bottom and side ridges of the pan. Use your rolling pin to roll over the top edges of the pan to "cut" the excess dough off.
- Use a fork to prick some holes in the bottom of the tart shell.
- Gently form a piece of aluminum foil into the tart shell and fill with pie weights or uncooked rice. Repeat with all other mini tarts.
- Bake for 15 minutes, then remove the foil and weights and bake for another 10 minutes until the edges are golden brown. Let the tart shells cool for 5- 10 minutes before removing them from the tart pans to cool completely.
Lemon Filling
- In a small pot, stir together all the eggs, sugar, and lemon juice.
- Heat on medium heat, stirring constantly until the mixture thickens considerably into a custard consistency, about 15 minutes.
- Stir in the butter, one cube at a time, until all the butter has melted and incorporated.
- Transfer filling to a bowl and press a piece of plastic wrap onto the surface of the custard to prevent a skin from forming while it's cooling.
- Once the lemon filling has cooled to about room temperature, spoon the filling into each tart shell until full. Chill the tarts in the fridge for at least 4 hours or overnight until set.
Meringue
- In a pot, bring about 1" of water to a simmer.
- In a large mixing bowl, stir together the egg whites and sugar. Place the bowl on top of the pot of simmering water to create a double boiler. Make sure the bottom of the bowl does not touch the water.
- Heat the egg and sugar mixture while stirring constantly until all the sugar has dissolved, about 4 minutes. When you rub a small amount of the syrup between your fingers, it should be smooth without any grittiness.
- Remove the bowl from the pot. Add in the vanilla extract. Use an electric mixer to whisk the egg whites on high speed until it becomes stiff peaks, about 5-7 minutes.
- Transfer the meringue to a piping bag fitted with a piping tip of your choice. Pipe the meringue on top of the lemon filling. Use a kitchen torch to toast the meringue before serving.


Sherri Bailey says
They worked perfectly!
I like that the lemon isn't to strong tasting
Nicole Smith says
Would you be able to freeze these with the meringue?
Willow says
The crust and the meringue was great but I end up having to substitue the filling recipe. I think there is an issue with that section. I havent tried it. Prehaps remove the 3 whole eggs and just do the yokes?
Althea Adams says
Hi.
Can I use this recipe for a large 9” tray?
Bethany Wrenn says
I have made this recipe so many times and it is ALWAYS a hit! I make them in mini 2" tart shells and started adding a small slice of strawberry to the top. The small additional flavor is superb! Thank you for sharing it.
Alexis Harrold says
These turned out so good!!! Took me two days to finish but I’m very happy. The filling is not too tarte and the tarte shells are delicious. Very happy with this recipe!!!
Anonymous says
Amazing!! Turned out perfect. Thank you for sharing!
Leah says
Hello! Thank you for such a detailed and delectable recipe!! May I ask how long will the whipped meringue stay fluffy for? I would like to make the whole tart and bring it on a road trip but not sure if the meringue will still be as gorgeous and soft after 6-8 hours.
Gail Ng says
It would be fine at room temperature for about 2-3 hours but since it's made with barely cooked eggs, it really should be kept chilled/in the fridge as much as possible to avoid spoilage. A warm car would likely make the meringue "weep" from condensation and moisture. The overall shape would be ok but it would create a pool of syrupy liquid in between the meringue and the top of the filling. I would recommend skipping the meringue if you can and just bringing the lemon tart which would be much more stable!
Bernadette says
When I made the curd, some of the egg white cooked making small pieces of cooked egg. I tossed it, got new eggs, tried again, and same thing. I used a whisk one time and a wooden spoon the other. Any ideas what I am doing wrong? So, 2nd time, when it happened again, feeling frustrated, I strained it using a fine mesh strainer. I also added some lemon zest to make it tangier. However, when I went to put into the shells, I only had enought for 3 shells. I measured what I had still in strainer, and it was not more than 1 pie shell full. My tart pans are 4". Anyone else experience this? I have made lemon curd many times and have never had this happen.
Lori says
Hi Bernadette,
Check freshness of eggs. Put them in water and if they float at all then they are not fresh.
It does sound more like the mixture is too hot and hence curdles. Wont taste good. More like a scrambled egg mixture.
Ashha says
Omg these are so so lovely
Venessa Clark says
Very yummy and easy to follow instructions
Lee says
I recently made this recipe for Christmas - there was not a single tart leftover!
Every component has incredible flavor and are harmonious with one another.
Thank you so much for sharing this wonderful recipe.
I am looking forward to making it again in the future.
Veronica says
I would like to say that this is the first time ever for me, leaving a review on a recipe I have found online, and it's because this recipe is a standout. And its not just the end result which tastes fabulous, but it is the ingredients list and the recipe method instructions where each step is so clearly explained that it is so easy to understand and do what needs to be done. The quantities overall were perfect and there was little or no waste. Thank you for sharing your step by step process in a manner that is easy to follow and use. Also, thank you for describing each section of the tart so clearly with the nice simple layout on your page with photos and not adding a huge amount of story to your recipe where readers have to skip through to get to the info they want. I also like how you can just tap a button to increase the recipe quantity and your webpage in general is very easy to read with the font you have selected. Bravo to you for putting so much effort in to make it simple!
Now regarding my actual results. I used less sugar in each step as I don't like things too sweet but it still tasted amazing! I didn't quite get the nice sharp finished edge on my pastry; and I didn't quite understand how to roll the edges away but I'm sure that just takes practice. I'm also not a huge fan of uncooked meringue, so I thought the heating of the egg whites and sugar together might assist in me liking the uncooked but torched meringue more, but it didn't, but that's OK as the meringue will be used for something else and it was a new method to make the meringue which worked well which made it more shinier too.
I have kept this recipe and will indeed make it again, and look forward to discovering more of your recipes.
With thanks,
Veronica from Perth, Australia